Roasted Winter Fruits

Hello! I’m sure you’ve heard me talk about my love for roasted veggies before- honestly I think that I could eat them all day. They get so tender and caramelized in the oven, making them the perfect addition to bowls, or one of my favourite stand-alone sides. However, when we’re talking about raw, uncooked veggies, I definitely prefer fruit. So I was thinking, what would happen if I roasted fruit?!!??! And, ladies and gentlemen, I can assure you that what happens when you roast fruit is PURE MAGIC.

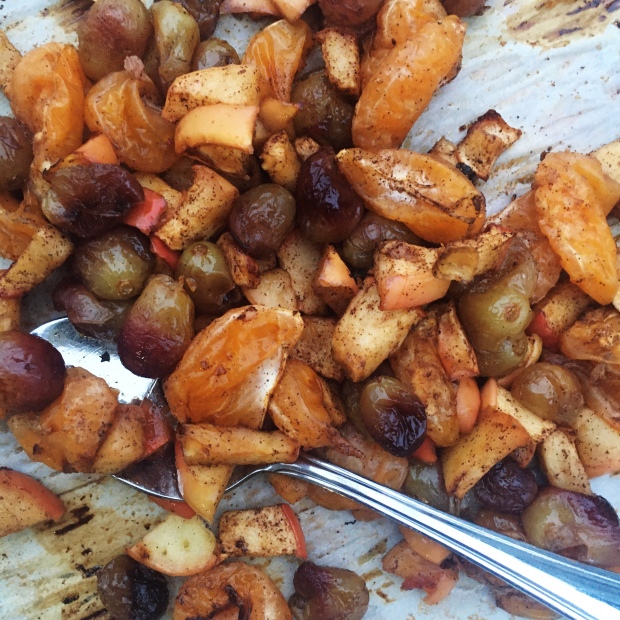
Seriously. Magic. You get ten times the caramelization that you get with veggies because of the higher sugar content, and everything gets all soft, bubbly, and sweet. I roasted some nice in-season winter fruits that you might not think to roast. We’re talking grapes, mandarins, and apples, all of which release some beautiful juices and get amazingly tender. It all feels so Christmas-y and heartwarming!

There is so little prep that goes into this- just washing some grapes, peeling some mandarins, and roughly chopping an apple. I tossed everything in some allspice before roasting for some extra holiday flavour. Then it all goes in the oven for about forty minutes; this is where the enchantment happens. Halfway through the baking time, I took a fork and smashed some of those mandarins and grapes, just to get the juices flowing. Other than that, you just let those fruits do their thing.

Not gonna lie, I sneaked a few of these fruits right off the pan. They would be amazing over oats, yogurt, ice cream, cake, pancakes, waffles- you name it, these would make it better!! Feel free to add some more spices if you like as well- I know that cinnamon would be a welcome addition to the flavour explosion.

Hope you enjoy these festive fruits!

Roasted Winter Fruits

Serves: 2-3

Total Time: 45 minutes

Ingredients:

  • 1 Gala apple, chopped
  • 2 mandarin oranges, peeled and split into segments
  • 1 1/4 cup red grapes
  • 1 tsp ground allspice

Directions:

  1. Preheat your oven to 400 degrees Fahrenheit.
  2. Add all of the ingredients to a bowl and combine. Spread out the fruits onto a parchment lined baking sheet.
  3. Place the baking sheet in the oven and roast for about 20 minutes.
  4. At this point, remove them from the oven and use a fork to lightly smash the mandarins and grapes, just bursting them so that the juices can escape. Place the pan back in the oven and roast for another 20 minutes.
  5. Take the fruits out of the oven, serve warm and enjoy!

Have a great weekend everyone! Can’t wait for more holiday recipes coming next week:))

Yours Truly,

Olivia:)))

Healthy Edible Cookie Dough

Happy Friday!!! We are exactly five weeks away from Christmas- how exciting is that?!?! I’m definitely brainstorming some awesome Christmas recipes right now🙌 If you have any recipes that you’d like me to make, be sure to let me know because I want to have a plethora of holiday awesomeness available for you!

I think I’m about due for a dessert recipe because I haven’t posted one in a while. This is for all you people out there who like to lick the batter off of the spoon, or sneak a finger into the bowl of cookie dough. Which, let’s be honest, is probably all of us. I remember that I tried making this kind of edible cookie dough way back, but my blender wasn’t very good so I still had a lot of chickpea chunks leftover. No, I haven’t attempted edible cookie dough since, and yes, I said chickpeas. No typos around here people!

This Healthy Edible Cookie Dough mostly consists of chickpeas, and before you X out of this blog post, here me out. Chickpeas are actually a great base for any flavour you want to throw at them; they’re kind of the blank canvas of the legume world. Combine that with the amazing, dough-like texture you get when you blend em up, and you get the perfect candidate for a healthy, edible cookie dough base!

Of course, I added other ingredients to create that cookie dough flavour. We’ve got vanilla, peanut butter, cinnamon, a little bit of oats, some maple syrup and a pinch of salt. I blended my dough with some water as well so that everything came together nicely. After that it’s up to you to completely customize your dough! I suggest adding dark chocolate chips or chopped figs and cinnamon- that’s what I did and it’s SO GOOD👌 But really, anything works. It just depends what kind of cookies you like!

This “dough” can be eaten straight (very good) or used as a sort of dessert hummus (also very good), or you can use it to top your oats, toast, or smoothie bowl (really, anyway you eat it it’s going to be good). It makes a great snack or dessert! Hope you enjoy:)

Healthy Edible Cookie Dough

Serves: 2 as a dessert, 4 as a dip

Total Time: 10 minutes

Ingredients:

  • 1 can of chickpeas, drained and rinsed
  • 1 tbsp natural peanut butter
  • 2 tbsp maple syrup
  • 2 tbsp rolled oats
  • 1 tsp vanilla extract
  • 2 tbsp water
  • 1/4 tsp cinnamon
  • A pinch of salt
  • 1/4 cup mix-ins like chopped dates or dried figs, dark chocolate chips, nuts, seeds, or fruit (optional)

Directions:

  1. Add all of the ingredients, except the mix-ins, to a blender or food processor and blend until smooth and creamy.
  2. Spoon into a bowl and mix in your mix-ins!
  3. Eat straight from the bowl or use as a dip or spread:)

Have a great Friday and an awesome weekend my friends! I’ll see you next week with more delicious recipes and my December Bullet Journal Set-Up❤️

Yours Truly,

Olivia:)

Sautéed Figs and Apples

It’s just an apple extravaganza over here right now😂 I love making fall desserts and I don’t have any pumpkin right now so apple is my go-to. Today I’m cooking them up with dried figs to make a delicious topping for nice cream, oats, and yogurt!

Figs are one of my new found loves- fresh ones are so good when they’re ripe, but I got a big bag of dried ones from Costco and OH MY GOD. They’re so sweet and sticky and delicious. Even though figs are a summer fruit, dried figs definitely give me fall vibes. They pair really well with cinnamon, and with apples🙌

This simple desserty topping takes like 5 minutes to cook up, and is soooo tasty. The apples and figs are sautéed in a bit of coconut oil; then some cinnamon and water are added to help everything come together. It adds such a nice fall touch to your breakfasts or snacks:) Hope you enjoy!!

Sautéed Figs and Apples

Serves: 2

Total Time: 10 minutes

Ingredients:

  • 2 large apples, sliced
  • 5 dried Smyrna figs, sliced
  • 1/2 tbsp coconut oil
  • 1/4 cup water
  • 1/2 tsp ground cinnamon

Directions:

  1. Heat the coconut oil in a pan over medium heat. Add in the apples and figs, and cook until soft, about 3 minutes.
  2. Add the water and cinnamon to the pan and stir to combine. Let the water cook off and the apples and figs cook down a bit more together, about 2 more minutes.
  3. Remove the apples and figs from the heat and serve warm over oats, nice cream or yogurt!

This is a simple recipe but it’s one I’ll keep coming back to!! See you guys tomorrow;)

Yours Truly,

Olivia:))

Peanut Butter Cluster Nice Cream

It’s summer so bring on the ice cold treats! Nice cream is one of my favourites because it’s super fast, tasty, and CREAMY, all without any dairy or refined sugar. I’ve made Neapolitan Nice Cream in the past, but today I made PEANUT BUTTER CLUSTER NICE CREAM. There are actual PEANUT BUTTER CLUSTERS in here. Summer, here we come.

All nice cream is is basically blended up frozen bananas. It has an amazing texture and is also really good for you:) Because of this magic, I ALWAYS include a frozen banana in my smoothie bowls. From now on I might throw these peanut butter clusters on my smoothie bowls too cause they’re pretty darn delicious. I made them using oat flour- which is just ground up oats. So yeah, you’ll be needing a good blender to make this recipe. The peanut butter clusters also contain peanut butter 😋, maple syrup, vanilla, and some dark chocolate chunks. I DEFINITELY recommend using crunchy peanut butter for these, because then you get some peanut pieces in there. I’ve actually been converted from team creamy to team crunchy, cause I love those peanuts❤️ If you don’t feel like making nice cream, these clusters would make a greet breakfast with some almond milk or yogurt, or a nice snack on their own.

Once you have the nice cream made and the peanut clusters rolled and frozen, you fold the two together and BOOM! A super delicious summer treat. Let’s be honest though, I will probably be eating this all year long. Hope you enjoy this recipe, and be sure to let me know some other nice cream flavours that you want me to make a recipe for!

Peanut Butter Cluster Nice Cream

Serves: 3

Total Time: 210 minutes

Ingredients:

For the Peanut Butter Clusters:

  • 1 cup oat flour
  • 2 1/2 tbsp maple syrup
  • 1 tsp vanilla extract
  • 3 tbsp runny or melted crunchy peanut butter
  • 2 tbsp dark chocolate chunks

For the Nice Cream:

  • 3 bananas, sliced and frozen
  • 1/2 tsp vanilla
  • Splash of water

Directions:

  1. Mix all of the peanut butter cluster ingredients together in a bowl. Roll into 1/2 tsp sized balls, then put into a container and freeze for about 2 hours, so that they’re easier to mix in with the nice cream.
  2. Once the peanut butter clusters are ready, throw the frozen banana, vanilla and SPLASH of water into the blender. You don’t need to much water, or else you’ll miss out on that creamy texture. Use the tamper to push the bananas down and blend until smooth. You want a nice swirl like this:

3. Scoop the nice cream into a parchment lined loaf pan, and mix in about half of the peanut butter clusters. Place in the freezer for another hour until the texture resembles ice cream. Serve with the rest of the clusters on top!!

This stuff is legit SO good and you should for sure make some ASAP. Perfect for a hot day!

Yours Truly,

Olivia:))

Chocolate Date Puffed Wheat Squares

How’s it going guys? Oh, you’re asking what you should do today? Well I have a great answer because you NEED to make these Chocolate Date Puffed Wheat Squares!

I don’t buy dates very often because they’re a tad expensive, but someone gave me a bunch a little while ago so I knew I had to do something special with them. I’ve been eating them by themselves (which is amazing), and I’ve also heard that they’re spectacular with peanut butter, but there are so many awesome desserty things you can do with dates. I decided to make these CHOCOLATE DATE PUFFED WHEAT SQUARES. Sweet, gooey, and a little crunchy, they’re the perfect treat!

These squares are pretty easy to make, too. You just soften up some dates in warm water, them blend them up to make a kind of paste. Then you mix that with cocoa, maple syrup, coconut oil and vanilla, heat it up a bit, and mix it in with puffed wheat. I let mine harden in the fridge overnight after I pressed them into a greased pan, but you should be good to go in a few hours. That simplicity mixed with the fact that these squares taste AMAZING and have no refined sugar makes them a winner in my book.

So yeah, go make these squares and you WILL NOT regret it:)

Chocolate Date Puffed Wheat Squares

Serves: Makes 9 squares

Total Time: 30 minutes, plus at least 3 hours cooling time.

Ingredients:

  • 10 large Medjool Dates
  • 1/4 cup maple syrup
  • 2 tbsp cocoa powder
  • 1 tsp vanilla
  • 2 tbsp coconut oil
  • 3 cups puffed wheat

Directions:

  1. Heat some water in a small pot over the stove until it just begins to simmer. Remove from the heat and add in the dates. Let them sit for about 10 minutes to soften them up.
  2. Remove the pits from the dates and add them into a blender or food processor. Blend until a kind of paste forms, but don’t worry, it doesn’t have to be completely smooth.
  3. Transfer the date paste back into the small pot and add the cocoa powder, maple syrup, coconut oil, and vanilla. Place over low heat on the stove for about 2 minutes as you stir to combine.
  4. Remove the date mixture from the heat. Dump the puffed wheat into a large bowl and mix in the chocolatey dates. Press the soon-to-be puffed wheat squares into an 8×8 pan greased with coconut oil.
  5. Cover the pan with plastic wrap and chill in the fridge until firm enough to eat; around 3 hours. You can try and speed up this process by throwing the squares into the freezer.
  6. Once the puffed wheat mixture has cooled, cut it into 9 squares and enjoy!
  7. Store in the fridge.

Hope you enjoy this recipe!

Yours Truly,

Olivia;))