Brussels Sprout, Fig and Walnut Salad

Who else thinks Brussels sprouts are the most underrated vegetable?!??! Because they are. It’s a fact. If I unwrapped a Tupperware full of roasted Brussels sprouts on Christmas morning, I don’t think that I would be mad about it. These little green bundles of joy are one of my favourite winter side dishes. Today we’re getting even more festive and mixing some roasted sprouts with figs and walnuts to make an AMAZING quinoa salad that is a perfect take on a classic accompaniment to your holiday dinner.

Like many other great recipes, we’re starting this one off by roasting a vegetable! Brussels sprouts are chopped in half, then given a nice massage with some salt, pepper, and olive oil. They go in the oven cut-side down (so they get nice and crispy) on a parchment lined baking sheet. But guess what? You get quadruple the roasty deliciousness because at various stages during the cooking time, the figs, walnuts, and some garlic get added onto the pan. The result is some crispy Brussels sprouts, caramelized figs, golden brown walnuts, and amazingly aromatic garlic.

Since we’re on the topic of garlic, let’s talk about the dressing, shall we? It starts with some tahini, lemon juice, and maple syrup, which would all make an awesome dressing on their own, but when they get combined with the roasted garlic, everything gets kicked up a notch. Actually, like, quite a few notches. This dressing is creamy, full of flavour, and is the best thing that you could possibly drizzle all over those roasted sprouts, nuts, and figs on a bed of quinoa. Because yes, there’s quinoa in here too. Talk about hearty and delicious!

This salad is a great side dish for dinner with your family, or just lunch on a weekday. Add a protein like some cooked chicken or chickpeas, and you’ve got a filling and super tasty meal! The best is when you get a bite of Brussels sprout, fig, and walnut all together…. MMMMMM!

Hope you enjoy!

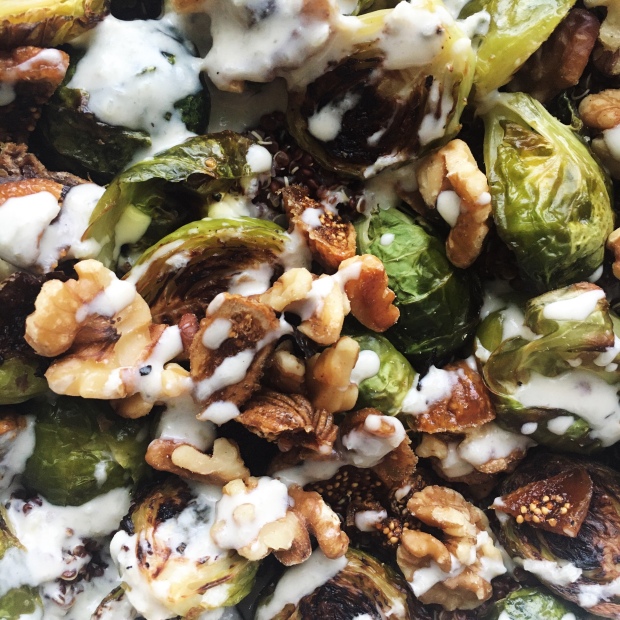
Brussels Sprout, Fig, and Walnut Salad

Serves: 4-6

Total Time: 40 minutes

Ingredients:

For the Salad:

  • 1/2 tbsp olive oil
  • 12 Brussels Sprouts, halved
  • 1 cup shelled Walnuts
  • 3 figs, chopped
  • 1 1/2 cups cooked quinoa
  • Salt and pepper to taste

For the Dressing:

  • 2 tbsp tahini
  • 2 tbsp lemon juice
  • 1 tsp maple syrup
  • 3 cloves of garlic, skins on, wrapped in tinfoil
  • 2 tbsp water
  • Salt and pepper to taste

Directions:

  1. Preheat your oven to 400 degrees Fahrenheit.
  2. Place the Brussels sprouts on a parchment lined baking sheet and toss them with some olive oil and salt and pepper. Place them in the oven to roast.
  3. After 10 minutes, remove the pan from the oven and add on the packet of garlic. Place back in the oven and roast for another 10 minutes.
  4. Take the baking sheet out of the oven and sprinkle on the chopped figs and the walnuts. Place back in the oven and continue to roast for a final 10 minutes.
  5. Remove the pan from the oven, and carefully unwrap the garlic packet. Remove the cloves from their skins and use a garlic mincer to mince the roasted garlic into a small bowl. Add in the rest of the dressing ingredients and stir to combine.
  6. Spread the cooked quinoa on the bottom of a large serving dish. Scoop all of the roasted Brussels sprouts, figs and walnuts on top. Finally, pour the dressing over everything and toss the salad so that it is evenly mixed together. Serve warm and enjoy!

I’ll see you guys Friday with another festive recipe!

Yours Truly,

Olivia:))

Ginger Spiced Brown Rice

Hey guys! Hope you all had an awesome weekend and are ready to slay the week ahead🙌 (I’m writing from my phone today so we get emojis👍) Today I have a VERY good brown rice recipe that’s a great base for any of your bowls, or an amazing side on its own. It uses fresh ginger, which is so fragrant and delicious!

All of the steps to make this rice are purposely done to extract maximum flavour👌 You start by frying up the ginger and garlic, and then toasting up the brown rice so it gets a bit browned. Carrot gets added in for sweetness, and then that super tasty curry powder! It adds great colour to this dish as well:) This all gets simmered together in a combo of water and almond milk. It might sound a tad weird but it makes the rice a bit creamier!

After about 25 minutes of cooking, the rice should absorb most of the liquid, but not be completely cooked through. So at this point, you add a bit more milk and simmer for a bit longer. When it’s all cooked and seasoned with a generous amount of salt and pepper, this rice tastes like heaven. Legit.

My advice is to make a huge batch of this and store it in the fridge for meal prep all week. Making a bowl? Use this rice. A salad? Use this rice. A burrito? Use this rice. Snack time? THIS RICE. Honestly it’s so flavourful and reminds me of a better version of Uncle Ben’s. Except way healthier and more tasty. Yep, I said it. I love that this uses brown rice too, because brown rice has more fibre, magnesium, and a bunch of other nutrients than white rice. Delicious and nutritious. What a win-win! You can have your rice and eat it too.

I hope that you enjoy this awesome recipe! Can’t wait to see what you use it as a base/side for.

Ginger Spiced Brown Rice

Serves: 2

Total Time: 50 minutes

Ingredients:

  • 1 tbsp olive oil
  • 2 cloves of garlic, minced
  • 1 tbsp fresh grated ginger
  • 1 carrot, grated
  • 1 tsp curry powder
  • 1/2 cup brown rice
  • 3/4 cup water
  • 1/4 cup + 1/2 cup unsweetened almond milk
  • Salt and pepper to taste

Directions:

  1. In a medium-sized pot, heat the olive oil over medium heat. Add in the garlic and ginger and fry for about 2 minutes, until aromatic.
  2. Next, add in the grated carrot and cumin, and continue to cook for about 3 minutes. Dump in the brown rice and toast for 2 more minutes.
  3. Pour in the water and the 1/4 cup of almond milk. Stir, season generously with salt and pepper, and reduce the heat so that the mixture is at a simmer. Cover and let cook for 25 minutes.
  4. At this point, the liquid should be absorbed, but the rice not cooked all the way through. Add in the 1/2 cup almond milk, stir, cover, and continue to let it simmer for another 15 minutes, until the rice is cooked all the way through (not too hard when you bite into it).
  5. Remove the rice from the heat and adjust with any more seasoning. Serve warm and enjoy!

Have a great week everyone! I have some great holiday baking recipes coming soon so be sure to check them out:)

Yours Truly,

Olivia:))

Chickpea Shakshuka

Hey there! I have a really fun and awesome recipe for you guys today! Even though you may not have heard of it, Shakshuka is SO GOOD. It’s a middle eastern dish that combines a warming tomato stew with poached eggs, and is the perfect addition to your breakfast spread. I added some chickpeas to mine for some extra protein and fibre. This recipe is super easy to follow and comes together in less than an hour, because the faster this deliciousness gets into your mouth, the better.

I’ve seen shakshuka on a bunch of cooking shows and featured in the occasional Pinterest post, so I thought, why not try it out? I began by frying up onions and garlic. What a shocker! I find it interesting how so many different cultures use garlic and onions in their food. Making tomato sauce? Garlic and onions. Curry? Garlic and onions. Shakshuka? GARLIC AND ONIONS BABY. I am not complaining because the smell of frying onions is out of this world. After I got that aromatic veg all sauteed up, I threw in some amazing spices, tomatoes, tomato paste, chickpeas, and lots of salt and pepper. Those ingredients all get to know each other very well in the pan while you continue on with your morning routine. I did some stretching:)

Personally, I am an egg lover, and so this is next part was my favourite. After stirring up the stew, I cracked four eggs DIRECTLY into there, brought it to a nice heavy simmer, covered, and let them poach. This is a critical moment because you want that yolk to be nice and runny. I appreciate a good hard boiled egg, but this is not the time. So set your timers because it will be very disappointing is you overcook these. I will personally be disappointed in you.

Once those eggs are done, you’re done! Step back! That’s all! I just took these off the heat, removed the lid so that the eggs don’t keep steaming, and I want to say that I dug in right then and there but no, I took the whole pan down to the fridge in our basement to preserve it for when the lighting was better, so I could take a good picture. Do you see the sacrifices that I make for you guys? Annnnnyways, when I finally got around to eating this, I scooped myself a big bowl, warmed it up, and topped it with fresh chives, parsley flakes, and avocado because you’ve gotta go big or go home. And let me tell you, this is AMAZING. It’s so full of flavour from all those spices, and then the chickpeas give you some texture, and that runny yolk is just perfection. This is such a great fall/winter breakfast, because it’s so cozy! Traditionally it is a breakfast dish, but I would be very happy to eat this any time of day.

Make sure that you try this out! I can’t wait to make it again for my family on a weekend.

Chickpea Shakshuka

Serves: 2-4

Total Time: 50 minutes

Ingredients:

  • 1 tbsp olive oil
  • 1 medium sized white onion, diced
  • 3 cloves of garlic, minced
  • 1 1/2 tsp ground cumin
  • 2 tsp paprika
  • 1/2 tsp cinnamon (trust me)
  • 1 tsp dried oregano
  • 1 tsp red chilli flakes
  • 2 tsp parsley flakes (plus more for garnish)
  • 1 can of diced tomatoes
  • 1 can of tomato paste
  • 1 can of chickpeas, drained and rinsed
  • 4 eggs
  • Salt and pepper to taste
  • Chopped chives, for garnish (optional)
  • 1 avocado for serving, sliced (optional)

Directions:

  1. Heat the olive oil over medium heat in a large, deep pan or skillet. Add in the onions and cook for around 4 minutes, until they’re just translucent. Next add in the garlic and cook for another 2 minutes.
  2. Add the all of the spices and herbs to the pan and cook for an additional 2-3 minutes, until they’re somewhat browned and nice and fragrant.
  3. Dump the tomatoes, tomato paste, and paprika into the pan. Season generously with salt and pepper, give everything a good stir, then lower the heat to a slow simmer. Cover the pan and let cook for 30 minutes.
  4. Remove the lid from the pan, stir everything again and make sure the stew is level across the top. Crack the 4 eggs directly into the pan, in a kind of square pattern so that they’re not too close to each other. Bring the stew back up to a faster simmer, cover again, and let the eggs poach for EXACTLY 5 minutes.
  5. Remove then pan from the heat and take the lid off. serve immediately and garnish with more parsley flakes, chopped chives, or avocado.
  6. Enjoy!

Hope you guys love this recipe! It’s one of my faves. Come back on Friday for my December Reading List!

Yours Truly,

Olivia:))

Double Pea Fried Quinoa

Hey there! I just wanted to start off by saying that on Sunday it was my three year blogging anniversary and I didn’t even realize it! I can’t believe it’s been three years already and want to thank you guys for all your support:) I’ve come a long way from just book reviews to lots of food stuff- if you’d like to check out my very first post I’ll put the link here.

So yeah, today we’ve got some Double Pea Fried Quinoa! Olivia is my name and frozen veggies are my GAME. Sorry that was a bit cringy but I just had to assert somehow that I really like using frozen veggies. This dish makes a great side, or base for a bowl or salad. It includes both green peas and chickpeas- hence the double peas. It’s also super speedy and has lots of flavour. Plus the bright greens from the peas and parsley will lift your spirits during the winter months.

I started by frying A LOT of garlic and some onions- you know how I love that garlic. Then I added in the green peas, chickpeas, cooked quinoa, and some parsley, salt and peppered it up, and bang it was done! It’s full of bright, fresh deliciousness and also some protein. And, like most of my recipes, it’s great for meal prep which is a bonus. Today I had this Double Pea Fried Quinoa with some tuna mixed with avocado, sprouts, and hummus for a very tasty and nutritious lunch. Yum:)

I don’t really know what else to say, except that you should probably go and make this right now. Go on!

Double Pea Fried Quinoa

Serves: 4

Total Time: 20 minutes

Ingredients:

  • 1 tbsp olive oil
  • 1 small white onion, thinly sliced
  • 4 large cloves of garlic, minced
  • 2 cups of frozen green peas
  • 2 cups of cooked quinoa
  • 1/2 cup packed fresh parsley
  • Salt and pepper to taste

Directions:

  1. Heat the olive oil in a large pan over medium heat. And in the onions and garlic and cook for 4 minutes, making sure that the garlic doesn’t burn.
  2. Add the frozen peas to a pan and stir until they’re defrosted, about 2 minutes.
  3. Add the quinoa and cook for an additional 4 minutes, stirring every once in a while to get even cooking.
  4. Mix in the parsley, season with salt and pepper, remove from the heat and enjoy!!

Simple as that! I hope you enjoy:) I’ll see you on Friday with my December Bullet Journal Set-Up! It’s a good one:))

Yours Truly,

Olivia

Chickpea Stir-Fry

I know it’s a Monday, but what better way to start off the week than with a delicious stir-fry? This is not a rhetorical question. Go ahead and search your soul. I’ll wait.

Couldn’t think of anything else? THAT’S WHAT I THOUGHT. This Chickpea Stir-Fry is full of veggies and flavour, two of my favourite things✌️ We’ve got onions, cabbage (or kale if you’d prefer), carrots and chickpeas in a realllllly simple sauce that brings everything together. But the real flavour bombs are the peanuts and fresh cilantro that go in during the last minute of cooking for some extra freshness😍 Want to take it to the next level? Throw some more of that stuff on top along with some green onion as a garnish. Yup🙌 That’s what I’m talking about.

If you’ve got under a half hour to whip something up, then this stir-fry is for you. With a 20 minute total time and super easy prep, this is one no-fuss meal idea! Double or triple the recipe, and you’ve got meal prep for the whole week. Pretty convenient👌

Finally, I’m going to let you in on a secret. You can use any vegetables you have around to make this stir-fry. ANY. I was running low on veggies myself when I made this, but luckily I had some carrots, onions, and cabbage ready to go. However, broccoli, cauliflower, celery, mushrooms and peppers would all be great in here; customize to your heart’s desire! The important thing is that you’ve got the sauce ingredients and the peanuts and cilantro, because that’s what makes this dish sing. I like serving my stir-fry over quinoa, but you can cook up some white or brown rice, or even couscous, if you’d like.

I hope you enjoy this quick, healthy and delicious meal idea! Let me know what you think🥰

Chickpea Stir-Fry

Serves: 2-3

Total Time: 20 minutes

Ingredients:

  • 1 tbsp olive oil
  • 1 can of chickpeas, drained and rinsed
  • 1/4 of a large white onion, sliced
  • 2 cloves of garlic, minced
  • 1/2 cup shredded cabbage or kale
  • 1 carrot, chopped
  • 1/4 cup fresh cilantro
  • 1/4 cup ground peanuts
  • 1/4 cup soy sauce
  • 2 tbsp rice vinegar
  • 1 tsp maple syrup
  • Cooked quinoa for serving
  • Sliced green onions + more cilantro and peanuts for garnish (optional)

Directions:

  1. Heat the olive oil in a large pan over medium heat. Add in the onions and carrots and cook until the onions are slightly translucent, about 5 minutes.
  2. Add the shredded cabbage or kale, as well as the chickpeas and garlic, to the pan. Continue to cook for about 8 more minutes, until the carrots can be pierced by a fork.
  3. In a small bowl, whisk together the soy sauce, maple syrup, and rice vinegar. Add the mixture to the pan and give everything a good stir. Allow the stir fry to cook for about 5 minutes, until most of the liquid has evaporated. Keep stirring.
  4. Mix in the fresh cilantro and peanuts and cook for a final minute. Remove from the heat, and serve over cooked quinoa. Garnish with green onions, more cilantro, and more peanuts!

Have a great week everyone!:)

Yours Truly,

Olivia:))