Lentil Turmeric Quinoa with Spinach and Mushrooms

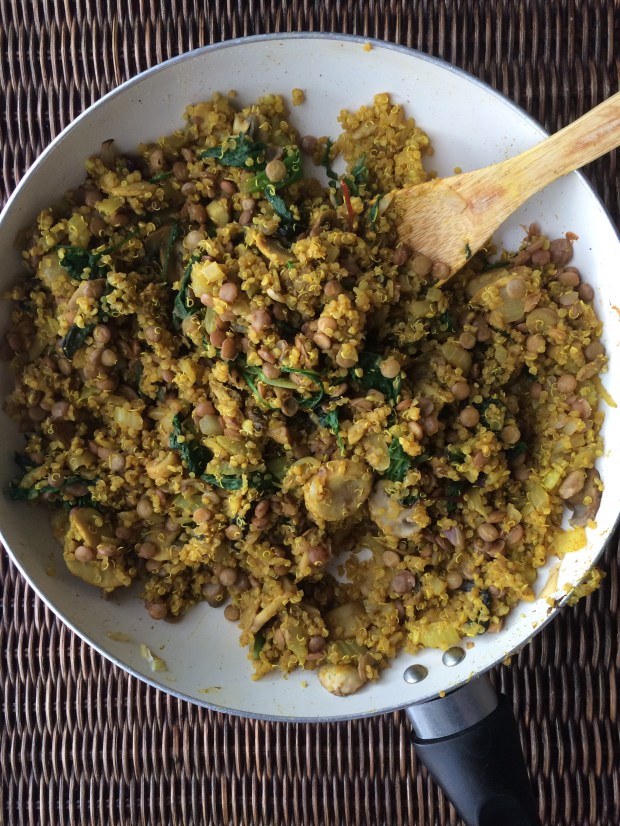
Hi!! Hope everyone’s having a great week so far;) In this post I’ll be sharing a recipe that is kind of big skillet of whatever I had I my fridge; it’s a great way to use up left overs. So if you want to switch out the ingredients in this recipe for ones that you have on hand and need to use up, go for it. Peppers, chickpeas, beans, and other kinds of greens would definitely work well in place of mushrooms, lentils and spinach. Anything that’s left over from a week of eating can be tossed in here. This recipe makes enough for two full servings, so if you make it for dinner one night it’s great for lunch the next day. Here’s how to make my Lentil Turmeric Quinoa with Spinach and Mushrooms!

Lentil Turmeric Quinoa with Spinach and Mushrooms

Cook Time: 30-40 minutes

Serves: 2 as a main course, 4 as a side dish

Ingredients:

  • 2 cups cooked quinoa
  • 1/2 cup dry green lentils
  • 1/2 tbs coconut oil
  • 1/2 a medium onion
  • 2 garlic cloves, finely chopped or minced
  • 1 celery stalk, chopped
  • 1 1/2 cup sliced mushrooms
  • 2 cups spinach
  • 1 tsp turmeric
  • 2 tsp cumin
  • 1 tsp coriander
  • 1 tsp allspice
  • Salt and pepper to taste
  • Water, as needed

Directions:

  1. Rinse the lentils and pick out any shrivelled up ones. Put them in a small pot with 1 1/2 cups water and bring to a boil, then turn the heat down and let the lentils cook in the simmering water for about 30 minutes, or until tender.
  2. While the lentils are cooking, heat the coconut oil in a large skillet. Add the garlic, onions and celery and cook until the opinions are translucent, about 6-8 minutes. Feel free to add a little bit of water to the pan to prevent the veggies from sticking.
  3. Add in the mushrooms and cook until soft.
  4. Next, put the cooked quinoa and all of the spices into the pan. Mix everything together and then add the spinach, cooking until it’s just wilted.
  5. Remove from the heat and add in the cooked lentils.
  6. Enjoy!

I hope that you enjoy this dish and have fun playing around with different combinations of vegetables. This is going to be my new go-to quinoa recipe;) Bye for now!

Yours Truly,

MyDayIsBooked;))

Chocolate Cherry Oatmeal

You know how I posted three recipes for Overnight Oatmeal a couple months back? Well, those are great to make ahead for rushed mornings, but if you have the time to make this Chocolate Cherry Oatmeal, I totally recommend it! In fifteen minutes you can have a bowl of creamy, chocolaty oats topped with seeds and of course, cherries. If you don’t have time to make this during weekdays, it’s a great breakfast to soothe your sweet tooth on the weekends. In short, this recipe hits the spot any day of the week! I used frozen cherries in this to top my oats, but if you don’t have some on hand, any fresh or frozen berry will do. Now let’s make some oatmeal!

Chocolate Cherry Oatmeal

Makes 1 Serving

Cook Time: 5-8 minutes

Ingredients:

  • 1 medium sized banana
  • 1/3 cup rolled oats
  • 2/3 cup water
  • 1 tbs unsweetened cocoa powder
  • 1/4 cup frozen cherries (or berries of your choice)
  • Your favourite toppings (nuts and seeds, nut and seed butters, dried fruit, etc.)

Directions:

  1. Mash half of the banana in a small pot. Add in the oats, cocoa, and water, and stir until combined.
  2. Place the pot over medium-high heat and bring the oat mixture to a boil.
  3. Turn the heat down to medium-low and simmer uncovered for 5-8 minutes, until desired thickness is reached. Make sure to stir the oats every couple minutes or so to avoid them sticking to the bottom of the pot.
  4. Remove the pot from the heat and pour its contents into a bowl. Top with the frozen cherries and other toppings of your choice. I like to slice the other half of the banana and use it to top the oats.
  5. Enjoy!

This is a healthy and delicious breakfast, and it definitely fills you up and gets you through your day! I hope that you like it and find it easy to make. Thanks for reading!

Yours Truly, MyDayIsBooked;))

Balsamic Roasted Veggie and Quinoa Salad

‘Sup people! One of my favourite things to do is come up with new recipes; I just love being creative and experimenting with different ingredients. Today my experiments paid off, because this salad turned out great! Chickpeas, sweet potato and cauliflower are the main components, with a few fresh cucumbers in there as well. I’m usually not a huge fan of balsamic vinegar, but together with rosemary, quinoa and roasted veggies, it’s waaaay better. Plus, there’s no greens in this salad, which is a nice change! I kept my salad vegetarian, but you could totally add some grilled chicken on top to make it a heartier meal. Here’s the recipe for my Balsamic Roasted Veggie and Quinoa Salad:

Ingredients:

Makes 4 servings

For the Roasted Veggies:

  • 1 sweet potato, peeled and cubed
  • 1 can chickpeas, drained and rinsed
  • 1/4 cup cauliflower florets, washed
  • 1 tbsp avocado or olive oil
  • 1 tbsp balsamic vinegar
  • 1 tsp salt
  • A bit of pepper
  • 1/2 tbsp rosemary leaves

For the Quinoa:

  • 1 cup quinoa, cooked
  • 1 cup cucumber, diced
  • 2 sprigs of green onion, chopped

For the Vinaigrette:

  • 1/4 cup avocado or olive oil
  • 2 tbsp balsamic vinegar
  • 1/2 tsp Salt

Directions:

  1. Preheat your oven to 400 degrees Fahrenheit
  2. Mix all of the roasted veggie ingredients in a large bowl, until the veggies are covered in oil and vinegar.
  3. Spread out the veggies on a sheet pan covered with parchment and bake for about 25-30 minutes, until the sweet potatoes are soft.
  4. While the veggies are baking, cook the quinoa and cut up the onion and cucumber. Mix it all in the bowl the you want to serve the salad in.
  5. Prepare the vinaigrette, mixing the oil and vinegar until combined.
  6. Once the veggies are ready, mix them in with the quinoa mixture. Pour in the vinaigrette and toss the salad.
  7. Enjoy!!


I hope that you like this quick recipe. the sweet potato and balsamic work really well together, and the fresh cucumber sort of brightens everything up. Thanks for checking out this post, and stay tuned for a crafty tutorial coming soon!!

Yours Truly, MyDayIsBooked;))

Chickpea Nutella

Hello again! I’m back, and this time you only had to wait ten days in-between posts! I think that’s a new record. Seriously though, this “Nutella” is amazing. If you’re skeptical about the whole chickpea thing, don’t worry, I was too. But the end result was this delicious chocolatey spread that goes well with just about everything. There is an option to add some peanut butter, which I obviously did, but if you’re sick of all the peanut butter recipes on this site than feel free to take a break from it! Personally, I don’t think I’ll ever get tired of peanut butter. Before I give you the recipe, I want to commemorate shaneandsimple.com for coming up with it:)

Ingredients:

  • 1 15oz can of chickpeas, drained, rinsed, and patted dry
  • 1/4 creamy natural peanut butter (optional)
  • 1 small ripe banana
  • 1/4 cocoa powder
  • 1 tsp vanilla
  • a pinch of salt
  • 2 tbsp water (or more; add until you reach your desired consistency)


Directions:

  1. Add all ingredients to a high-speed blender and blend until desired consistency is reached. Add more water if needed.


And……………. wow, that’s pretty much it. I think that’s the simplest recipe ever! Enjoy this spread on toast, with fruit, or anything else that needs chocolate on it! (Which is pretty much everything.) Thank for checking out this recipe! I’ll definitely be posting more in the summer – this darn invention called “studying for final exams” is killing my free time! Enjoy this spread in the meantime!


Yours Truly, MyDayIsBooked;))


Avocado Tuna Salad Wrap

Hello! I’ve been super busy and haven’t been able to post in a while, but I can’t wait to share this delicious lunch recipe with you! I literally had a chicken salad sandwich for lunch every day last week, so I was craving something a little different, and tuna was the perfect option! Plus, using avocado instead of mayo makes it healthier and more delicious. Scroll down for the recipe!

Makes 1-2 servings (depending on how hungry you are!)

Ingredients:

  • 1 can of chunk tuna, drained
  • 1/4 white onion, finely chopped
  • 1 wrap (preferably whole wheat)
  • Half of an avocado
  • A few spinach leaves
  • About 1/4 of a cucumber, julienned
  • Salt and pepper to taste

Directions:

  1. Mash the avocado and mix in the tuna and onion, then season to taste with salt and pepper.
  2. Open the wrap and lay down some spinach leaves.
  3. Next, fill the wrap with the tuna mixture and the cucumbers. Make sure to put another layer of spinach over the cucumbers so that the wrap doesn’t get soggy.

Wrap up the wrap and you’re done!

This wrap is a great alternative to sandwiches (especially when you’ve been having the same one for a week straight!). It’s also super easy to make; you can do it before school in the morning. I hope that you enjoy them as much as I did!

Your truly, MyDayIsBooked;))