Cactus Cut Sweet Potatoes

Hey guys! I have a SICK recipe for you tonight- these Cactus Cut Sweet Potatoes are here to play. I love the version they have at restaurants, but today we’re baking pies and also using sweet potatoes instead of regular potatoes because sweet potatoes are amazing😍

Sweet potatoes and potatoes are actually pretty similar in nutritional content, but potatoes are higher in potassium while sweet potatoes are higher in vitamin A. So it all comes down to which potato you prefer- and I think you already know which kind of tater has my heart😂

These cactus cut sweet potatoes are get super crisp and delicious in the oven, and are perfectly spiced! They may not look orange to you, but that’s because I used a Japanese sweet potatoe. I actually really like this variety, and they’re a bit smaller which is good for the recipe🙌 But regular ol’ orange sweet potatoes will work just fine as well.

This super tasty snack/side is also very easy to make. Start by truly slicing your sweet potato- I would say to about 1/8 of an inch. The average thickness I got was this:

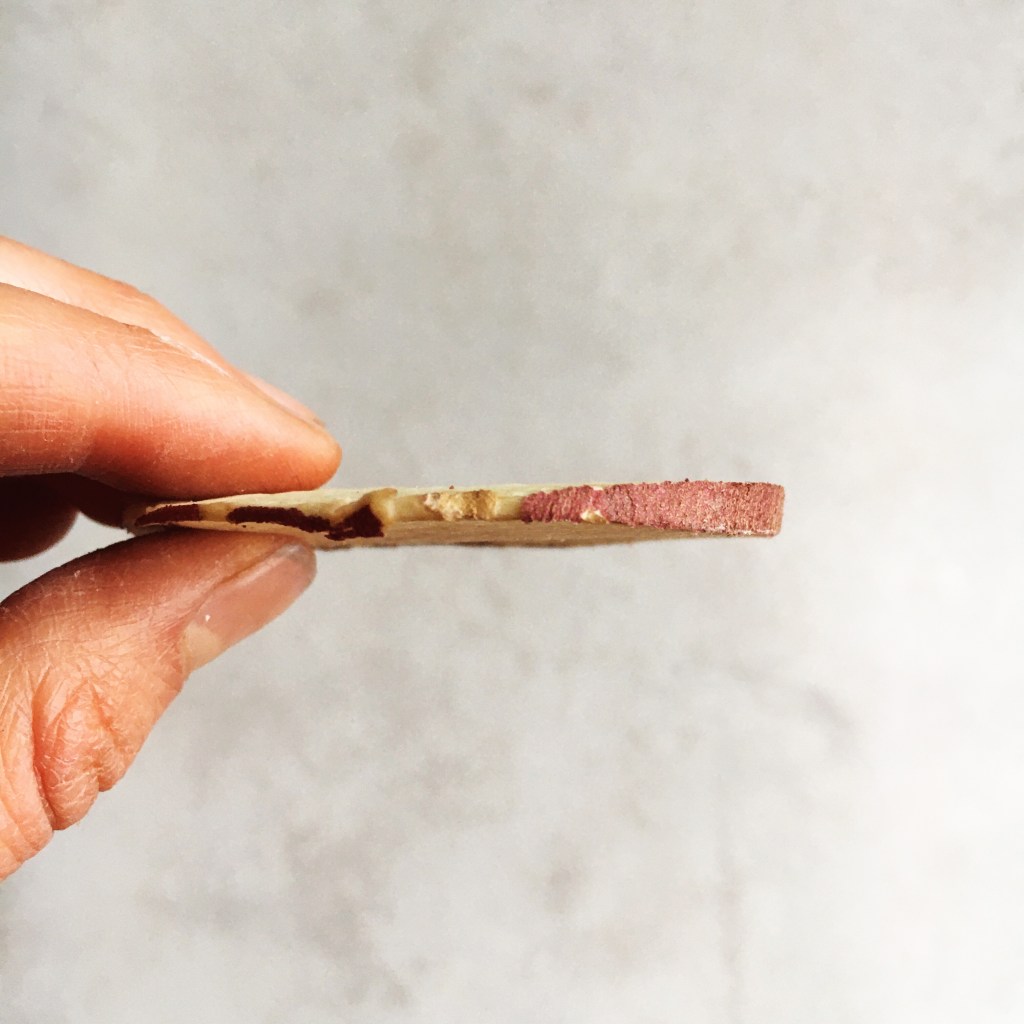
Although I definitely need to work on my knife skills because my cuts were a lil all over the place😂

Next you’re going to toss your taters in a bag with some olive oil and all those delicious spices that make these cactus cuts shine! Paprika, chilli powder, garlic powder, salt and pepper all make and appearance, and of course you’ve gotta have that cayenne for spice.

The final step before the oven is to lay the sliced potatoes down flat on a parchment lined baking sheet- making sure it’s not too crowded so they have room to reach their full delicious potential! After roasting for 20 minutes, you’re going to flip em and them bake for another 5-10, keeping a close eye on those little suckers so they don’t burn. And then voila! You’ve got some warm, seasoned cactus cut sweet potatoes that are AMAZING with hummus, tzatziki, or just by themselves😍

I love this recipe because it’s perfect for a party (when we can have them) and also for snacking! I also had them as a side with my egg scramble for dinner and they were👌 Hope you enjoy!!

Yours Truly,

Olivia:))

Cactus Cut Sweet Potatoes

Ingredients

-1 small japanese or regular sweet potato, cut into 1/8 inch slices

-2 tsp olive oil

-1 tsp paprkia

-1/2 tsp chilli powder

-1/2 tsp garlic powder

-1/4 tsp cayenne powder

-Salt and pepper to taste


Directions

1. Preheat your oven to 400 degrees Fahrenheit.

2. Add the sliced sweet potatoes into a large ziploc bag with the rest of the ingredients. Shake everything up until the potatoes are coated with the oil and the spices.

3. Lay each slice on a parchment lined baking sheet, being careful not to over-crowd the pan. Place them in the oven for 20 minutes.

4. Remove the pan from the oven and flip over all of the potatoes with a fork. Place them back in the oven for 5-10 more minutes, until crispy and cooked through, watching to make sure they don’t burn.

5. Remove the potatoes from the the oven, let cool slightly and enjoy!


Flourless Chocolate Muffins

Hey there guys! Everyone loves chocolate, and today I’ve got a quick and easy chocolate muffin recipe that is FLOURLESS, REFINED SUGAR FREE and VERY TASTY.

I tried to pack as much protein into these as I could, without using protein powder, because I know sometimes I don’t have access to it and I wanted to make sure that both you and I could make these with minimal ingredients. So I turned to one of my favourite, super versatile ingredients- chickpeas! They’re full of protein and give the density to these muffins that is otherwise missing because of the lack of flour. I promise that you can’t taste them in there at all- much like in my Healthy Edible Cookie Dough. All you get is an amazing, chocolate-y flavour in a cute and fluffy mini muffin.

The other simple ingredients in this tasty snack include cocoa powder, egg, baking powder, peanut butter (yum), vanilla and banana. Everything gets tossed into the blender and combined until a smooth batter forms. I greased up my mini muffin pans with a bit of coconut oil, filled them up, and baked for about 15-20 minutes. So these muffins are not only healthy, but quick and easy to make too!

I love this recipe because it’s soooooo delicious and makes the perfect snack, quick breakfast, or healthy dessert. The chickpeas worked perfectly as a kind of flour substitute- I definitely want to play around with that some more! Don’t be scared away by them though- they give a great texture but have no effect on the taste.

Hope you enjoy this delicious recipe!

Yours Truly,

Olivia:))

Flourless Chocolate Muffins

  • Servings: Makes 18 Mini Muffins
  • Print

Ingredients

-3/4 cup canned chickpeas, drained and rinsed

-1 ripe banana

-3 tbsp cocoa powder

-1 tsp vanilla

-1 tsp baking powder

-1 egg

-1 tbsp peanut butter


Directions

1. Preheat your oven to 350 degrees Fahrenheit.

2. Add all of the ingredients to a blender or food processor and combine to form a smooth batter.

3. Grease 18 mini muffin cups with a little bit of coconut oil and fill them 3/4 of the way with batter. Bake the muffins for 15-20 minutes, until a toothpick comes out clean.

4. Remove from the oven and let cool completely before you enjoy.


Quick and Easy Banana Pancakes

PANCAKES- one of the best breakfasts ever! I’ve been crazy about pancakes lately and I wanted to share the recipe that I’ve been using. It’s quick, easy, uses 2 INGREDIENTS, and so tasty! I also love all the protein they pack in first thing in the morning.

I’ve used a lot of oats in my pancakes in the past, and while they do make a good cake, they can make things a bit dense. So I went really simple and just used banana and egg- and I loved the result! I remember a few years ago I tried out this simple recipe, but it never really stuck. I’m pretty much obsessed with it now though!

Because they lack a bit of that density that some kind of flour would give them though, they’re a little bit harder to flip. Some tips to make flipping easier are:

  • Use Slightly Underripe Bananas- slightly underripe bananas are more starchy then when they’re very mushy and ripe, and so using them in this recipe helps the pancakes to hold together better and not burn as easily.
  • Use a Thin Spatula- the thinner the spatula you use, the easier it is to get under these delicate pancakes and flip em!
  • Make the Pancakes on the Smaller Side- it can be really difficult to flip large pancakes, and making them smaller means that it’s easier to get under them. I use strictly one tablespoon full of batter for each pancake.
  • Wait Until You Can See Bubbles All Around the Edges to Flip- I know it can be hard to wait to eat these pancakes, but make sure you wait until you see those bubbles to flip! If the pancake isn’t cooked through enough, the flip will fail.

Keeping those tips in mind, flipping should be a breeze!

I love how versatile this recipe is too- you can add cinnamon, allspice, a bit of cocoa powder, matcha, or any other powdered flavouring you’d like. And for only using a banana and two eggs, you get LOTS of small pancakes- I’m talking like 10-15! I love eating these with some extra banana and frozen blueberries on top, drizzled with peanut butter, with Greek yogurt, or with other fruit. The eggs in them are a great source of protein, so they’re perfect for a pre or post workout snack as well. Or have them for a quick and easy breakfast that makes everyday feel like Saturday!

Enjoy this simple and delicious breakfast idea!

Yours Truly,

Olivia:))

Quick and Easy Banana Pancakes

  • Servings: 1
  • Print

Ingredients

-1 large banana

-2 eggs

-1/4 tsp cinnamon or allspice (optional)


Directions

1. Mash the banana in a small bowl.

2. Add in the eggs and the allspice, and whisk everything together until combined.

3. Heat up a small pan over medium-low heat.

4. Scoop the pancakes batter by tablespoon-fulls into the pan, and cook for about 1-2 minutes, until you can see bubbles all around the edges. Carefully flip the pancakes with a thin spatula, and continue to cook for another 1 minute.

5. Use the spatula to transfer the pancakes onto a plate, and repeat step 4 until all of the batter is used up!

6. Serve warm.


Chocolate Smoothie Bowl

Sometimes you just want some chocolate for breakfast, ya know? I know I do at least, and so today I’m sharing a delicious CHOCOLATE SMOOTHIE BOWL that not only tastes amazing, but is loaded with fruits and veggies so you can start your day off right🙌

I always have a stock of frozen bananas in the freezer, because they make the best base for creamy smoothie bowls! I chop mine up before freezing so that it’s easy to just pop em in the blender. That’s ingredient number one in this smoothie bowl👍 Ingredient two is some nice frozen mango- also VERY good for texture, plus it adds some sweetness. Next we’re adding spinach because we gotta get those greens in!! The chocolate flavour completely masks the taste of the spinach, so you get the benefit of the veggies with the benefit of some tasty chocolate. That’s a win-win situation if I ever saw one.

For the chocolate flavour, I threw in one full tablespoon of some amazing, organic cocoa, along with little bit of water (you don’t want to overdo it on the water or you’ll end up with more of a smoothie soup), and blended until everything was nice and creamy!!

One of my favourite things about smoothie bowls is all the different ways that you can top them. On this one I went with some frozen blueberries, a little bit of coconut, and obviously some peanut butter😍😍 But there are so many different topping possibilities! Here are some delicious topping ideas:

  • More fresh or frozen fruit
  • Different kinds of nut butters
  • Raw or toasted nuts and seeds
  • Granola
  • Cereal
  • Dark chocolate
  • Puffed wheat

Toppings really make the bowl, so make sure you don’t skip out on them if you have the time!

Smoothies and smoothie bowls are one of my favourite breakfasts because they fit in all of those nutrients and a delicious taste in a super convenient format. If you don’t have time to enjoy this smoothie in bowl form, you can definitely add a bit more water to make a thinner smoothie and take it with you on the go.

This bowl is such a healthy and delicious breakfast treat. I had a couple of eggs on the side of mine for some protein, and it was the perfect way to start my day. Hope you enjoy!

Yours Truly,

Olivia:)

Chocolate Smoothie Bowls

  • Servings: 1
  • Print

Ingredients

-1 frozen banana, chopped

-1/2 cup packed spinach

-1/2 cup frozen mango, chopped

-1 tbsp organic cocoa powder

-2 tbsp water


Directions

1. Combine all of the dressing ingredients in a blender or food processor and blend until smooth.

2. Scoop into a bowl and top with your favourite toppings.


Candied Walnut Popcorn

MERRY CHRISTMAS!!!! Hope you’re all having an amazing day so far! I know this Christmas looks a little different than past years, but hopefully you guys can find some way to hang out with family, whether it be virtually or with a small, socially distant group in person.

For a fun and festive Christmas recipe, I thought I’d share a delicious popcorn mix! It’s a quick and easy recipe that you can whip up while celebrating the holiday. The walnuts are beautifully candied in some maple syrup on the stove, making them tender and sweet, balancing perfectly with the salted popcorn! I also threw some cinnamon in there for some extra Christmas flavour.

Also, we’re making our popcorn from scratch! Of course, you can use pre-made popcorn if you want to speed things up even more, but making your own is surprisingly easy and healthier. You’ve just got to heat up the oil, toss in the kernels, and listen to them pop! Plus you can season to your own taste with salt.

I’m going to keep this post short today so you can get straight to the recipe and go back to making holiday memories! I hope you enjoy this recipe and have a great rest of your day:)

Candied Walnut Popcorn

Serves: 4

Total Time: 20 minutes

Ingredients:

  • 2 tbsp coconut oil
  • 1/3 cup popcorn kernels
  • 1 1/2 cups walnuts
  • 2 tbsp maple syrup
  • 1/2 tsp cinnamon + more to taste
  • Salt to taste

Directions:

  1. Heat the coconut oil in a large pot over medium-low heat.
  2. Add in the popcorn kernels to the pot, and put on the lid, leaving it slightly ajar so that the steam can escape. Listen to the kernels pop! When the popping slows, remove the pot from the heat.
  3. Season the popcorn to taste with salt.
  4. In a small pot, combine the walnuts and maple syrup. Put the pot on the stove over medium-low heat, and wait for the maple syrup to come to a slight simmer. Keep stirring the walnuts and maple until the maple syrup begins to caramelize and turns into a sticky coating on the walnuts, about 3-5 minutes.
  5. Take the pot off of the heat and let the candied walnuts cool for about 2 minutes before adding them to the popcorn. Mix everything up and season to taste with some more salt and cinnamon.
  6. Enjoy!!

Merry Christmas and I’ll see you soon with my 2021 Bullet Journal Set-Up! I’m so excited:))

Yours Truly,

Olivia:)))