Chocolate Smoothie Bowl

Sometimes you just want some chocolate for breakfast, ya know? I know I do at least, and so today I’m sharing a delicious CHOCOLATE SMOOTHIE BOWL that not only tastes amazing, but is loaded with fruits and veggies so you can start your day off right🙌

I always have a stock of frozen bananas in the freezer, because they make the best base for creamy smoothie bowls! I chop mine up before freezing so that it’s easy to just pop em in the blender. That’s ingredient number one in this smoothie bowl👍 Ingredient two is some nice frozen mango- also VERY good for texture, plus it adds some sweetness. Next we’re adding spinach because we gotta get those greens in!! The chocolate flavour completely masks the taste of the spinach, so you get the benefit of the veggies with the benefit of some tasty chocolate. That’s a win-win situation if I ever saw one.

For the chocolate flavour, I threw in one full tablespoon of some amazing, organic cocoa, along with little bit of water (you don’t want to overdo it on the water or you’ll end up with more of a smoothie soup), and blended until everything was nice and creamy!!

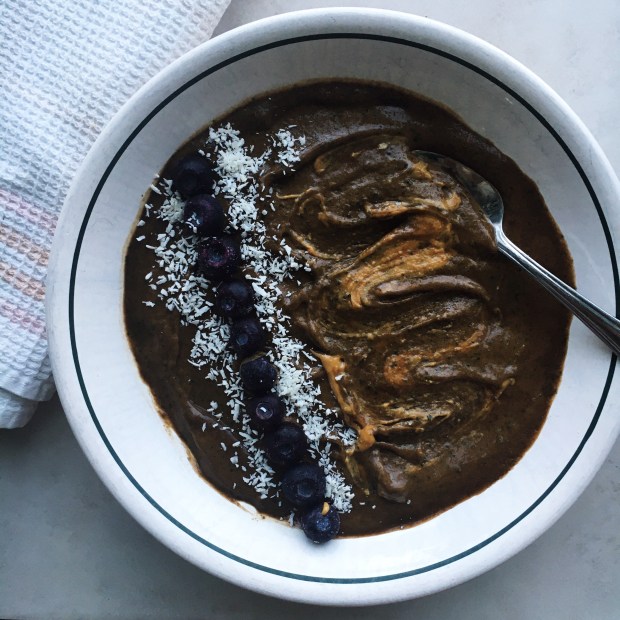
One of my favourite things about smoothie bowls is all the different ways that you can top them. On this one I went with some frozen blueberries, a little bit of coconut, and obviously some peanut butter😍😍 But there are so many different topping possibilities! Here are some delicious topping ideas:

  • More fresh or frozen fruit
  • Different kinds of nut butters
  • Raw or toasted nuts and seeds
  • Granola
  • Cereal
  • Dark chocolate
  • Puffed wheat

Toppings really make the bowl, so make sure you don’t skip out on them if you have the time!

Smoothies and smoothie bowls are one of my favourite breakfasts because they fit in all of those nutrients and a delicious taste in a super convenient format. If you don’t have time to enjoy this smoothie in bowl form, you can definitely add a bit more water to make a thinner smoothie and take it with you on the go.

This bowl is such a healthy and delicious breakfast treat. I had a couple of eggs on the side of mine for some protein, and it was the perfect way to start my day. Hope you enjoy!

Yours Truly,

Olivia:)

Chocolate Smoothie Bowls

  • Servings: 1
  • Print

Ingredients

-1 frozen banana, chopped

-1/2 cup packed spinach

-1/2 cup frozen mango, chopped

-1 tbsp organic cocoa powder

-2 tbsp water


Directions

1. Combine all of the dressing ingredients in a blender or food processor and blend until smooth.

2. Scoop into a bowl and top with your favourite toppings.


5 Minute “Baked” Sweet Potatoes

I have a VERY deep love of sweet potatoes, and my obsession has only grown after rediscovering this method of cooking them. It takes five minutes, is super easy, and is done in- wait for it- the MICROWAVE. That’s right, we’re making some baked potatoes in the microwave, and I promise you that after trying them out you will never go back to the oven🙌

Don’t get me wrong, I still love some good roasted or air fried sweet potatoes. I love when they get all crispy! But when I’m looking for a quick sweet potato fix, this method is the best. You’re basically steaming the sweet potato in the microwave by wrapping it in a damp paper towel and then cooking it on high for about 5 minutes, flipping halfway through. This super simple technique is a game changer because it allows you to whip up some delicious potatoes on short notice, instead of waiting 30-40 minutes for them to roast in the oven.

I remember that I saw this idea somewhere on social media a couple of years ago and was only cooking my sweet potatoes this way before I discovered roasting them. But I don’t know why I stopped this microwave magic altogether- now that I’ve remembered how awesome it is I can’t wait to start making sweet potatoes more quickly! What I have in mind is making quick sides for dinner, super fast and delicious school lunches, and last minute additions to salads and bowls.

I hope this method changes your guys’ lives as much as it’s going to change mine!😂 If anyone’s down to start a sweet-potato-cooking-technique-discussion-group let me know because I will be the president✌️

5 Minute “Baked” Sweet Potatoes

Serves: 1

Total Time: 7 minutes

Ingredients:

  • 1 small sweet potato, washed and cleaned (any eyes or blemishes removed)
  • Hummus, chives, avocado, beans, or plain yogurt for topping (optional)

Directions:

  1. Grab about 2-3 connected sheets of paper towel and soak them under the tap. Wring them out until no more water comes out, and the towels are damp.
  2. Use a fork to poke about 10 holes all around the sweet potato. Wrap it in the damp paper towels, place on a plate, and microwave on high for 2 minutes and 30 seconds.
  3. Take the potato out of the microwave, flip it over, and microwave for another 2 minutes and 30 seconds, or until the potato is cooked all the way through.
  4. Unwrap the potato, cut open the top lengthwise, and top with hummus, plain Greek yogurt, chives, or avocado, or add to your favourite bowls and salads.
  5. Enjoy!

There’s a super simple recipe for you on a Saturday! Have a great rest of your weekend and get ready for more tasty recipes coming next week:)

Yours Truly,

Olivia;))

Coconut Curried Vegetable Rice

Hi friends! It seems that there’s a theme running through my recipes this week, and that theme is SIMPLE DELICIOUSNESS. Maybe you don’t think of curry being that simple. But guess what, this one is. We’re making good use of the stuff you’re already got in your spice cupboard and pantry and we’re making it into something super tasty.

I wanted to make some sort of curry paste for this, but I didn’t have many of the traditional curry paste ingredients. So I made my own take on a curry paste, using common ingredients that I DID have. We’re talking chilli powder, ground ginger, soy sauce, basil, curry powder, lemon juice, and a bunch of other good stuff. I like the concept of this paste because if you don’t want to make curry out of it right away, you can put it in the fridge for a few days until you’re ready to use it.

It’s also great because it acts as your flavour bomb for the whole curry! All of the spices and flavour you need for the whole dish is found in it, making for a super easy single application of amazingness.

All of the veggies in this dish really sing too. I love a good rainbow in my curries, and almost any veggie would work in here, so feel free to do some substituting with what you have and what you like. I personally found my own heavenly combo of mushrooms, onions, bok choy, red peppers, and carrots to be very nice.

The vegetables get cooked down together in some coconut oil, then sauteed a bit more when the curry paste is added, and then everything simmers together in some coconut milk. To make this heartier and more of a one-pot meal, I thought, why not add in some rice? So brown rice gets thrown in too and cooked in all of the delicious flavours.

Once this curry is done, your house will definitely smell really good and you’ll have a few meals worth of awesome curry rice stocked up in your fridge. I love how flavourful this is, and how it has just the perfect amount of spice! Plus, it goes great with any protein you choose to add, and is so hearty and comforting.

Hope you enjoy!

Coconut Curried Vegetable Rice

Serves: 3-4

Total Time: 70 minutes

Ingredients:

For the Curry Paste:

  • 1/2 tbsp chilli powder
  • 1/2 tbsp ground cumin
  • 1 tbsp ground ginger
  • 1 tsp dried basil
  • 1 tsp crushed red pepper flakes
  • 1 tsp curry powder
  • 1 tbsp soy sauce
  • Juice of 1/2 a lemon
  • 3 cloves of garlic, minced
  • 1/4 of a white onion, diced

For the Coconut Curried Vegetable Rice:

  • 1 1/2 tbsp coconut oil
  • 1/4 of a white onion, sliced
  • 1 red pepper, sliced
  • 1 large carrot, peeled and chopped
  • 4 white mushrooms, sliced
  • 8 stalks of baby bok choy, cut into halves
  • 1 serving of Curry Paste (above)
  • 1 400ml can of coconut milk
  • 2/3 cup brown rice
  • Salt and pepper to taste

Directions:

  1. To make the Curry Paste, combine all of the curry paste ingredients in a blender or food processor until a paste-like consistency is reached. Don’t worry about small chunks of onion; these will be cooked in with the curry. Use immediately to make Coconut Curried Vegetable Rice or store in the fridge for up to 3 days before using.
  2. Heat the coconut oil in a large, deep skillet. Add in all of the veggies for the curry and cook until the onion is translucent and the peppers are beginning to soften, about 6-8 minutes.
  3. Add the curry paste to the pan and sautee for another 2 minutes.
  4. Dump the coconut milk into the pan and give everything a good stir to combine. Season generously with salt and pepper, and stir in the brown rice.
  5. Bring the contents of the pan to a simmer and turn the heat to low, covering the pan and letting the curry cook for 35-40 minutes, until the rice is completely cooked through.
  6. Remove the pan from the heat season more to taste with salt and pepper, serve warm and enjoy!

I love this recipe so much and I hope you guys do too! See you Friday:))

Yours Truly,

Olivia;))

Fresh Baked Falafel

Hey guys! Welcome to my first recipe of 2021- I wanted to start the year off right and this recipe is SO GOOD. We’re making amazing homemade falafels that are packed with flavour and are super healthy too! All you’ve gotta so is follow three simple steps; blend, shape, then bake, and you can be poppin’ these bites of deliciousness into your very own mouth.

First off- blend! You’ve heard of a one bowl recipe, but have you ever heard of a no bowl recipe? Probably not until now, but that’s right- this recipe calls for no bowl and only one blender or food processor. All of the fresh and amazing ingredients for our falafels are being thrown in there and simply combined until a nice, even consistency is reached. I didn’t call these FRESH Baked Falafel just for fun either. We’ve got fresh parsley, freshly squeezed lemon juice, minced garlic, chopped onion, and so many other ingredients to make these chickpea nuggets come to life! I also used some oat flour to bind everything together, but if you prefer to use another kind of flour you can go ahead.

Step two- shape! I got out a little spoon, scooped tablespoon sized amounts of falafel mixture into my hands, and formed them into flat patties. This shape is the best for baking because the outsides get nice and browned while the inside still cooks all the way through. This step is pretty straight forward, and also fun and kind of messy.

Finally- bake! These babes bake for fifteen minutes on one side, then get flipped and bake for another fifteen. The result is a golden brown, toasty falafel that is amazing on or in just about anything. Bowls, salads, wraps, sandwiches; you name it, these will take it up a notch. I recommend making a double or triple batch, freezing them, and pulling them out when you want something fast and tasty.

Hope you enjoy these amazing Fresh Baked Falafels!! Let me know how they turn out when you give this recipe a try:)

Fresh Baked Falafel

Serves: Makes 9-10 Falafels

Total Time: 50 minutes

Ingredients:

  • 1 can of chickpeas, drained and rinsed
  • 1/2 cup fresh parsley
  • 1/4 cup oat flour
  • 1/2 a white onion, chopped
  • 2 cloves of garlic, minced
  • 1/2 tbsp tahini
  • 1 tbsp lemon juice
  • Salt and pepper to taste

Directions:

  1. Preheat your oven to 400 degrees Fahrenheit.
  2. Add all of the falafel ingredients to a blender or food processor and blend until everything is completely combined.
  3. Scoop the mixture out from the blender by tablespoon fulls and form into discs about 1/4 inch thick. Spread them out on a parchment lined baking sheet.
  4. Place the falafels in the oven and bake for 15 minutes. At this point, remove the pan, flip the falafels, and then place them back in the oven to bake for another 15 minutes.
  5. Take the falafels out of the oven, let them cool, and enjoy in bowls, salads, wraps, or sandwiches, or just dip in hummus.

Have fun making and eating these Falafels! See you guys Wednesday with another great recipe:)

Yours Truly,

Olivia:)))

Smoky Roasted Cauliflower Steaks

‘Sup guys! I’ve done a lot of sweet Christmas recipes so far, but today I have some Smoky Roasted Cauliflower Steaks that are a GREAT vegetarian main or side dish for your Christmas dinner. I also threw some mushrooms on the pan to toast with the steaks because mushrooms are so tasty and remind me of the holidays!

The concept of a cauliflower steak is a thick slab of cauliflower seared or roasted so that it is reminiscent of a steak. I actually love steaks- I’m not vegan or vegetarian, but I love veggies too, and these “steaks” are just so good and perfect for switching it up once and a while.

In this recipe, I amped up the meatiness of the cauliflower by using liquid smoke in the marinade!! My family and I made some homemade beef jerky the other week (it was so good I highly recommend), and an ingredient in the marinade was liquid smoke. It gave it such a good flavour! So I thought, why not add it to my cauliflower? And it worked its magic there too. Liquid smoke is used in a variety of vegan and vegetarian recipes because it does give that savoury, meaty flavour, so it’s worth picking some up. Also in the marinade, we have balsamic, garlic, and a bunch of spices that all work together to create a ziploc bag full of deliciousness😂

I marinaded the steaks for 4 hours- flipping the bag halfway through to make sure that everything got coated evenly. This made the cauliflower so flavourful! I then placed the steaks on a sheet pan in the oven, but not before tossing some sliced mushrooms in the leftover marinade and throwing them on the pan as well.

Everything roasts up SO nicely in the oven, getting crispy and tender and steak-like! These steaks, along with the mushrooms, would be great alongside some mashed potatoes (or sweet potatoes), more roasted veggies, and maybe some vegetable gravy! They’re super tasty and have a wonderful texture.

Hope you enjoy this vegan holiday dish!

Smoky Roasted Cauliflower Steaks

Serves: 3

Total Time: 5 hours

Ingredients:

For the Steaks and Mushrooms:

  • 1/2 a head of cauliflower, washed and cut lengthwise into about 3/4 inch slabs
  • 5-6 white mushrooms, sliced
  • Sprinkle of dried oregano and dried rosemary
  • Salt and pepper to taste

For the Marinade:

  • 1/4 cup balsamic vinegar
  • 1/2 tsp maple syrup
  • 1/4 tsp liquid smoke
  • 1/2 tsp salt
  • 1 tsp garlic powder
  • 1/2 tsp paprika
  • 1/4 tsp ground pepper
  • Red chilli flakes to taste

Directions:

  1. Combine all of the marinade ingredients in a large resealable bag. Add in the cauliflower steaks and place in the fridge for 4 hours, flipping over the bag halfway through to make sure that the marinade gets to every part of the veggies.
  2. Once the 4 hours are up, preheat your oven to 400 degrees Fahrenheit. Remove the steaks from the marinade and place them on a parchment lined baking sheet.
  3. Toss the sliced mushrooms in the remaining marinade, and then place them on the baking sheet as well. Sprinkle some dried rosemary, oregano, salt and pepper over everything, throw the pan in the oven and roast for 35-40 minutes, until the cauliflower is tender.
  4. Remove the pan from the oven and serves the mushrooms and cauliflower warm.
  5. Enjoy!

Hope you’re all having a wonderful Christmas-week so far! I’ll see you on Wednesday with another holiday recipe🥰

Yours Truly,

Olivia:)))