Mediterranean Spiced Shrimp Bowls

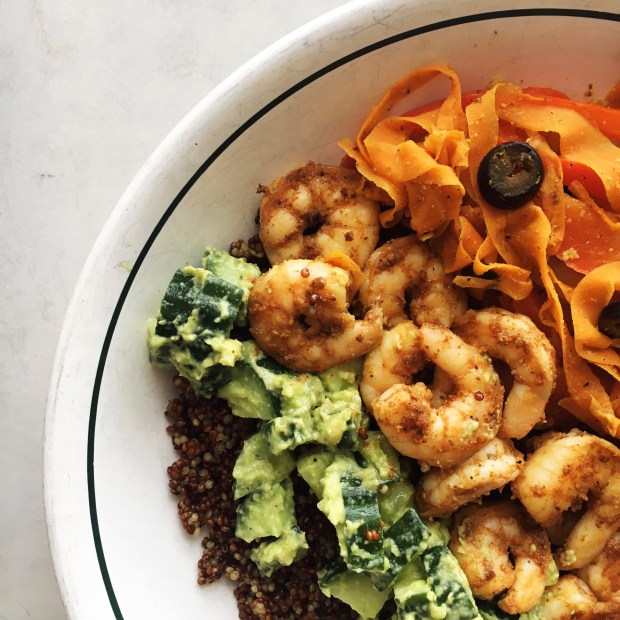
Hey there! I took a bit of a break from posting for a while but I am coming back STRONG with these delicious Mediterranean Spiced Shrimp Bowls.

I love shrimp so much- all seafood is so delicious! I was looking in the freezer the other day for an easy protein I could whip up for lunch and I locked in on the bag of frozen shrimp. I’ve never done much cooking of meat/fish/crustaceans, but I decided to give it a try! And you know what? Shrimp is probably one of the easiest proteins you can make. They’re super fast to cook and it’s not hard at all to tell when they’re done. They’re also full of protein with roughly 25 grams per 16 shrimp.

I used some frozen shrimp and defrosted them by running them under cold water, although it said not to do that on the bag. I would like to know what the problem with that is. (insert laughing face emoji here). If you know you’re going to be making these ahead of time though, you can always throw your shrimp in the fridge to defrost over night, or even use fresh shrimp.

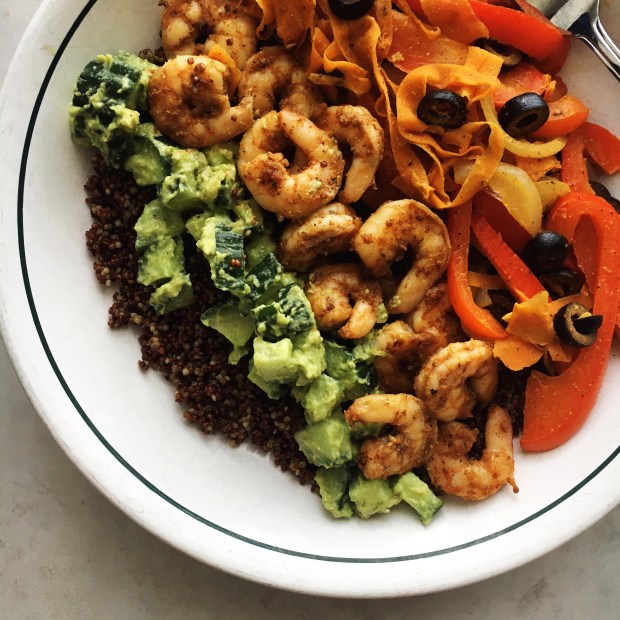
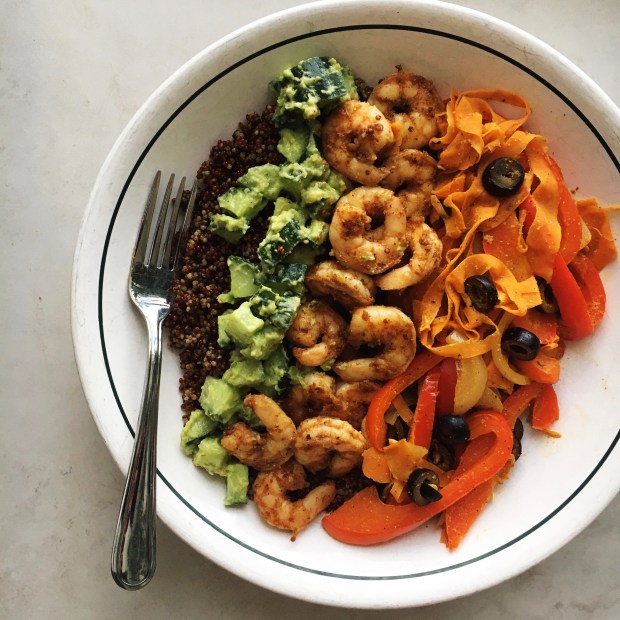
To make these delicious bowls, I started by tossing the shrimp with a bunch of delicious spices, and then sauteeing them in some olive oil. They only need about two minutes per side, and are finished when they’re opaque and slightly pink. So easy! Next we have a bunch of veggies- we’re talking peppers, onions, olives and some carrot ribbons- that get cooked up with lemon juice, garlic powder, and some tahini for some extra flavour. Finally, for some green-ness there’s a tasty cucumber and avocado salad. Serve everything over quinoa and you’ve got a LUNCH.

Let me know how you like these bowls! I definitely want to keep making shrimp recipes because the deliciousness times the easiness factor is out of this world. Maybe I’ll venture out into some other animal proteins too?!? Who knows! Enjoy:)

Yours Truly,

Olivia:))

Mediterranean Spiced Shrimp Bowls

Mediterranean Spiced Shrimp Bowls

Ingredients

For The Shrimp:

-20-25 medium shrimp, defrosted or fresh

-1 tbsp olive oil

-1/2 tsp cumin

-1/2 tsp chilli powder

-1/2 tsp garlic powder

-1/4 tsp cayenne powder

-1/2 tsp oregano

-Salt and pepper to taste

For The Sauteed Veggies:

-1/2 tbsp olive oil

-2 small carrots, made into ribbons with a veggie peeler

-1 red bell pepper, thinly sliced

-1/4 of a white onion, sliced

-1 200ml can of sliced black olives, drained

-1/2 tsp garlic powder

-Juice of 1/2 a lemon

-1/2 tbsp tahini

-Salt and pepper to taste

For the Cucumber Avocado Salad:

-1/4 of a long English cucumber, diced

-1/4 of a ripe avocado

-2 tsp tahini

-Salt and pepper to taste

Other:

-Cooked quinoa for serving


Directions

1. Add the olive oil for the shrimp to a pan and heat over medium heat. Add your shrimp to a small bowl and mix them with all of the spices. Dump the shrimp into the pan and cook for about 2 minutes per side, until the shrimp are opaque and slightly pink. Transfer them to a plate and set aside.

2. Add the olive oil for the veggies into the still hot pan. Add the veggies in and sautee until the peppers are soft and the onions are translucent. Add in the lemon juice, garlic powder, tahini, and salt and pepper and continue to cook for another 3 minutes. Remove from the heat and set aside.

3. Mash the avocado for the salad in a small bowl, mix in the rest of the ingredients, and set aside.

4. To construct your bowls, start with some cooked quinoa, then add the veggies, shrimp, and cucumber salad. Finish with a squeeze of lemon juice if desired and enjoy!


Eggs Benedict with Avocado Hollandaise

What’s this?!? A savoury breakfast?!?! It’s true, this weekend I thought I’d shake it up a bit and ditch my usual oats or yogurt for this GORGEOUS Eggs Benedict with Avocado Hollandaise. And I’m glad I tried it out because it was delish. (I did have a yogurt bowl later in the day to make up for it though. Let’s not get too crazy).

Eggs Benedict is pretty tasty- usually you’ve got a perfectly poached egg, a toasty English muffin, and some Hollandaise sauce, which can be a bit rich. So today we’re lightens up the whole thing by making an AVOCADO Hollandaise because avocados are awesome and versatile like that✌️ All you need is avocado, some lemon juice, salt, pepper, and paprika. And some water. That’s it baby. Then everything gets mixed up and your “Hollandaise” is ready to smother an amazing egg and a nice piece of whole grain/sprouted wheat toast.

Poaching eggs is actually really easy; there are just a few simple steps to follow:

  1. Bring a deep pan full of water to a boil.
  2. Add in 2 tbsp of vinegar.
  3. Turn the heat down so that the water is at a heavy simmer. Crack your egg into a small bowl and then carefully add it to the water.
  4. Let the egg patch for 4 minutes.
  5. Scoop out gently with a slotted spoon!

Not too bad! The vinegar in the water adds a bit of seasoning and helps the egg whites firm up faster so they don’t go all over the place in the water. But yeah, if that sounds easy, that’s the hardest part of this whole shebang.

When to enjoy this recipe? Um, pretty much whenever because it’s so easy and SO GOOD. But it works very well for brunch, weekend breakfasts, a fun lunch, or even a breakfast for dinner situation. I love how the bright lemon works with the rich yolk and you can mop everything up with the toast- so good!

Hope you enjoy this rare savoury breakfast sighting! Have a great week:)

Yours Truly,

Olivia:))

Eggs Benedict with Avocado Hollandaise

Ingredients

-2 eggs

-1-2 slices of whole grain or sprouted wheat bread, toasted

-1/4 of an avocado

-3 tsp lemon juice

-10-12 tsp water

-1/4 tsp paprika

-Salt and pepper to taste


Directions

1.Poach the eggs according to the steps above and set aside on a plate with a paper towel on it.

2.In a small bowl, mash the avocado until little to no lumps remain. Stir in the lemon juice, water, paprika and salt and pepper. Alternatively, you may blend thses ingredients together in a blender.

3.Place one egg on each piece of toast (or both on one, you do you) and cover with the “hollandaise” sauce. Enjoy!


Carrot and Cabbage Slaw

Slaw is so good guys! It goes on so many things- like sandwiches, bowls, and TACOS- and makes a delicious side! Today I’m sharing an amazing, fresh slaw recipe that’s lightened up with a super tasty dressing using avocado. Yum!

We’re keeping it super simple and using just one kind of cabbage and some carrots in this slaw. And if we’re going to pick just one cabbage, it’s gotta be purple cabbage! I grated up some purple cabbage and my carrots and combined them in a large bowl. This step doesn’t take very long at all, but if you’re looking for a speedier option, you can always grab a bag of pre-shredded cabbage mix at the grocery store.

The dressing is really what makes this slaw- it doesn’t require any blender whatsoever, and is so tangy and delish! I mashed up half of an avocado and mixed in some lemon juice, apple cider vinegar, garlic powder, and lots of salt and pepper. So easy, right? When mixed in with the veggies, the dressing loses its green colour, and so you don’t even notice that you’re eating avocado- all you taste is a fresh and amazing slaw!

This is a great addition to any supper, and would be so good on my Veggie Tacos, Epic Veggie Sandwich, or as a finishing touch to a bowl or salad! It’s so healthy, delicious, and bright, and I love how simple it is to make!

Yours Truly,

Olivia:))

Carrot and Cabbage Slaw

  • Servings: 4
  • Print

Ingredients

-1 cup shredded cabbage

-1 cup shredded carrot

-1/2 a ripe avocado

-2 tsp apple cider vinegar

-2 tsp lemon juice

-1/4 tsp garlic powder

-Salt and pepper to taste


Directions

1. Combine the carrot and cabbage together in a large bowl.

2. Mash the avocado in a small bowl. Add in the apple cider vinegar, lemon juice, garlic powder and salt and pepper, and stir to combine.

3. Mix the dressing into the carrots and cabbage.

4. Serve with your favourite dishes.


Homemade California Rolls

I’m SO excited for this post because sushi is my absolute favourite food. I would consider going vegan but I don’t think I could give up sushi! That sashimi- or raw fish- is just too good. Going out to sushi restaurants is always so fun, but right now depending on where you live you might not be able to go to a restaurant. So in this post I’m going to detail how to make your very own sushi at home!

Making sushi can seem complicated, but it doesn’t have to be. All you need is a few simple ingredients that you can find in the International or Asian aisles!

  • Sushi Rice – this is usually a Californian or Japanese short or medium grain rice, but will be labelled as sushi rice. It’s important that you use sushi rice because it’s more starchy and sticky than regular rice, which is important when spreading it onto your nori.
  • Sushi Nori (roasted seaweed) – these are rectangles of roasted seaweed that the rice gets spread onto, and everything gets rolled inside.
  • Rice Vinegar – rice vinegar is used to season up your sushi rice! If you’re making your sushi gluten free, make sure you purchase a gluten free rice vinegar.

With those ingredients as your base, you can proceed to choose any fillings you’d like. I went with some avocado, cucumber, and canned (not imitation) crab to make some great California rolls. There are so many delicious combinations you can try though- and I hope to get my hands on some sushi grade fish soon!

Some more roll ideas include:

  • Vegetarian- fill your rolls with mushrooms cooked in soy sauce, just avocado, carrot, or cucumber, or some combination of the four.
  • Sushi Grade Fish- slice up some sushi grade salmon or tuna and pair it with some creamy avocado.
  • Cooked Shrimp, Crab or Tuna- fill your rolls with cooked shrimp, canned crab, or canned tuna mixed with soy and avocado (see my Tuna and Avocado Poke Bowls)

Ok, so now we’ve got all of our ingredients rounded up- now it’s time to make some rolls! The first and most important step is cooking your rice.

It’s very important to rinse your rice first, to get rid of some of that starchiness. Otherwise, your rice with be too mushy. I placed mine and a bowl and rinsed and drained it about 4-5 times, swirling it around with my fingers, under the water is clear when I mixed it. I then filled the bowl with more water and let the rice soak for about 10 minutes.

Once the rice is good to go, it goes into a pot with some more water and simmers for about 10-15 minutes, until it’s cooked all the way through. I then let it cool for a bit before mixing in some rice vinegar for flavour.

Get ready to get rolling! To roll your sushi rolls, you’ll need a bamboo sushi mat- these are easily found on Amazon for around ten dollars or so. I got out my mat, covered it with a piece of plastic wrap, and placed one sheet of nori down.

I then scooped out some sushi rice onto the nori, and spread it around with my fingers to cover the whole sheet in a nice, even layer. You don’t want to see too much of the nori underneath, but you also don’t want the rice layer to be to thick, so find a good middle ground. Leave about a centimetre strip at the top empty, however, so that it can seamlessly seal the end of the roll. This picture does not illustrate this very well- do better than me!

For the rolls, you can choose if you want to have the rice on the inside, or the outside. In this demonstration I flipped my nori over so that the rice would be on the outside, but in the photos I took of my final product were of my second batch of rolls, where the rice was on the inside. I found that these were easier to roll and held together more nicely, but you can choose whichever you like best! Here I proceeded to add in my filling right on top of the rice in a straight line, leaving some space at the bottom.

To roll up the sushi, you’re going to fold over the bamboo mat from the bottom, until that overhang you left at the bottom covers the filling ingredients to form a roll. Press firmly so that everything gets held together, and keep rolling until the full sheet of sushi covered nori is rolled into a nice cylinder. You may need to pause a few times to adjust the plastic and the mat during this process. Once everything is rolled up, you can use a bit of water on your finger to seal the nori on the outside of the roll.

All that’s left is to cut the sushi into nice even pieces, dip em into some soy sauce, and enjoy! It can take a little while to get a hang of the rolling, so don’t be discouraged if your first few rolls aren’t turning out so nice- my first rolls were a bit rough. Making sushi is an art that takes years to perfect, but these homemade rolls are great for a little something different at home, and they’re super fun to make as well!

Definitely play around with filling combinations, dipping sauces, and toppings too, to make these rolls your own. If you have any questions feel free to leave a comment! Enjoy:)

Yours Truly,

Olivia:))

Homemade California Rolls

  • Servings: 2-4
  • Print

Ingredients

-3/4 cup sushi rice

-1 cup water

-3 tbsp rice vinegar

-1/4 of an avocado, sliced

-1/4 of a cucumber, julienned

-1 170g can of real crab meat

-2 sheets of sushi nori


Directions

1. Add the rice to a small bowl, fill it with water, and swirl it around with your fingers. You should see the water turn white and cloudy as the starch from the rice is released. Drain the rice and repeat this process 4-5 times, until the water remains clear.

2. Fill the bowl with water once more and let the rice soak for 10 minutes to remove additional starch. Drain and add the rice to a pot.

3. Add the 1 cup of water to the pot and bring to a boil, then turn the heat to low, cover, and let the rice simmer for 10-15 minutes, until cooked through. Set aside and let cool before mixing in the rice vinegar.

4. Lay your bamboo sushi mat flat on your counter and cover it with a piece of plastic wrap. Place a sheet of nori down, and proceed to spread out about half of the rice on it in an even layer, leaving an empty space of about one centimetre at the top for sealing.

5. Either flip the nori over so that the rice will be on the outside of your sushi, or leave it so that the rice will be on the inside. In a straight line about an inch away from the bottom of the nori, lay down half of the crab, cucumber, and avocado.

6. Begin rolling the sushi by folding over your mat from the bottom, an pressing firmly to make a tight roll once the empty space at the bottom of the nori has completely encircled the filling. Continue to roll your sushi by rolling the mat, pausing to adjust the plastic or the mat when needed.

7. Seal the roll by brushing a little bit of water onto the nori with your finger. Slice into 8 even rolls.

8. Repeat steps 4-7 with your remaining ingredients.

9. Serve with soy sauce.


Curry Marinated Tofu Bowl

Happy Monday everyone! I have an awesome recipe for you guys that’s great for lunch, dinner, or meal prepping. It’s fresh, full of flavour, and so healthy and filling!

I haven’t had tofu in a while, but a few blocks have been in my freezer, waiting to be cooked up. I read an article recently that says frozen tofu is actually more easy to use and better to eat. The freezing expands the pores in the tofu because the water in it expands, which makes it more receptive to marinades. It’s also easier to press; you just have to give it a couple of presses with a plate to get the majority of the water out. Plus, freezing generally gives tofu a firmer texture. That’s great for what we’re doing with it today- pan searing!

I had my tofu already portioned out into three blocks which were about 85g each. Then I added them to a Ziploc bag with curry powder, coriander, garlic powder, and red pepper flakes, along with olive oil and lemon juice. The tofu is marinated for at least three hours, although you can go for six or eight if you have the time! After marination, I fried up my tofu “steaks” until they got a nice, crispy exterior. So tasty and a great source of plant based protein!

The other components of this bowl are just as flavourful. We have some couscous cooked in coconut milk, and a delicious olive, tomato, cucumber and avocado salad!! So, you’ve got your protein, your carbs, and your veggies. A perfectly balanced meal! Of course, I couldn’t resist throwing some hummus on top of there too😂 Definitely feel free to add some to your bowl as well, along with any other condiments you like:)

Enjoy this awesome bowl!

Curry Marinated Tofu Bowl

Serves: 3

Total Time: 195 minutes

Ingredients:

For the Marinated Tofu:

  • 3 85g blocks of firm or extra firm tofu, thawed from frozen (if using fresh, follow steps to properly press your tofu before hand, and disregard step 1).
  • Juice of 1/2 a lemon
  • 2 tbsp olive oil + 1 tbsp (for cooking)
  • 2 tsp curry powder
  • 1 tsp garlic powder
  • 1 tsp ground coriander
  • 1/2 tsp ground ginger
  • 1 tsp red pepper flakes
  • Salt and pepper to taste

For the Couscous:

  • 1 400ml can of light coconut milk
  • 1 cup of golden couscous
  • Salt and pepper to taste

For the Salad:

  • 1 tomato, diced
  • 1/2 a cucumber, diced
  • 12 black olives, pitted and cut in halves
  • 1/2 a ripe avocado
  • Juice of 1/2 a lemon
  • Salt and pepper to taste

Directions:

  1. Place your blocks of tofu on a flat cutting board lined with paper towel. Use a plate or another cutting board to press down on the tofu and remove any excess water. Repeat a few times until most of the liquid has been pressed out.
  2. Add the tofu to a bag with the rest of the marinating ingredients (except the 1 tbsp of olive oil for frying). Mix everything together in the bag and make sure that the blocks are evenly coated in the marinade. Place the bag in the fridge and let the flavours soak into the tofu for at least 3 hours; go 6-8 if you can.
  3. While the tofu is marinating, bring the can of coconut milk to a boil in a small pot. Add in the couscous, remove from the heat, and stir. Cover the pot and let the couscous stand for 5 minutes, until the milk had been absorbed. Season to taste with salt and pepper, and set aside.
  4. In a medium sized bowl, mash the avocado and add in the rest of the salad ingredients. Mix to combine, then set aside.
  5. Once the tofu is done marinating, remove each block from the bag and cut it in half.
  6. Heat the remaining 1 tbsp of olive oil in a pan over medium heat. Add in the tofu “steaks” and cook until nice and browned, about 3-4 minutes. Flip over and cook on the other side for an additional 4 minutes. Then remove from the heat.
  7. To assemble each bowl, put some couscous on the bottom, followed by some salad, and then finish with two slices of tofu. Top with hummus or another condiment of choice:)

Hope this recipe brightens up your Monday! Have an awesome rest of your week, and I’ll see you on Wednesday with another great recipe:)

Yours Truly,

Olivia:)))