Carrot Oat Cake

Hello! I’ve got another delicious oat recipe for you guys today. I already have a stovetop Carrot Cake Oatmeal recipe up on here, but this recipe is definitely more cake like and is faster to make! It cooks in the microwave- not the oven- because although baked oats are so tasty, I’m waaaaay too impatient to wait for those.

I love love LOVE oats if you couldn’t tell- they’re such a fast, healthy, and filling breakfast. Not to mention that they’re the perfect blank canvas for any delicious flavours you’d like!

I feel like carrot cake is kind of a spring thing, right? People make carrot cake for Easter all the time. We don’t need any justification to enjoy these oats right now though because carrot cake is delicious any time of year. To make this delicious breakfast/snack/dessert, you only need a few ingredients that you for sure already have on hand. And if you don’t then GO PICK THEM UP because this recipe is one you don’t want to miss.

I started by mixing together some grated carrot, apple, oat flour (just blended oats- this really helps with the more cakey texture), baking powder, vanilla, water, and a bunch of great spices together in a lil ramekin. And then BOOM the hardest part is over. The microwave will take over from here. The microwave is so underrated, honestly. It makes oats, SWEET POTATOES, and….. warms up your food. Ok I’m sure there are many uses for it that I haven’t discovered yet but for now, oats and sweet potatoes are enough for me because they’re two of my favourite things.

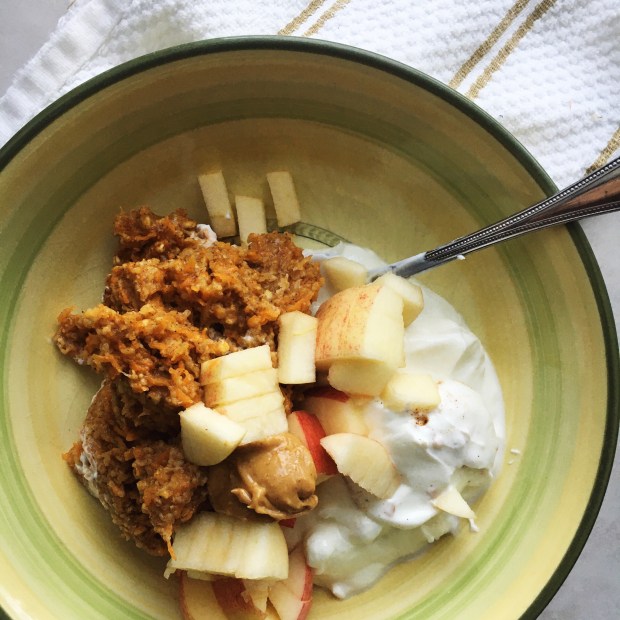
So yeah, two minutes in the microwave and you’ve got a BEAUTIFUL little cake that is perfect as a quick breakfast, a healthy dessert, or a snack anytime you’re craving some carrot cake! I love how the carrot shines through because it’s not too sweet. If you like your carrot cake a bit sweeter though, you can add about a tablespoon of maple syrup. Plus- get creative with some add-ins too! I went very classic with mine, but chopped nuts, raisins, or even pineapple would be very tasty in here. Those things would all be great as toppings too! After I took nice pictures of this I scooped it into a bigger bowl and ate it with lots more yogurt, the rest of the apple, and some peanut butter.

Hope you love this super delicious and quick carrot cake recipe as much as I do!

Yours Truly,

Olivia:))

Carrot Oat Cake

Ingredients

-1/4 cup oat flour (blended oats)

-1 small carrot, grated (about 1/4 cup)

-1/2 an apple, grated

-1/2 tsp cinnamon

-1/4 tsp allspice

-1/4 tsp ground ginger

-1/2 tsp baking powder

-1/4 tsp vanilla

-1/4 cup + 2 tbsp water


Directions

1. Mix together all of the ingredients in a small bowl or ramekin.

2. Microwave on high for 1 1/2-2 minutes, until a cakey texture is reached.

3. Top with yogurt, apples, and more cinnamon and enjoy!


Cactus Cut Sweet Potatoes

Hey guys! I have a SICK recipe for you tonight- these Cactus Cut Sweet Potatoes are here to play. I love the version they have at restaurants, but today we’re baking pies and also using sweet potatoes instead of regular potatoes because sweet potatoes are amazing😍

Sweet potatoes and potatoes are actually pretty similar in nutritional content, but potatoes are higher in potassium while sweet potatoes are higher in vitamin A. So it all comes down to which potato you prefer- and I think you already know which kind of tater has my heart😂

These cactus cut sweet potatoes are get super crisp and delicious in the oven, and are perfectly spiced! They may not look orange to you, but that’s because I used a Japanese sweet potatoe. I actually really like this variety, and they’re a bit smaller which is good for the recipe🙌 But regular ol’ orange sweet potatoes will work just fine as well.

This super tasty snack/side is also very easy to make. Start by truly slicing your sweet potato- I would say to about 1/8 of an inch. The average thickness I got was this:

Although I definitely need to work on my knife skills because my cuts were a lil all over the place😂

Next you’re going to toss your taters in a bag with some olive oil and all those delicious spices that make these cactus cuts shine! Paprika, chilli powder, garlic powder, salt and pepper all make and appearance, and of course you’ve gotta have that cayenne for spice.

The final step before the oven is to lay the sliced potatoes down flat on a parchment lined baking sheet- making sure it’s not too crowded so they have room to reach their full delicious potential! After roasting for 20 minutes, you’re going to flip em and them bake for another 5-10, keeping a close eye on those little suckers so they don’t burn. And then voila! You’ve got some warm, seasoned cactus cut sweet potatoes that are AMAZING with hummus, tzatziki, or just by themselves😍

I love this recipe because it’s perfect for a party (when we can have them) and also for snacking! I also had them as a side with my egg scramble for dinner and they were👌 Hope you enjoy!!

Yours Truly,

Olivia:))

Cactus Cut Sweet Potatoes

Ingredients

-1 small japanese or regular sweet potato, cut into 1/8 inch slices

-2 tsp olive oil

-1 tsp paprkia

-1/2 tsp chilli powder

-1/2 tsp garlic powder

-1/4 tsp cayenne powder

-Salt and pepper to taste


Directions

1. Preheat your oven to 400 degrees Fahrenheit.

2. Add the sliced sweet potatoes into a large ziploc bag with the rest of the ingredients. Shake everything up until the potatoes are coated with the oil and the spices.

3. Lay each slice on a parchment lined baking sheet, being careful not to over-crowd the pan. Place them in the oven for 20 minutes.

4. Remove the pan from the oven and flip over all of the potatoes with a fork. Place them back in the oven for 5-10 more minutes, until crispy and cooked through, watching to make sure they don’t burn.

5. Remove the potatoes from the the oven, let cool slightly and enjoy!


Flourless Chocolate Muffins

Hey there guys! Everyone loves chocolate, and today I’ve got a quick and easy chocolate muffin recipe that is FLOURLESS, REFINED SUGAR FREE and VERY TASTY.

I tried to pack as much protein into these as I could, without using protein powder, because I know sometimes I don’t have access to it and I wanted to make sure that both you and I could make these with minimal ingredients. So I turned to one of my favourite, super versatile ingredients- chickpeas! They’re full of protein and give the density to these muffins that is otherwise missing because of the lack of flour. I promise that you can’t taste them in there at all- much like in my Healthy Edible Cookie Dough. All you get is an amazing, chocolate-y flavour in a cute and fluffy mini muffin.

The other simple ingredients in this tasty snack include cocoa powder, egg, baking powder, peanut butter (yum), vanilla and banana. Everything gets tossed into the blender and combined until a smooth batter forms. I greased up my mini muffin pans with a bit of coconut oil, filled them up, and baked for about 15-20 minutes. So these muffins are not only healthy, but quick and easy to make too!

I love this recipe because it’s soooooo delicious and makes the perfect snack, quick breakfast, or healthy dessert. The chickpeas worked perfectly as a kind of flour substitute- I definitely want to play around with that some more! Don’t be scared away by them though- they give a great texture but have no effect on the taste.

Hope you enjoy this delicious recipe!

Yours Truly,

Olivia:))

Flourless Chocolate Muffins

  • Servings: Makes 18 Mini Muffins
  • Print

Ingredients

-3/4 cup canned chickpeas, drained and rinsed

-1 ripe banana

-3 tbsp cocoa powder

-1 tsp vanilla

-1 tsp baking powder

-1 egg

-1 tbsp peanut butter


Directions

1. Preheat your oven to 350 degrees Fahrenheit.

2. Add all of the ingredients to a blender or food processor and combine to form a smooth batter.

3. Grease 18 mini muffin cups with a little bit of coconut oil and fill them 3/4 of the way with batter. Bake the muffins for 15-20 minutes, until a toothpick comes out clean.

4. Remove from the oven and let cool completely before you enjoy.


Vanilla Protein Waffles

Just posted these super delicious Quick and Easy Banana Pancakes not too long ago, so I thought I should probably get a waffle recipe up here, because I know lots of people love waffles more than pancakes. Personally, I can’t decide! I love both pancakes and waffles- and I wouldn’t say not to either of these delicious recipes.

These Protein Waffles only require a few ingredients, are SO TASTY, and are, of course, full of protein. I recently got my hands on some protein powder for the first time in a little while, and so I’m so excited to use it! It makes my smoothie bowls and oats super creamy, and also is a great addition to pancakes, muffins, other baked goods, and these waffles. Protein is important for recovery after working out, building muscle, and just keeping your body functioning. The one I used is vegan, but there are many different kinds out there! If you’re looking for more info you can find it here. Adding protein like this at breakfast is a great way to start your day and fill you up! Eggs and Greek yogurt are also great sources of breakfast protein, but when you want to switch it up a bit, protein powder can be delicious. Especially in WAFFLE FORM.

All of the batter ingredients get mixed up in one bowl for the least amount of dishes possible (you’re welcome), and then simply poured into a waffle iron. Make sure that you spray your iron with a bit of cooking oil before adding the batter, so that you can remove your waffles as easy as possible! I forgot to spray the top of mine and had a bit of trouble- that’s why I’m here, so you can learn from my mistakes. My waffles were in the iron for about 2 minutes, and got nice and golden brown on the outside, and super fluffy on the inside!

I used vanilla protein powder in this recipe, because I love the flavour that it lends. But if all you have is another flavour- like chocolate- feel free to try it out! Chocolate waffles would also be very tasty.

After removing these beautiful waffles from the iron, I topped them with a dollop of Greek yogurt, some sliced strawberries, and a drizzle of peanut butter. SO. DANG. GOOD. This recipe makes 1 serving, or about 2 waffles, but if you want to share this amazingness, go ahead and double it. I did not want to share.

I hope you enjoy these Vanilla Protein Waffles! There are so many occasions to enjoy them- whether it’s breakfast on a Saturday morning, a nice Valentine’s Day brunch, or a delicious snack. Making a big batch and freezing them for weekday mornings is a great idea as well! Way better than Eggos:) Also- don’t forget to let me know if you prefer pancakes or waffles in the comments!

Yours Truly,

Olivia:)))

Vanilla Protein Waffles

  • Servings: 1
  • Print

Ingredients

-1 scoop (34g) vanilla protein powder

-1/2 a ripe banana

-1 egg

-2 tbsp almond milk

-1/2 tsp baking powder

-1/4 tsp cinnamon

-cooking spray


Directions

1. Heat up your waffle iron.

2. Mash the banana in a small bowl. Whisk in the egg, and then add in the remaining ingredients (except for the cooking spray).

3. Spray the top and bottom of your waffle iron with the cooking spray. Scoop the waffle batter into the iron to fill 2 of the waffle moulds.

4. Clamp down the waffle iron and cook your waffles for about 2 minutes, until golden brown.

5. Carefully use a for to pry your waffles out of the iron, and serve warm with your favourite toppings.


Baked Egg Cups

I love my eggs! I usually have a couple for either breakfast or lunch to get in that protein and all those amazing omega-3s. My preferred egg cooking methods are scrambling and boiling- but that can be a problem during busy mornings. And so I present you with these amazing Baked Egg Cups!

They’re cute little bites of breakfast goodness, and are super easy to take to-go! Just grab a couple of these on your way out the door along with some toast, and you’ve got a balanced and filling breakfasts. These would also be great in a bowl or salad, or wrap for meal prep! And of course, when you want a high protein snack, these egg cups have got your back.

Ok, so it’s the weekend and you are MEAL PREPPING because that’s how you roll. And while you’re whipping up a bunch of delicious food, why not throw these egg cups into the mix? Start by sauteeing some diced onion and black beans in a little olive oil, until those onions get soft and a little brown. Next you’re going to remove that from the heat and mix in some diced tomatoes, and scoop a little bit of this veggie mixture into each cup of some mini muffin tins! So cute:)) Fill the tins with some perfectly seasoned whisked egg and throw them in the oven for 10-12 minutes, and you’ve got yourself breakfast and snacks for the whole week!

These Baked Egg Cups are so tasty- those onions and tomatoes give a lot of flavour. Plus, those black beans add a bit more heartiness and some additional protein! Dipping these in salsa or making a breakfast burrito out of them would be so good!

You can store them in the fridge if you’re going to eat them all throughout the week, but you can also throw them in a Ziploc bag and freeze them for whenever you need! Just throw them in the microwave for 1-2 minutes before devouring.

Hopefully these lil egg cups help you with your breakfast meal prepping! Enjoy:)

Yours Truly,

Olivia:))

Baked Egg Cups

  • Servings: Makes 18 Mini Egg Cups
  • Print

Ingredients

-1 tsp olive oil

-1/4 of a white onion, diced

-1/2 cup canned black beans, drained and rinsed

-1/2 a tomato, diced

-5 eggs

-Salt and pepper to taste

-Cooking spray or a bit more olive oil to grease the muffin tins.


Directions

1. Heat the olive oil over medium heat in a pan. Add in the onions and black beans, and cook until the onions are translucent and slightly browned, about 4-5 minutes. Season with salt and pepper.

2. Preheat your oven to 350 degrees Fahrenheit.

3. Remove the pan from the heat and stir in the diced tomatoes. Spray two mini muffin tins lightly with the cooking spray, or grease each tin with some olive oil.

4. In a bowl, whisk together the eggs and season generously with salt and pepper.

5. Scoop about a 1/2 tbsp of the bean, onion and tomato mixture into each mini muffin cup. Cover the mixture with the beaten eggs, filling the mini muffin cups almost to the top.

6. Place the muffin tins in the oven and bake the egg cups for about 10-12 minutes, until they appear solid.

7. Remove from the oven, and let cool completely before eating or freezing.