Coconut Curried Vegetable Rice

Hi friends! It seems that there’s a theme running through my recipes this week, and that theme is SIMPLE DELICIOUSNESS. Maybe you don’t think of curry being that simple. But guess what, this one is. We’re making good use of the stuff you’re already got in your spice cupboard and pantry and we’re making it into something super tasty.

I wanted to make some sort of curry paste for this, but I didn’t have many of the traditional curry paste ingredients. So I made my own take on a curry paste, using common ingredients that I DID have. We’re talking chilli powder, ground ginger, soy sauce, basil, curry powder, lemon juice, and a bunch of other good stuff. I like the concept of this paste because if you don’t want to make curry out of it right away, you can put it in the fridge for a few days until you’re ready to use it.

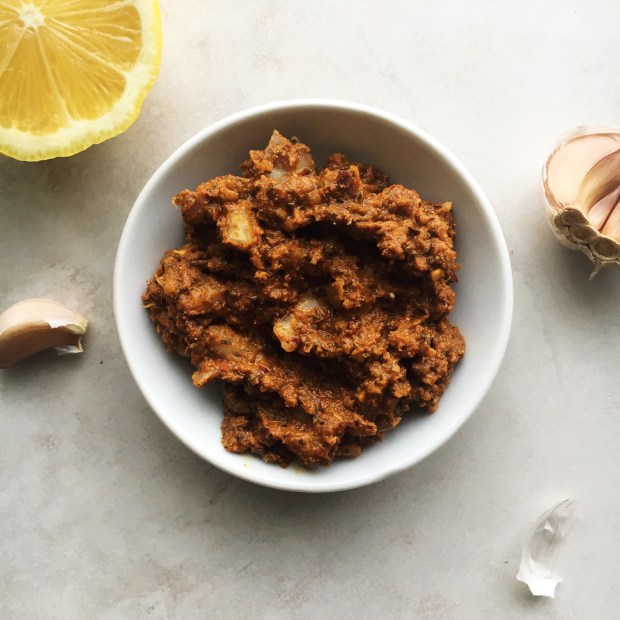
It’s also great because it acts as your flavour bomb for the whole curry! All of the spices and flavour you need for the whole dish is found in it, making for a super easy single application of amazingness.

All of the veggies in this dish really sing too. I love a good rainbow in my curries, and almost any veggie would work in here, so feel free to do some substituting with what you have and what you like. I personally found my own heavenly combo of mushrooms, onions, bok choy, red peppers, and carrots to be very nice.

The vegetables get cooked down together in some coconut oil, then sauteed a bit more when the curry paste is added, and then everything simmers together in some coconut milk. To make this heartier and more of a one-pot meal, I thought, why not add in some rice? So brown rice gets thrown in too and cooked in all of the delicious flavours.

Once this curry is done, your house will definitely smell really good and you’ll have a few meals worth of awesome curry rice stocked up in your fridge. I love how flavourful this is, and how it has just the perfect amount of spice! Plus, it goes great with any protein you choose to add, and is so hearty and comforting.

Hope you enjoy!

Coconut Curried Vegetable Rice

Serves: 3-4

Total Time: 70 minutes

Ingredients:

For the Curry Paste:

  • 1/2 tbsp chilli powder
  • 1/2 tbsp ground cumin
  • 1 tbsp ground ginger
  • 1 tsp dried basil
  • 1 tsp crushed red pepper flakes
  • 1 tsp curry powder
  • 1 tbsp soy sauce
  • Juice of 1/2 a lemon
  • 3 cloves of garlic, minced
  • 1/4 of a white onion, diced

For the Coconut Curried Vegetable Rice:

  • 1 1/2 tbsp coconut oil
  • 1/4 of a white onion, sliced
  • 1 red pepper, sliced
  • 1 large carrot, peeled and chopped
  • 4 white mushrooms, sliced
  • 8 stalks of baby bok choy, cut into halves
  • 1 serving of Curry Paste (above)
  • 1 400ml can of coconut milk
  • 2/3 cup brown rice
  • Salt and pepper to taste

Directions:

  1. To make the Curry Paste, combine all of the curry paste ingredients in a blender or food processor until a paste-like consistency is reached. Don’t worry about small chunks of onion; these will be cooked in with the curry. Use immediately to make Coconut Curried Vegetable Rice or store in the fridge for up to 3 days before using.
  2. Heat the coconut oil in a large, deep skillet. Add in all of the veggies for the curry and cook until the onion is translucent and the peppers are beginning to soften, about 6-8 minutes.
  3. Add the curry paste to the pan and sautee for another 2 minutes.
  4. Dump the coconut milk into the pan and give everything a good stir to combine. Season generously with salt and pepper, and stir in the brown rice.
  5. Bring the contents of the pan to a simmer and turn the heat to low, covering the pan and letting the curry cook for 35-40 minutes, until the rice is completely cooked through.
  6. Remove the pan from the heat season more to taste with salt and pepper, serve warm and enjoy!

I love this recipe so much and I hope you guys do too! See you Friday:))

Yours Truly,

Olivia;))

Fresh Baked Falafel

Hey guys! Welcome to my first recipe of 2021- I wanted to start the year off right and this recipe is SO GOOD. We’re making amazing homemade falafels that are packed with flavour and are super healthy too! All you’ve gotta so is follow three simple steps; blend, shape, then bake, and you can be poppin’ these bites of deliciousness into your very own mouth.

First off- blend! You’ve heard of a one bowl recipe, but have you ever heard of a no bowl recipe? Probably not until now, but that’s right- this recipe calls for no bowl and only one blender or food processor. All of the fresh and amazing ingredients for our falafels are being thrown in there and simply combined until a nice, even consistency is reached. I didn’t call these FRESH Baked Falafel just for fun either. We’ve got fresh parsley, freshly squeezed lemon juice, minced garlic, chopped onion, and so many other ingredients to make these chickpea nuggets come to life! I also used some oat flour to bind everything together, but if you prefer to use another kind of flour you can go ahead.

Step two- shape! I got out a little spoon, scooped tablespoon sized amounts of falafel mixture into my hands, and formed them into flat patties. This shape is the best for baking because the outsides get nice and browned while the inside still cooks all the way through. This step is pretty straight forward, and also fun and kind of messy.

Finally- bake! These babes bake for fifteen minutes on one side, then get flipped and bake for another fifteen. The result is a golden brown, toasty falafel that is amazing on or in just about anything. Bowls, salads, wraps, sandwiches; you name it, these will take it up a notch. I recommend making a double or triple batch, freezing them, and pulling them out when you want something fast and tasty.

Hope you enjoy these amazing Fresh Baked Falafels!! Let me know how they turn out when you give this recipe a try:)

Fresh Baked Falafel

Serves: Makes 9-10 Falafels

Total Time: 50 minutes

Ingredients:

  • 1 can of chickpeas, drained and rinsed
  • 1/2 cup fresh parsley
  • 1/4 cup oat flour
  • 1/2 a white onion, chopped
  • 2 cloves of garlic, minced
  • 1/2 tbsp tahini
  • 1 tbsp lemon juice
  • Salt and pepper to taste

Directions:

  1. Preheat your oven to 400 degrees Fahrenheit.
  2. Add all of the falafel ingredients to a blender or food processor and blend until everything is completely combined.
  3. Scoop the mixture out from the blender by tablespoon fulls and form into discs about 1/4 inch thick. Spread them out on a parchment lined baking sheet.
  4. Place the falafels in the oven and bake for 15 minutes. At this point, remove the pan, flip the falafels, and then place them back in the oven to bake for another 15 minutes.
  5. Take the falafels out of the oven, let them cool, and enjoy in bowls, salads, wraps, or sandwiches, or just dip in hummus.

Have fun making and eating these Falafels! See you guys Wednesday with another great recipe:)

Yours Truly,

Olivia:)))

Candied Walnut Popcorn

MERRY CHRISTMAS!!!! Hope you’re all having an amazing day so far! I know this Christmas looks a little different than past years, but hopefully you guys can find some way to hang out with family, whether it be virtually or with a small, socially distant group in person.

For a fun and festive Christmas recipe, I thought I’d share a delicious popcorn mix! It’s a quick and easy recipe that you can whip up while celebrating the holiday. The walnuts are beautifully candied in some maple syrup on the stove, making them tender and sweet, balancing perfectly with the salted popcorn! I also threw some cinnamon in there for some extra Christmas flavour.

Also, we’re making our popcorn from scratch! Of course, you can use pre-made popcorn if you want to speed things up even more, but making your own is surprisingly easy and healthier. You’ve just got to heat up the oil, toss in the kernels, and listen to them pop! Plus you can season to your own taste with salt.

I’m going to keep this post short today so you can get straight to the recipe and go back to making holiday memories! I hope you enjoy this recipe and have a great rest of your day:)

Candied Walnut Popcorn

Serves: 4

Total Time: 20 minutes

Ingredients:

  • 2 tbsp coconut oil
  • 1/3 cup popcorn kernels
  • 1 1/2 cups walnuts
  • 2 tbsp maple syrup
  • 1/2 tsp cinnamon + more to taste
  • Salt to taste

Directions:

  1. Heat the coconut oil in a large pot over medium-low heat.
  2. Add in the popcorn kernels to the pot, and put on the lid, leaving it slightly ajar so that the steam can escape. Listen to the kernels pop! When the popping slows, remove the pot from the heat.
  3. Season the popcorn to taste with salt.
  4. In a small pot, combine the walnuts and maple syrup. Put the pot on the stove over medium-low heat, and wait for the maple syrup to come to a slight simmer. Keep stirring the walnuts and maple until the maple syrup begins to caramelize and turns into a sticky coating on the walnuts, about 3-5 minutes.
  5. Take the pot off of the heat and let the candied walnuts cool for about 2 minutes before adding them to the popcorn. Mix everything up and season to taste with some more salt and cinnamon.
  6. Enjoy!!

Merry Christmas and I’ll see you soon with my 2021 Bullet Journal Set-Up! I’m so excited:))

Yours Truly,

Olivia:)))

Smoky Roasted Cauliflower Steaks

‘Sup guys! I’ve done a lot of sweet Christmas recipes so far, but today I have some Smoky Roasted Cauliflower Steaks that are a GREAT vegetarian main or side dish for your Christmas dinner. I also threw some mushrooms on the pan to toast with the steaks because mushrooms are so tasty and remind me of the holidays!

The concept of a cauliflower steak is a thick slab of cauliflower seared or roasted so that it is reminiscent of a steak. I actually love steaks- I’m not vegan or vegetarian, but I love veggies too, and these “steaks” are just so good and perfect for switching it up once and a while.

In this recipe, I amped up the meatiness of the cauliflower by using liquid smoke in the marinade!! My family and I made some homemade beef jerky the other week (it was so good I highly recommend), and an ingredient in the marinade was liquid smoke. It gave it such a good flavour! So I thought, why not add it to my cauliflower? And it worked its magic there too. Liquid smoke is used in a variety of vegan and vegetarian recipes because it does give that savoury, meaty flavour, so it’s worth picking some up. Also in the marinade, we have balsamic, garlic, and a bunch of spices that all work together to create a ziploc bag full of deliciousness😂

I marinaded the steaks for 4 hours- flipping the bag halfway through to make sure that everything got coated evenly. This made the cauliflower so flavourful! I then placed the steaks on a sheet pan in the oven, but not before tossing some sliced mushrooms in the leftover marinade and throwing them on the pan as well.

Everything roasts up SO nicely in the oven, getting crispy and tender and steak-like! These steaks, along with the mushrooms, would be great alongside some mashed potatoes (or sweet potatoes), more roasted veggies, and maybe some vegetable gravy! They’re super tasty and have a wonderful texture.

Hope you enjoy this vegan holiday dish!

Smoky Roasted Cauliflower Steaks

Serves: 3

Total Time: 5 hours

Ingredients:

For the Steaks and Mushrooms:

  • 1/2 a head of cauliflower, washed and cut lengthwise into about 3/4 inch slabs
  • 5-6 white mushrooms, sliced
  • Sprinkle of dried oregano and dried rosemary
  • Salt and pepper to taste

For the Marinade:

  • 1/4 cup balsamic vinegar
  • 1/2 tsp maple syrup
  • 1/4 tsp liquid smoke
  • 1/2 tsp salt
  • 1 tsp garlic powder
  • 1/2 tsp paprika
  • 1/4 tsp ground pepper
  • Red chilli flakes to taste

Directions:

  1. Combine all of the marinade ingredients in a large resealable bag. Add in the cauliflower steaks and place in the fridge for 4 hours, flipping over the bag halfway through to make sure that the marinade gets to every part of the veggies.
  2. Once the 4 hours are up, preheat your oven to 400 degrees Fahrenheit. Remove the steaks from the marinade and place them on a parchment lined baking sheet.
  3. Toss the sliced mushrooms in the remaining marinade, and then place them on the baking sheet as well. Sprinkle some dried rosemary, oregano, salt and pepper over everything, throw the pan in the oven and roast for 35-40 minutes, until the cauliflower is tender.
  4. Remove the pan from the oven and serves the mushrooms and cauliflower warm.
  5. Enjoy!

Hope you’re all having a wonderful Christmas-week so far! I’ll see you on Wednesday with another holiday recipe🥰

Yours Truly,

Olivia:)))

Chocolate Tahini Snowballs

Hey guys! There’s only a week until Christmas time and I’m so ready! I’ve been thinking about how I’m going to wrap my gifts and make them all pretty and it just brings me joy. And you know what else brings me joy? These Chocolate Tahini Snowballs!! They’re super cute and are a great addition to your spread of holiday baking.

I think that bite-sized desserts are honestly the best, because how else are you going to sample all those delicious holiday treats? These Snowballs are the perfect size and are absolutely stunning. They’re rolled in coconut just before baking to give that snowball effect, but the coconut adds so much to the flavour and texture as well. So yum! When you pick up these snowballs, they feel pretty hefty, and so it seems like they’re going to be dense and dry. But when you bite into them you get a warm, fudgy inside that is to die for! The tahini gives such a nice rich and nutty flavour, contrasting the chocolate perfectly. And these little bundles of joy deliver all this while being vegan, oil free, and refined sugar free!

I love how simple these are to make too:)) I started by mixing all of the ingredients together in a big bowl, and then rolling out little balls, covering them with coconut, and baking them for just fifteen minutes!! The recipe can easily be doubled if you want double the chocolate-y deliciousness, and why wouldn’t you? So yeah, these are amazing if you need a festive recipe in a pinch, or are just looking for a quick and healthy dessert to satisfy your sweet tooth. They would be great next to some of my Ginger Oat Cookies– just sayin.

I hop you enjoy these bite-sized holiday treats! They’re so fun to make and to eat:))

Chocolate Tahini Snowballs

Serves: Makes about 10 Snowballs

Total Time: 25 minutes

Ingredients:

  • 1/2 cup oat flour (blended oats)
  • 1/2 cup rolled oats
  • 1/3 cup cocoa powder (I used organic)
  • 1/4 cup tahini
  • 3 tbsp maple syrup
  • 1 tsp vanilla extract
  • 2 tbsp almond milk
  • 1/4 cup unsweetened desiccated coconut

Directions:

  1. Preheat your oven to 350 degrees Fahrenheit.
  2. Mix all of the ingredients, except for the coconut, together in a large bowl.
  3. Scoop out tablespoon fulls of the mixture and roll into balls using your hands.
  4. Dump the coconut onto a small plate, and roll the balls around in it until they are completely covered.
  5. Place the snowballs on a parchment lined baking sheet and bake for 15 minutes.
  6. Remove from the oven, let cool and enjoy!!

Make sure you come back for more delicious holiday recipes next week!!!

Yours Truly,

Olivia:))))