Posts

Bullet Journaling Supplies

Hi guys! Today I wanted to share the supplies I use for bullet journaling. I’ve mentioned in all of my bullet journaling posts that you don’t need any special equipment to start bullet journaling; just a journal and a pen. But these are all of the supplies I use to journal, as I feel that they are some of the basics and have served me well so far!


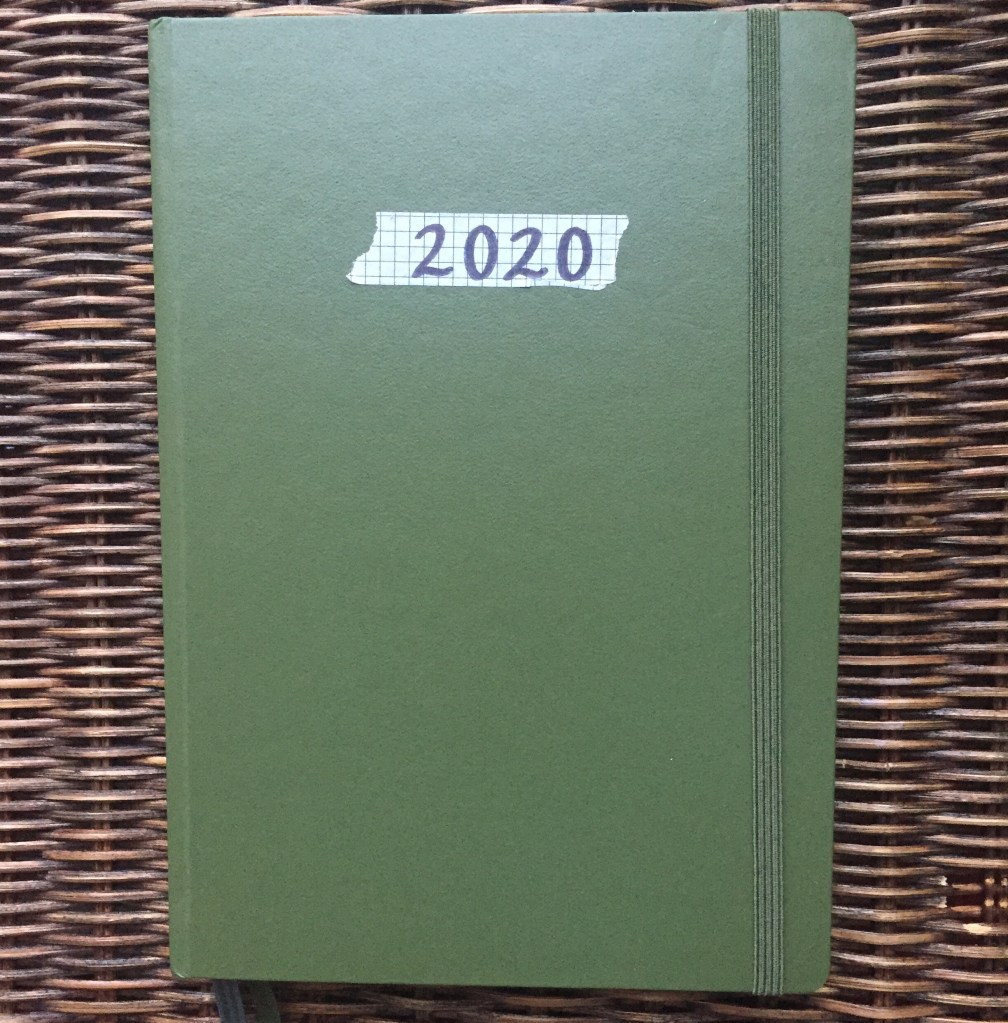
Let’s start with my journal;) I’m currently using the Leuchttrum 1917, which I used last year as well. It’s a great size, and has a back pocket. I also love the number of pages it has- 251- which means I get a lot of pages to use per month! This is a great journal for when you’re first starting out as well, as it’s only around $25.

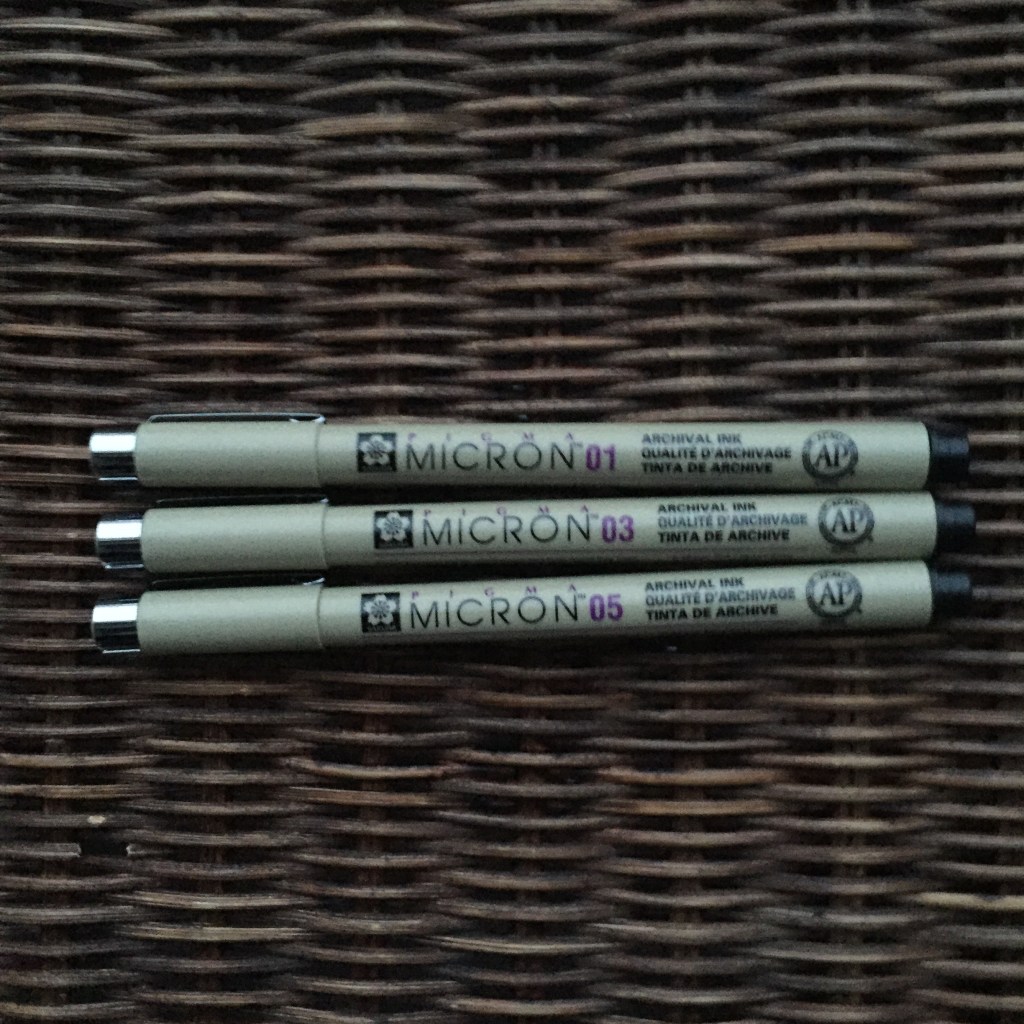
Next up are the fine liners that I use. These are great for outlining things, lettering and drawing borders for calendars and other spreads. I got mine in a three pack; one has a 0.1 mm tip, one has a 0.3 mm tip, and one has a 0.5 mm tip. I get about a year of use out of each set, so they’re great quality;)

Here are the brush pens that I use- I’d say that these are my most important pens. They’re the perfect size for a bullet journal, and can be used for so many different kinds of lettering! One is hard tipped and one is soft tipped, so you can choose the one that you prefer while doing calligraphy.

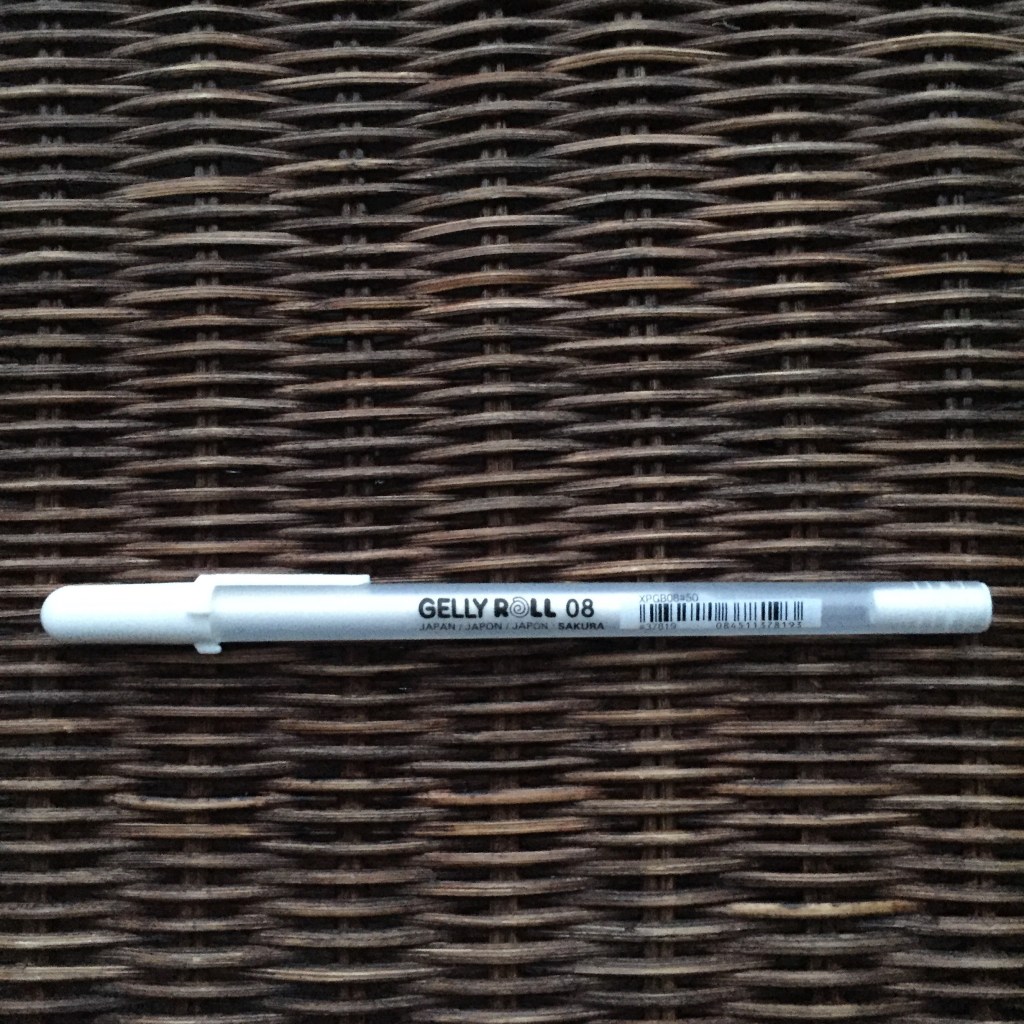
I got this white gel pen over Christmas! It’s not necessary, but I really love it because it’s great for drop shadows and looks amazing over a black background. I used it in my 2020 set up a lot.

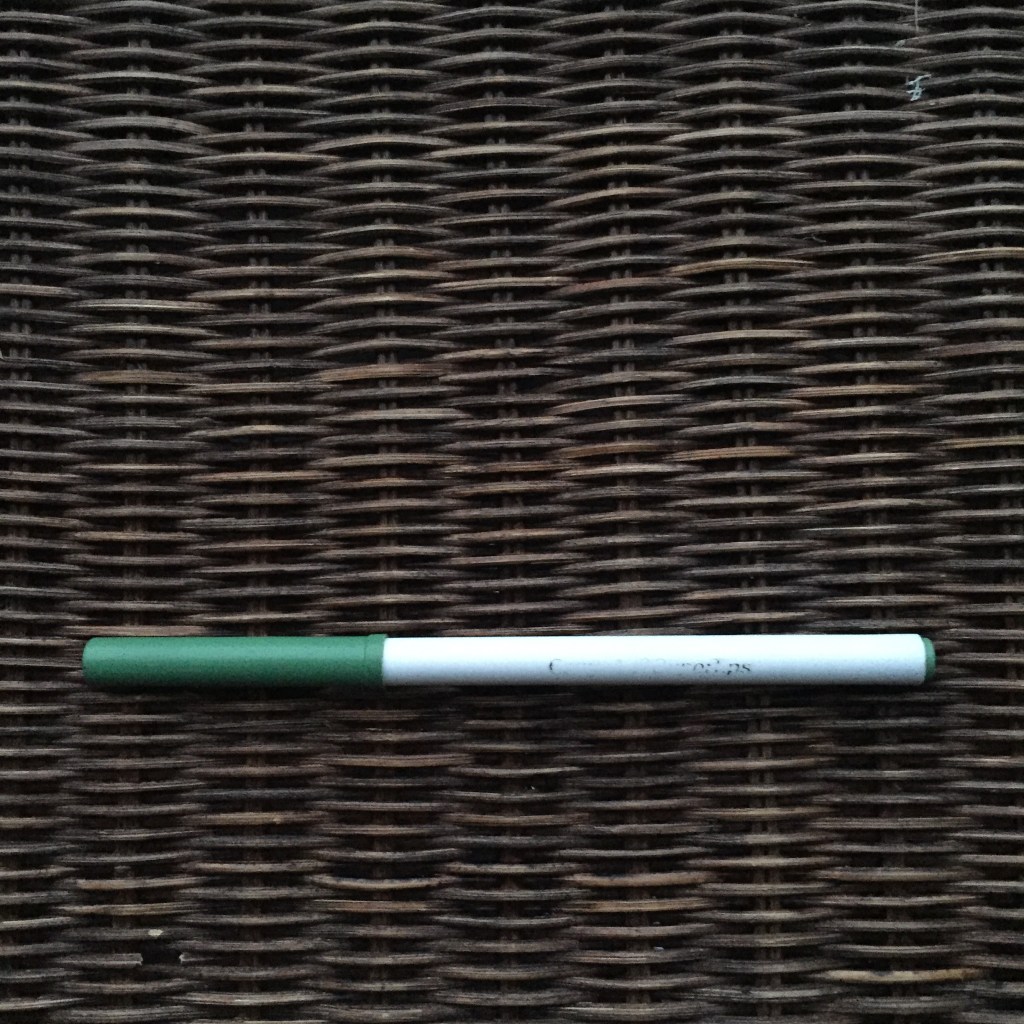
These Crayola Super Tips are some other markers that I use quite a bit. They’re cheap and are so versatile; they can be used for calligraphy, colouring and outlining.

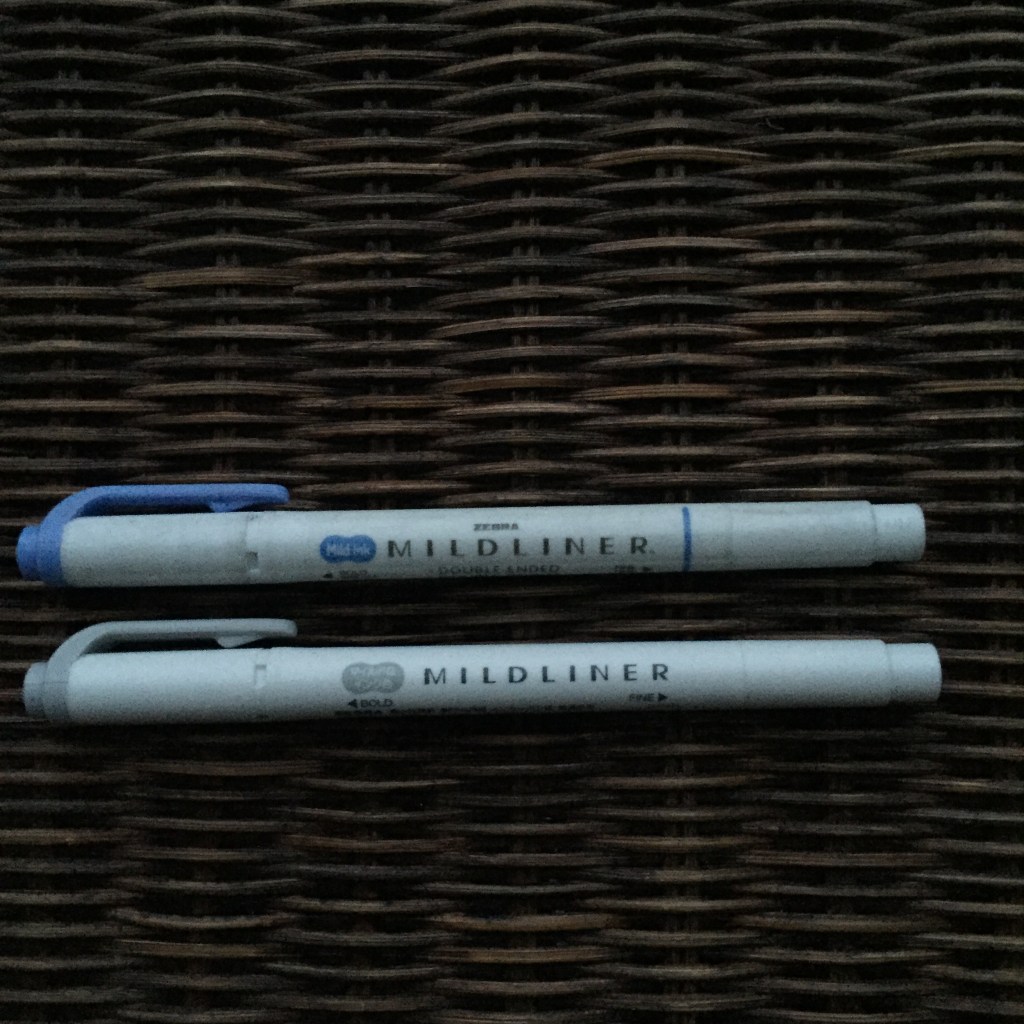
These Zebra Mildliners are useful, but I don’t use them as often as some of my other supplies. They work well for highlighting and sometimes lettering.

I have lots of gel pens that I use also! Mostly for colour coding my tasks, but this month I’m using this gold gel pen a lot.

I recently started using this glue-tape and I love it- it’s super convenient for gluing things down in your journal. I also love washi tapes. This black and white one is my favourite!

That’s all of my favourite supplies! Most of it can be found on Amazon, and isn’t too expensive. See you on Wednesday!

Yours Truly,

MyDayIsBooked;)

Apple Pie

Hi guys! There’s nothing better to end off the week than a nice slice of Apple Pie, and that’s just what I made today. This Pie has a super easy to make crust, a delicious, cinnamony filling, and is no bake!!! There’s no refined sugar in it either, and is healthy so you can feel good about eating it. Don’t get me wrong though; this Pie is SUPER tasty, especially when it comes to the filling. Hope you enjoy!!

Apple Pie

Serves: Makes 1 9-inch pie

Total Time: 45 minutes

Ingredients:

For the crust:

  • 2 1/2 cups oat flour
  • 1/2 cup coconut oil
  • 1 tsp vanilla
  • 2 tbs maple syrup
  • 1/3 cup water

For the filling:

  • 3 medium apples, diced
  • 1 tbs cinnamon
  • 1/2 tbs vanilla
  • 1 cup water
  • 1 tbs oat flour

Directions:

  1. In a large bowl, combine the crust ingredients until a dough forms. Press the mixture into the bottom of a 9-inch pie plate, taking a little bit out if the crust is too thick. Cover with plastic wrap and place in the freezer for 15 minutes, then place in the fridge.
  2. In a pot, add in the apples, cinnamon, vanilla and water. Bring to a boil and then reduce to a simmer. Let the filling cook for 10-15 minutes until the apples are soft and any remaining liquid is syrupy. Add in the oat flour and cook for another 2 minutes, then remove from the heat.
  3. Let the filling cool, then spread it in an even layer on the crust. Cover with plastic wrap again and place in the fridge to cool completely before eating.
  4. Enjoy!

This Pie is just what you need to snuggle up by the fire with on those cold winter nights;) Have a great weekend everyone!

Yours Truly,

MyDayIsBooked:)))

2020 Reading Challenge

Hi guys! Hope your week is going well- mine feels really long but I guess that’s to be expected of the first week back. So far I’ve been sticking to my resolution of making my lunch the night before, so that’s made it a bit easier.

A new year is upon us, and that means that there are so many more new books to read! But, if you’re like me, it can be hard to branch out and read different genres and types of books. So this year I decided to set a Reading challenge for myself. There are twenty requirements for the books I need to read this year, which I have outlined in my bullet journal. Once I fulfill one of these requirements I’ll write down which book I read to meet it underneath. These are things like “written in the 1920s”, or “about food”.

I think that this will be a really fun and interesting way to challenge myself to read different kinds of books this year! Down below I have the full challenge.

2020 Reading Challenge

Read at least one book that….

  • Was written in the 1920s
  • Was released in 2020
  • Has less than 200 pages
  • Takes place during a war
  • Has a colour in the title
  • Has been banned previously
  • Was written by an author in their 20s
  • Has 20 or “twenty” in the title
  • Is set in Asia
  • Is becoming a movie in 2020
  • Has more than 500 pages
  • Is translated from another language
  • Was published in your birth year
  • Has more than 20 letters in the title
  • Has a bird on the cover
  • Is about food
  • Is about philosophy
  • Was written by a Canadian author
  • Was written by an author who has written more than 20 books
  • Is non-fiction

There’s the list! I recommend that you write it down somewhere and fill in the book you read to complete each item, so that you can look back on it at the end of the year.

See you with another recipe on Friday!

Yours Truly,

MyDayIsBooked;))

Stuffed Mushrooms

Hi guys! I’m back at school again, and back to making lunches. On my Instagram story you can see what I’m eating for lunch each day, which will hopefully give you some inspiration. I’d also like to do some more lunch recipes in the future;)

Today, however, I’d like to feature one of my favourite veggies: Mushrooms!! I love mushrooms so much- they have a great earthy and deep flavour that is rich and delicious. They’re great any way you prepare them; sautéed, roasted, fried, or even raw with some hummus! I have a tasty stuffed mushroom recipe for you guys that also packs in some protein because it uses soft tofu in the stuffing. If you’re new to using tofu or would like to learn more about it, I give sort of the run down on this soy protein in my previous post, Soy Marinated Tofu.

From the sautéed onion to the splash of balsamic vinegar and fresh thyme, everything about these mushrooms screams homey deliciousness! Hope you enjoy;)))

Stuffed Mushrooms

Serves: 3-4

Total Time: 50 minutes

Ingredients:

  • 1 tbs olive oil
  • 1/4 of a large onion, diced
  • 1 clove of garlic, minced
  • 12 medium sized white mushrooms
  • 1 tsp dried Thyme leaves (or 1/2 tsp ground thyme)
  • 2 tbs balsamic vinegar
  • 1 block (85g) soft tofu
  • Salt and pepper to taste

Directions:

  1. Wash the mushrooms and remove the stems by gently pulling them out. Set the mushroom caps aside and dice the stems.
  2. In a small bowl, mash the soft tofu until it resembles cottage cheese. Set aside.
  3. Heat the olive oil in a pan over medium heat. Add in the onion and cook until translucent, about 6 minutes. Add in the garlic and mushroom stems, and cook for an additional 2 minutes.
  4. Pour in the balsamic vinegar and add in the thyme. Let the mixture cook for about 4 more minutes, until most of the liquid has cooked off.
  5. Add in the soft tofu and stir, combining all of the ingredients before letting them cook for an additional 4 minutes, then remove from the heat and season with salt and pepper.
  6. Preheat your oven to 400 degrees Fahrenheit.
  7. Place the hollow mushroom caps on a parchment lined baking sheet. Scoop about a teaspoon of filling into each.
  8. Place in the oven and bake for 20 minutes.
  9. Enjoy!!

Have a great week everyone!

Yours Truly,

MyDayIsBooked;)

Soy Marinated Tofu

Hey there! This year I’d like to start eating more plant-based, and exploring different kinds of plant protein. Although everything that I post on MyDayIsBooked is usually vegan, I’m not a vegan or vegetarian myself.

I feel like tofu is a little intimidating to a lot of people, because it’s not something that they cook very often. I cooked it for the first time a few weeks ago, and it’s actually super easy and delicious! In this post I’ll give you the run down on how to cook tofu, plus an awesome marinade to get you started.

Tofu

Tofu is a plant-based protein source made from soy beans. The varieties of firmness range from silken to extra firm. Silken and soft tofu are usually blended up in desserts, and medium to extra firm are used fried, sautéed, baked or steamed. This is because the firmer types stand up better to marinades and being cut into cubes and cooked. Pressing tofu is a common technique that gets rid of extra water in the tofu, letting you achieve a crispier texture. If you’d like to press your tofu, place a block of it on a folded dish towel on a sheet pan, and place another folded dish towel on top. On top of that dish towel, put something heavy such as a book or pan weighted with cans. Leave the tofu to be pressed for about a half an hour. The recipe in this post does not call for you to press your tofu, and it is by no means necessary.

Soy-Marinated Tofu

Serves: 2

Total Time: 40 minutes +

Ingredients:

  • 1 175g block of extra firm tofu
  • 1 tbs olive oil
  • 1/4 cup soy sauce
  • Juice of 1/2 a lime
  • 1 clove of garlic, smashed

Directions:

  1. Cut a slit in the package of tofu and drain all of the water out. Remove the block from the package and cuto it into one centimetre cubes. Place them in a large ziplock bag.
  2. Add the soy sauce, lime juice, and garlic into the bag. Squeeze all of the air out and then seal, giving it a shake to combine the soy and lime juice, then placing it in the fridge for at least thirty minutes, and up 4 hours.
  3. When the tofu is finished marinating, heat the olive oil in a pan over medium heat. Pour the marinade form the bag into a bowl, and dump the cubes of tofu into the pan. Cook until slightly browned on each side; about 1-2 minutes per side.
  4. Eat in a bowl with quinoa, in wraps, or in a stir fry, and use the leftover marinade as a sauce. I ate mine in a bowl with sprouts, avocado, roasted sweet potato, quinoa and kimchi;)

I hope that was helpful and that you’ll try tofu sometime!

Yours Truly,

MyDayIsBooked;))