Hey there! This is going to be a heavy week for posting because I have so much to share with you guys before the new year! I think I’m going to have something coming out that’s either book-related or bullet journal related very day so stay tuned. Yesterday I posted my 2021 Bullet Journal Set-Up which turned out so great; make sure to check it out! Today we’re going over my reading challenge for the year, which is probably one of the most fun pages in my journal.
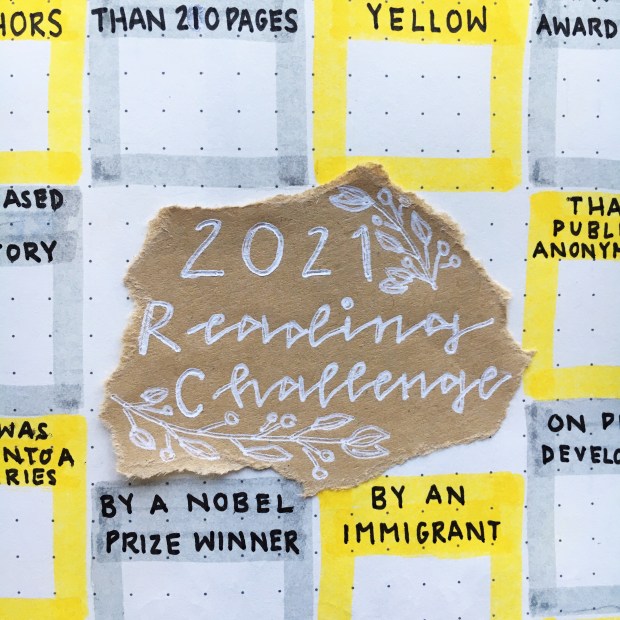
I started doing this reading challenge thing last year, and I’m IN LOVE with it! Unfortunately I didn’t think of doing it until around the second week of January, so it wasn’t included in my 2020 Set-Up, but was within the month of January in my bullet journal. But this year I knew for sure that I wanted to do it again, so I made sure to include it in the very first pages. To match the rest of my 2021 Set-Up, I went with these yellow and grey boxes, with a cute title written in white ink on kraft paper in the centre.
This is unrelated but hat little crinkle in the bottom left corner really bugs me. Annnnyways, how the challenge works is basically I have to read one book that fulfils each of the prompts. So, for example, I have to read a book that is yellow, a book written by an immigrant, a book that was turned into a TV series, and so on and so forth. I don’t fill them out in any particular order, I just make sure that they all get done! Since it’s 2021 I gave myself 21 prompts to complete! Last year I had 20, and I felt like this was a good number because it still let me read some books that didn’t necessarily work for my reading challenge.
I loved doing a challenge like this last year because it just broadened my reading horizons so much! I read so many books that I would have otherwise never found out about, which was something that I really enjoyed. Reading is amazing because it allows you to learn so much about different people’s perspectives and the human experience as a whole, and so keeping your TBR list eccentric and surprising really maximizes your exposure to new ideas. This year I’m hoping to go even more outside my comfort zone and read some more awesome books! Definitely feel free to come along on this challenge with me to check out some reads that you usually wouldn’t pick up.
Be sure to look at my Instagram page throughout the year, because that’s where I share the most updates on what I’m reading and how it fits into this challenge. I’ll also fill you in during my monthly reading lists if you’re looking for inspiration and can’t seem to fill a prompt! Here’s my full reading challenge if you’re looking to follow along:)
2021 Reading Challenge
Read a book….
On Nutrition
That Is A Biography
With A Number In The Title
With A Map
That Has 2 Authors
With Less Than 210 Pages
That Is Yellow
That Is An Award Winner
That Is Based On A True Story
That Was Published Anonymously
That Was Turned Into A TV Series
Written By A Nobel Prize Winner
Written By An Immigrant
On Personal Development
About Theology
Set In Australia
About A Historical Figure
With a 1 Word Title
Written Before 1921
Translated From Arabic
Released In 2021
Hope you decide to go through with this challenge with me! Let me know if you do in the comments or on Instagram (mydayisbooked_blog). It’s going to be a fun time! See you tomorrow with another post:))
Hey guys! Hope you all had an amazing holiday!! I’m really excited for today’s post because it’s my 2021 BULLET JOURNAL SET-UP!!!!! I received a new bullet journal for Christmas and had so much fun creating my spreads for the new year. Opening up a new journal is always so satisfying, and I can’t wait for the fresh start that this journal is going to help me with in 2021✨
If this is your first year bullet journaling, a bullet journal is basically a planner, diary, mood and habit tracker and scrapbook all in one! I go a bit more in depth about what bullet journaling is all about in my very first set-up in 2018, and I also have a whole post on How I Use My Bullet Journal which is very helpful if you’re just starting, so be sure to check those out:) Plus, if you’re looking for more inspiration make sure to take a look at my 2019 and 2020 set-ups as well:))
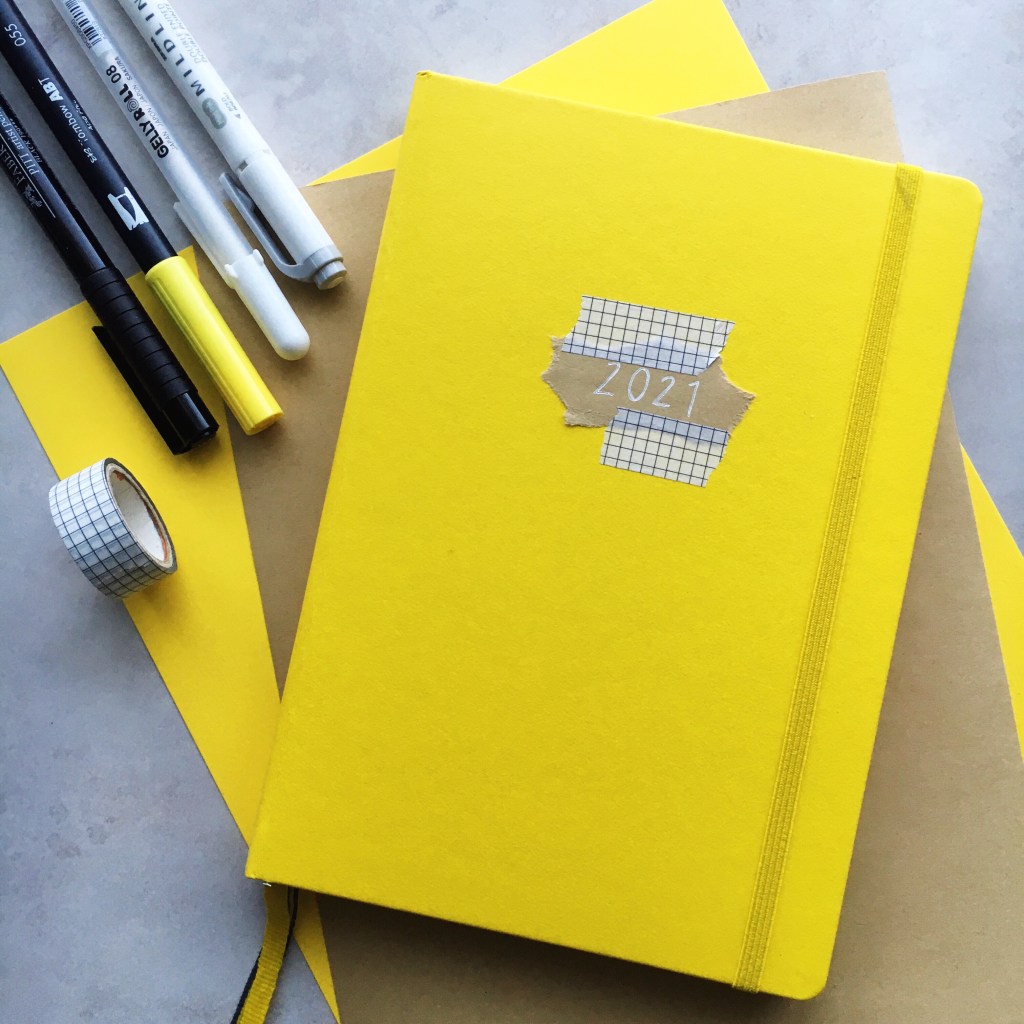
This year I’m using a Leuchtturm 1917 journal for the third time because I really love the quality; it’s hardcover, has numbered pages, a pocket at the back, and it’s not too expensive! This is also the only journal I can find that has at least 240 pages. I like to give myself 20 pages per month and be able to fit the whole year in one journal, so the amount of pages in the Leuchtturm 1917 is great🙌 For 2021 I chose their Lemon yellow colour🥰 It’s pretty bright, but yellow is one of my favourite colours and I thought that it would bring some positive vibes into this year which we all need!
I know that lots of people like to keep their beginning-of-the-year spreads pretty neutral, but last year I brought in some olive green because my journal was an olive green colour, and it looked really good. So this year I decided to use some yellow in my 2021 set-up and I love how it turned out!! I paired it with a nice light grey. Actually yellow and grey are two of the Pantone colours of the year as well, so look at me go! As is hinted at by the cover of my journal, I used a lot of brown kraft paper in these spreads as well, and wrote over it with a white gel pen. I got a whole roll of this stuff on Amazon for like five bucks and it was TOTALLY worth it- it looks so good! And then I also used some washi tape because the one I have is neutral and it’s a great way to fill in empty space. The markers I used throughout this spread were a bright yellow Tombow Dual Brush Pen in the shade 055, a light grey Zebra Mildliner, my Faber Castell fineliners, and my Sakura Gelly Roll 08 gel pen.
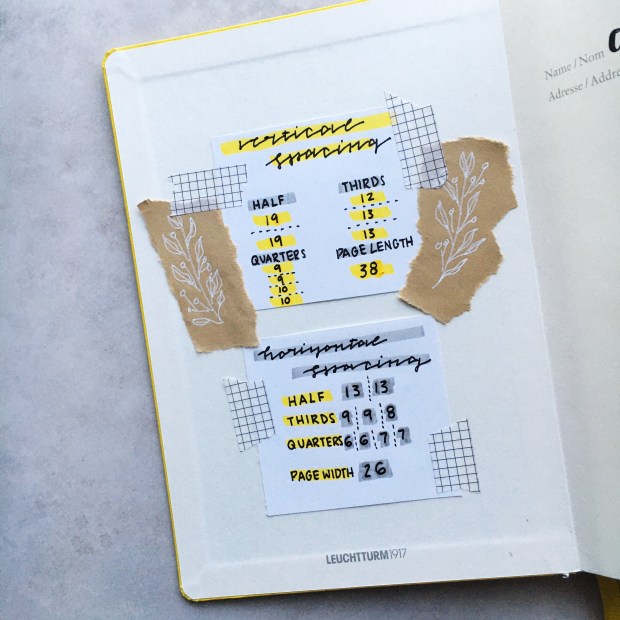
On the inside cover I glued in some simple little spacing cheat sheets. These are great for when I’m making any sort of spread and need to know how to divide up the page without doing the math or counting every single time. There are some great resources on how to use a whole page to make a more elaborate cheat sheet; I love AmandaRachLee on Youtube! But I like this simple and I don’t feel like I need to use up a whole page for it. I decorated with a cute little olive branch motif on that brown kraft paper, which is something you’ll see me use a lot throughout this set-up!
Then on the opposite page I wrote out my name and contact info, and a little quote/personal motto:)
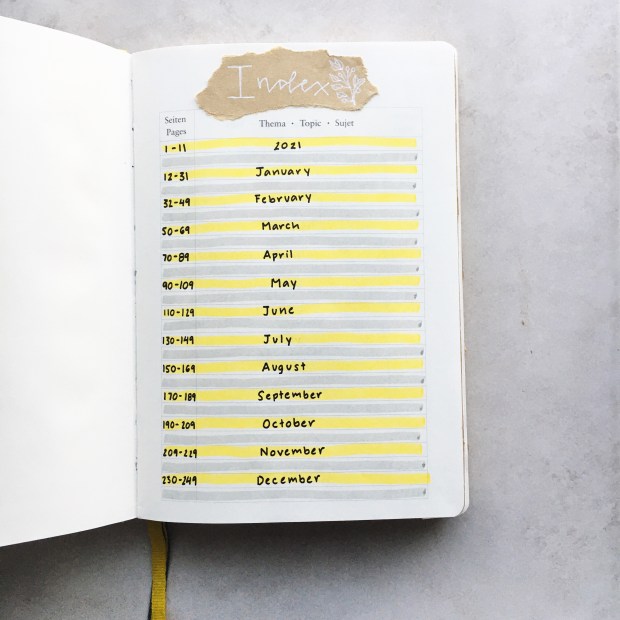
This journal also comes with a pre-made index, which is really nice! I don’t keep track of every single page in my journal, but I did write out which pages I’m using for which months. I wrote out my own title, and I love the way that the yellow and grey work together! There is still some space on those grey lines to keep track of more spreads if I want to. There were two more pages that had indexes on them, but I think I’ll just either glue those together or leave them blank.
Here’s page 1 in my journal! I did a nice 2021 title page with a border of kraft paper that has some of those olive branch doodles on it. I wrote out 2021 in a simple, yellow font, and then actually wrote out the words twenty twenty-one as well. On the opposite page there’s my key. I pretty much kept the same key as last year because I found that it works really well for me! But there are so many options that you can use when it comes to bullet shapes and pen colours to differentiate between tasks and keep you organized. I used a stencil to draw out a key on that kraft paper for decoration as well.
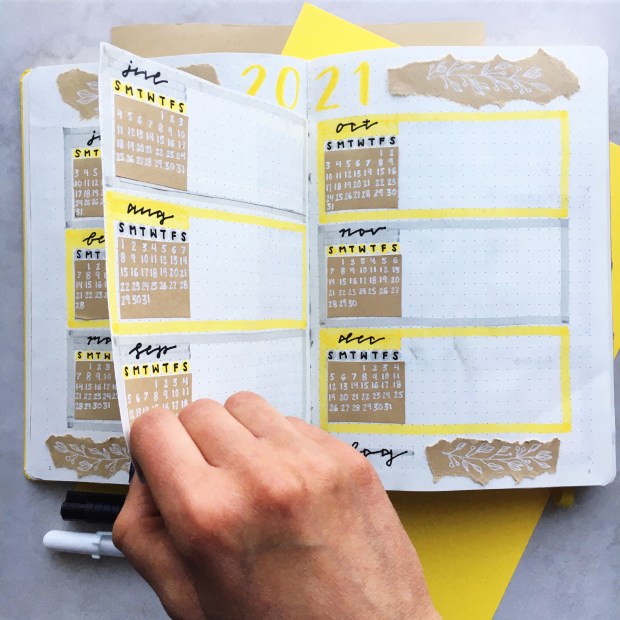
This next spread is my future log! This is where I write down all the events that are coming up for the year; like birthdays, future appointments, or exam dates. The little calendars I drew out are also helpful when I’m setting up my monthly spreads. This year I was inspired by AmandaRachLee to try something really cool. I cut the edges of the page in between two spreads so that it’s like a little door that you can flip back and forth. This way you only have to write out one title, and it also makes the whole thing feel more cohesive because instead of splitting this between two spreads, it’s like it’s only one spread. I used kraft paper for those olive branch doodles, and also to write out the calendars. This spread is super functional and super cute- which is great combo when it comes to bullet journaling!
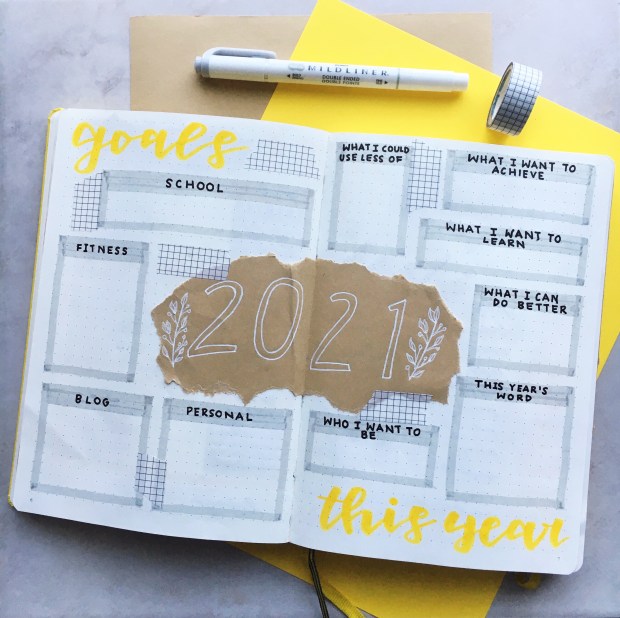
Next up is my goals/”this year” spread. I drew out a big 2021 in the centre on kraft paper, which I LOVE. On the left side I have some boxes to write down my goals for the year, which I split into school, fitness, blog and personal. Then on the right I have a space to do a bit of journaling before the year begins. I wrote some prompts that will help me to get focused on what I want to achieve this year. It’s great to have some goals to work on over the course of the year- whether you’re using a bullet journal or not. I love these pages so much and can’t wait to fill them in!
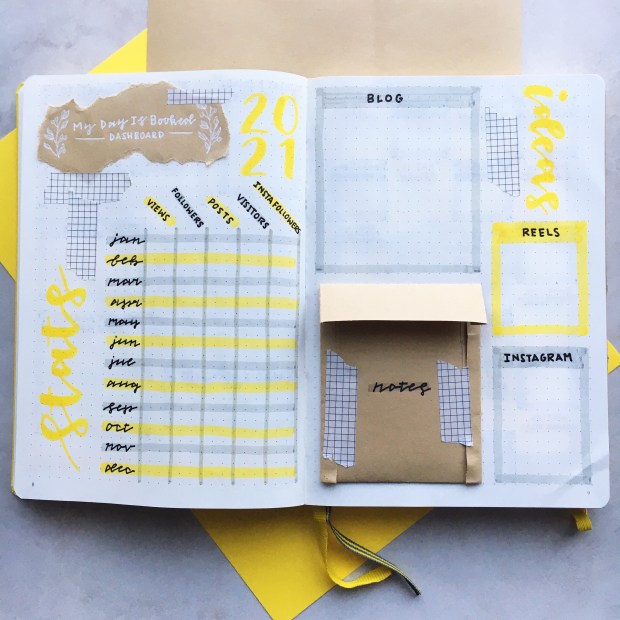
This spread took me a while to figure out because I knew that I wanted some sort of blogging spread at the beginning of my journal, but just didn’t know what that would look like. But now that I’m finished I’m so so happy with the way that this looks! I wrote out “My Day Is Booked Dashboard” on that kraft paper and used it as a tile, and then wrote 2021 in yellow beside that. Beneath the title on the left page, I have a chart where I can track all of my blog and Instagram stats. Last year I tracked these monthly in my monthly recaps, but because I was often behind on those monthly recaps I couldn’t get an accurate count of my Instagram growth. So this will allow me to write down everything right away. Then on the next page I have lots of space to write down both blog and Instagram ideas, and I made such a cute little envelope out of my kraft paper to hold any extra notes that I might have! Maybe I’ll do a tutorial on Instagram reels on how to make one! I’ll write that down in my ideas section:) Even if you don’t have a blog, a page like this can still be very helpful for work or school. Make it your own!
These are the last two pages of my set-up:) Of course I had to include a 2021 reading challenge- I enjoyed the one I did last year so much! I’ll have a whole other post dedicated to this coming out soon. Then on the opposite page I wrote out a quote, because I love to have one to start off the year. My quote this year is “What the New Year brings to you depends a lot on what you bring to the New Year.” This really resonated with me because it reminds me that it’s important to have a positive attitude, work hard and give it your all! I did another of those kraft paper borders to surround this page.
And that concludes my 2021 Set-Up!! I’m so excited to fill all of these spreads in, and I love how they make me feel ready to take on the world in 2021. I hope that you found some inspiration in this post and that you have fun setting up your own journal! Don’t forget to check out my past set-ups if you want to see more spread ideas, and feel free to ask me any questions you have about bullet journaling! Stay tuned for my January 2021 Set-Up coming up soon:))
MERRY CHRISTMAS!!!! Hope you’re all having an amazing day so far! I know this Christmas looks a little different than past years, but hopefully you guys can find some way to hang out with family, whether it be virtually or with a small, socially distant group in person.
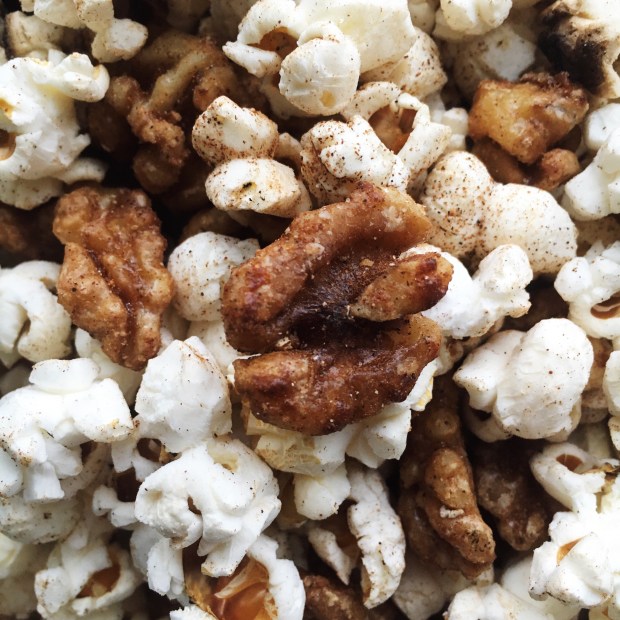
For a fun and festive Christmas recipe, I thought I’d share a delicious popcorn mix! It’s a quick and easy recipe that you can whip up while celebrating the holiday. The walnuts are beautifully candied in some maple syrup on the stove, making them tender and sweet, balancing perfectly with the salted popcorn! I also threw some cinnamon in there for some extra Christmas flavour.
Also, we’re making our popcorn from scratch! Of course, you can use pre-made popcorn if you want to speed things up even more, but making your own is surprisingly easy and healthier. You’ve just got to heat up the oil, toss in the kernels, and listen to them pop! Plus you can season to your own taste with salt.
I’m going to keep this post short today so you can get straight to the recipe and go back to making holiday memories! I hope you enjoy this recipe and have a great rest of your day:)
Candied Walnut Popcorn
Serves: 4
Total Time: 20 minutes
Ingredients:
2 tbsp coconut oil
1/3 cup popcorn kernels
1 1/2 cups walnuts
2 tbsp maple syrup
1/2 tsp cinnamon + more to taste
Salt to taste
Directions:
Heat the coconut oil in a large pot over medium-low heat.
Add in the popcorn kernels to the pot, and put on the lid, leaving it slightly ajar so that the steam can escape. Listen to the kernels pop! When the popping slows, remove the pot from the heat.
Season the popcorn to taste with salt.
In a small pot, combine the walnuts and maple syrup. Put the pot on the stove over medium-low heat, and wait for the maple syrup to come to a slight simmer. Keep stirring the walnuts and maple until the maple syrup begins to caramelize and turns into a sticky coating on the walnuts, about 3-5 minutes.
Take the pot off of the heat and let the candied walnuts cool for about 2 minutes before adding them to the popcorn. Mix everything up and season to taste with some more salt and cinnamon.
Enjoy!!
Merry Christmas and I’ll see you soon with my 2021 Bullet Journal Set-Up! I’m so excited:))
Hey guys! I’m so excited because it’s Christmas Eve tomorrow!! And so to celebrate Christmas Eve Eve, we’ve got to have some more cookies! If you thought I could let a holiday season go by without making any sort of peanut butter recipe, then you would be mistaken. Peanut butter is still one of my favourite things on the planet, and so I had to make a delicious cookie using it!
I was inspired by the Kraft peanut butter cookie recipe, which I make a lot for my family. It’s super simple, using only peanut butter, sugar, and an egg, but I wanted to make it a bit healthier, and also add a super fun and delicious surprise inside! So I started by mixing together some oat flour, natural peanut butter, an egg, and some maple syrup. Natural peanut butter is one of my best discoveries over the past few years- you get all of the pure, peanut flavour without any added hydrogenated oils, sugar, or maltodextrin! If you haven’t already, make the switch because it’s definitely worth it:) Oat flour is another thing that’s great to have on hand; it’s just ground up oats. I keep a little bit in a small bag so it’s ready to use in speedy recipes like this!
Mixed up together, the ingredients make a nice dough that is easily rolled up into balls. This is where the surprise comes in! I stuck a frozen blueberry in each dough ball and then covered it with dough, flattening the whole thing a bit with my hand. The blueberry gets nice and melty and gooey in the oven, making for a super tasty centre and sort of a peanut butter and jam combo. The cookie itself is delicious as well! And they only bake for about 15 minutes, so they’re the perfect last-minute Christmas treat, either for Christmas day, or maybe after all the business is over and you want to relax with a peanut-buttery snack.
Enjoy these simple and tasty cookies!!:)
Peanut Butter Surprise Cookies
Serves: Makes 9 Cookies
Total Time: 30 minutes
Ingredients:
1/3 cup creamy, unsalted natural peanut butter
2/3 cup oat flour
3 tbsp maple syrup
1 egg
9 frozen blueberries
Directions:
Preheat your oven to 350 degrees Fahrenheit.
Mix together the peanut butter, oat flour, maple syrup and egg in a medium sized bowl.
Take a tablespoon sized amount of dough and roll it into a ball. Place a frozen blueberry in the centre, then roll again so that the blueberry is completely covered by dough. Put the ball of dough on a parchment lined baking sheet, and flatten slightly using your fingers. Repeat until you have 9 cookies on the sheet.
Bake the cookies for 15-18 minutes, until golden brown on the bottom.
Cool completely and enjoy!
Have an amazing Christmas everybody! I’ll have a recipe coming oat on Christmas Day so make sure you check it out if you want a fun snack to make with your family. I hope you all spend time with loved ones and have a great holiday:))
‘Sup guys! I’ve done a lot of sweet Christmas recipes so far, but today I have some Smoky Roasted Cauliflower Steaks that are a GREAT vegetarian main or side dish for your Christmas dinner. I also threw some mushrooms on the pan to toast with the steaks because mushrooms are so tasty and remind me of the holidays!
The concept of a cauliflower steak is a thick slab of cauliflower seared or roasted so that it is reminiscent of a steak. I actually love steaks- I’m not vegan or vegetarian, but I love veggies too, and these “steaks” are just so good and perfect for switching it up once and a while.
In this recipe, I amped up the meatiness of the cauliflower by using liquid smoke in the marinade!! My family and I made some homemade beef jerky the other week (it was so good I highly recommend), and an ingredient in the marinade was liquid smoke. It gave it such a good flavour! So I thought, why not add it to my cauliflower? And it worked its magic there too. Liquid smoke is used in a variety of vegan and vegetarian recipes because it does give that savoury, meaty flavour, so it’s worth picking some up. Also in the marinade, we have balsamic, garlic, and a bunch of spices that all work together to create a ziploc bag full of deliciousness😂
I marinaded the steaks for 4 hours- flipping the bag halfway through to make sure that everything got coated evenly. This made the cauliflower so flavourful! I then placed the steaks on a sheet pan in the oven, but not before tossing some sliced mushrooms in the leftover marinade and throwing them on the pan as well.
Everything roasts up SO nicely in the oven, getting crispy and tender and steak-like! These steaks, along with the mushrooms, would be great alongside some mashed potatoes (or sweet potatoes), more roasted veggies, and maybe some vegetable gravy! They’re super tasty and have a wonderful texture.
Hope you enjoy this vegan holiday dish!
Smoky Roasted Cauliflower Steaks
Serves: 3
Total Time: 5 hours
Ingredients:
For the Steaks and Mushrooms:
1/2 a head of cauliflower, washed and cut lengthwise into about 3/4 inch slabs
5-6 white mushrooms, sliced
Sprinkle of dried oregano and dried rosemary
Salt and pepper to taste
For the Marinade:
1/4 cup balsamic vinegar
1/2 tsp maple syrup
1/4 tsp liquid smoke
1/2 tsp salt
1 tsp garlic powder
1/2 tsp paprika
1/4 tsp ground pepper
Red chilli flakes to taste
Directions:
Combine all of the marinade ingredients in a large resealable bag. Add in the cauliflower steaks and place in the fridge for 4 hours, flipping over the bag halfway through to make sure that the marinade gets to every part of the veggies.
Once the 4 hours are up, preheat your oven to 400 degrees Fahrenheit. Remove the steaks from the marinade and place them on a parchment lined baking sheet.
Toss the sliced mushrooms in the remaining marinade, and then place them on the baking sheet as well. Sprinkle some dried rosemary, oregano, salt and pepper over everything, throw the pan in the oven and roast for 35-40 minutes, until the cauliflower is tender.
Remove the pan from the oven and serves the mushrooms and cauliflower warm.
Enjoy!
Hope you’re all having a wonderful Christmas-week so far! I’ll see you on Wednesday with another holiday recipe🥰