Tuna and Avocado Poke Bowls

I’m so excited about this recipe! You don’t even know. Obviously with the pandemic going on I haven’t been eating out as much, and yesterday I was just craving something different. Something that made me feel like I’m at a restaurant somewhere. The ingredients that I had on hand didn’t seem very restaurant-quality (canned tuna isn’t exactly a star protein), but I came up with something that HIT. THE. SPOT.

I love tuna poke- I love raw fish of any kind, really, but getting a big chunk of tuna steak is kind of expensive and it’s not the kind of thing that I just have lying around in my fridge. HOWEVER, I do have a large quantity of canned tuna. I mixed it with mashed avocado, soy sauce, rice vinegar, sesame oil and ginger to make an amazing mixture that definitely reminds me of delicious poke! Plus I formed it into little balls to serve, which really brought the restaurant vibe!

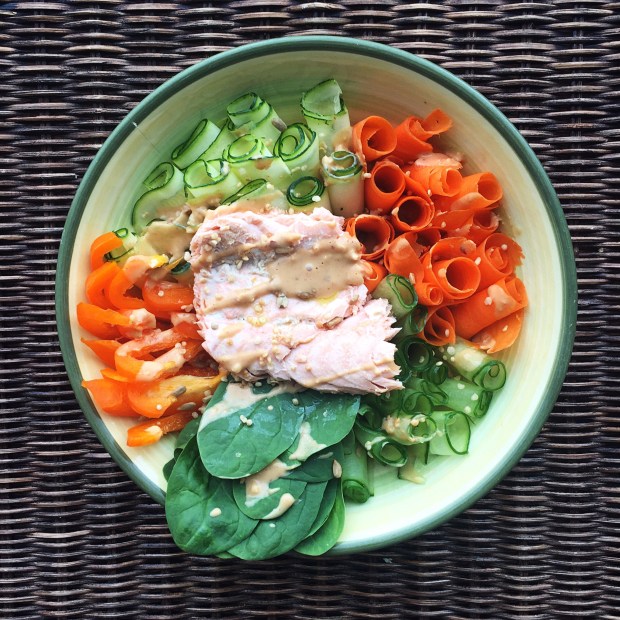
For the other components of this bowl, I tried to get creative and really have fun. We have some HOMEMADE pickled veggies people! Homemade!! They’re so simple to make and sooooooo tasty! Plus you have some wild rice, which contains tons of good-for-you vitamins, spinach, thinly sliced cucumbers, and a sprinkle of hemp hearts. Delish!

I really hope you give this bowl a try! It’s so fun to make and eat, and makes for a slightly-fancy at home dinner for when you can’t go out. Enjoy!

Tuna and Avocado Poke Bowls

Serves: 2

Total Time: 45 minutes

Ingredients:

For the Tuna:

  • 1 can of light chunk tuna, drained (I used yellowfin)
  • 1/2 a ripe avocado
  • 1/2 tsp sesame oil
  • 1 1/2 tsp soy sauce
  • 1 1/2 rice vinegar
  • 1/2 tsp ground ginger

For the Pickled Veggies:

  • 1/2 a large carrot, cut in half width-wise and shaved into thin strips with a veggie peeler (see Thai Ribbon Salad)
  • 1/4 of a red onion, sliced very thinly
  • 1 cup white vinegar
  • 1 tsp chilli flakes
  • 1 clove of garlic, minced

For the Bowl:

  • 1/2 cup wild rice
  • 1 tbsp rice vinegar
  • A couple of handfuls of spinach
  • 1/2 a cucumber, sliced thinly
  • Hemp hearts or sesame seeds for topping

Directions:

  1. Combine the wild rice with 1 cup of water in a pot. Bring to a boil, then cover and reduce the heat to a simmer. Cook for about 30 minutes, until all of the water has evaporated. Then remove from the heat, fluff with a fork, and let stand for 5-10 minutes.
  2. After the rice starts cooking, mix the vinegar, garlic, and chilli flakes in a small bowl. Add in the shaved carrot and thinly sliced red onion, trying to make sure that most of the veggies are covered by the pickling liquid. Cover the bowl with plastic wrap and place in the fridge for a least 35 minutes to pickle.
  3. In a medium sized bowl, mash the half avocado and stir in the soy sauce, rice vinegar, ginger, sesame oil and tuna.
  4. Once the rice is cooked, stir in the rice vinegar. Split the rice up into two serving bowls, and top with the pickled veggies, cucumber, a handful of spinach, half of the tuna mixture each, and some hemp hearts or sesame seeds.
  5. Enjoy!

Hope you’re all having a great week! See you Friday;))

Yours Truly,

Olivia

Thai Ribbon Salad

Hey there! Today I have a quick and easy recipe for you guys that you can just throw together and top with whichever protein you’d like! This Thai Ribbon Salad looks super fancy, but all you need is a veggie peeler and some veggies and you can whip it up in a snap!

In this salad I used zucchini, which is one of my favourite summer vegetables, along with cucumber, carrots, and bell peppers. Top it all of with some spinach, crispy quinoa, sunflower seeds and a protein of your choice (salmon goes amazing in this salad), and you’ve got a perfect summer salad!

Did I not mention the dressing yet? Because it’s AWESOME. I used the peanut dressing from my Asian Kale and Quinoa Salad with Peanut Dressing. I had to put the dressing in the name because THAT’S HOW GOOD IT IS. I’ll link to the recipe in the ingredients down below. In the meantime, lets get to the salad!

Thai Ribbon Salad

Serves: 2

Total Time: 20 minutes

Ingredients:

  • 1 small zucchini
  • 1 carrot
  • 1/2 a cucumber
  • 1 bell pepper, thinly sliced
  • 1 cup spinach
  • 2 tbsp sunflower seeds
  • 2 tbsp quinoa (optional)
  • 1 batch of Peanut Dressing
  • Protein of your choice (optional)

Directions:

  1. Using a veggie peeler or mandolin, slice the zucchini, cucumber, and carrots into thin strips. Start by dragging the peeler down the outside of one side of the veggies so that you don’t get a piece of all skin in your salad. Then continue to drag the peeler down lengthwise to create thin pieces. Once you’ve reached the middle of the vegetable, you can turn it around and repeat on the other side. It might be hard to get all the way through the middle of the veggies, so you can save that part for a lil snack later;)
  2. Toss the veg with the peppers, spinach, sunflower seeds, quinoa, and dressing. Top with a protein of your choice (or leave as is) and enjoy!

Hope you like this simple summer salad!

Yours Truly,

Olivia

Peanut Stir Fry

Hey there! Stir frys are actually awesome, in case you didn’t know. They’re loaded with veg (one of my favourite things), have a delicious sauce (another one of my faves), and this one has peanut butter (my ALL TIME favourite thing). This stir fry is also pretty much fool-proof and can be served with any type of grain you’d like; rice, brown rice, quinoa, noodles, we’re making it work.

If you really need to, you can also switch out some of the veggies I used as well. Snap peas, red onion, and even cauliflower would work in here. And if you want to add in some cooked chicken or beans for protein then go ahead! What I’m saying is, this stir fry is really versatile and works with pretty much anything.

This sauce is OFF THE HOOK though. You’ve got creamy peanut butter, spicy sriracha, and a little salt from the soy sauce. So good. Enough talk. Let’s get to the stir fry.

Peanut Stir Fry

Serves: 1-2

Total Time: 30 minutes

Ingredients:

For the Stir Fry:

  • 1 tbsp olive oil
  • 1/2 a white onion, thinly sliced
  • 1 small red bell pepper, thinly sliced
  • 4 small mushrooms, sliced
  • 1/2 a head of broccoli, cut into small florets
  • 1 carrot, sliced
  • Green onion for topping (optional)

For the Sauce:

  • 1 tbsp creamy natural peanut butter
  • 1 tsp sesame oil
  • 1 tbsp rice vinegar
  • 1 tsp soy sauce
  • 1/2 tsp ground ginger
  • 1/2 tsp maple syrup
  • 1/2 tsp sriracha
  • Sprinkle of red chilli flakes
  • 2 tbsp water (or more if you want a thinner sauce)

Directions:

  1. Mix together all of the sauce ingredients in a small bowl and set aside.
  2. Heat the olive oil in a large pan over medium heat. Add in all of the sliced veggies and cook until they’re tender, about 8-10 minutes. Add water to the pan if it starts to dry out, and stir often to prevent burning.
  3. Once the veggies are soft, add the sauce and cook for another minute. Make sure that all of the vegetables are evenly coated.
  4. Remove the pan from the heat and serve the stir fry with noodles, quinoa, or by itself. Top with sliced green onion.

Enjoy this healthy and delicious meal idea! See you Wednesday;))

Yours Truly,

Olivia

The ULTIMATE Guide To Roasting Veggies

Hey guys! Roasted veggies are one of my favourite things to eat, and my go to side dish. They get so caramelized and delicious in the oven and just taste AMAZING! I’ve posted a lot of recipes that feature roasted veggies as well, and I thought that it was high time to post an ULTIMATE guide to making these babies. They’re very simple and straight forward, but this post will help you get the perfect roasting time and know exactly what to look for when your veg comes out of the oven.

I’d have to say that my favourite veggie to roast is sweet potato, but I also love a good roasted cauliflower, onion, beet, carrot, or chickpea. The possibilities are endless! I’ll categorize the veggies that I’m writing about into groups like root vegetables and cruciferous vegetables (your vocab word of the day- veggies like broccoli and cauliflower), so that if there is a veggie I’ve missed you can roast it the same way as the other veggies in its family. Let’s get started!

First of all, I almost always roast my veggies at 400 degrees Fahrenheit. It’s high enough to cook the veggies quickly and get some nice caremelization going, but not so high that you’ll burn them to a crisp. Some kind of oil is also good for roasting, so I usually toss my veg in about a tablespoon or two of olive oil, enough to lightly coat them, and some salt and pepper before throwing them on a parchment lined baking sheet in the oven. You can also get creative with other spice combos! Okay, now that you know the roasting basics, you can scroll on down and I’ll let you know how to prepare each vegetable and how long to roast it for. When reading this next part, keep in mid that soft means easily pierce-able with a fork, but not mushy. No one likes mushy vegetables.

Root Vegetables

Sweet Potatoes (had to start with my fave): Wash your potato well, or peel it. Dice into cubes about an couple centimetres wide. Roast for about 30-35 minutes, until the sweet potatoes are soft and going slightly dark around the edges. (ps I don’t do a lot of normal potato roasting, but I can assume it would be the same procedure).

Carrots: Peel the carrots. Cut into sticks about five centimetres long and a centimetre wide. Roast for about 25-30 minutes, until soft and slightly caremelized.

Beets: Peel the beets. Dice into cubes that are two centimetres wide and roast for 30-35 minutes, until soft.

Onion: Peel the onion. Cut the onion in half, then into think slices, without separating the layers. Roast for about 20 minutes, until they’re soft and slightly brown.

Garlic (great for soups and dips!): Wrap a whole garlic clove in some tinfoil (I don’t use oil for this one) and roast for 15-20 minutes. Let the tinfoil cool slightly, then unwrap the little packet and remove the garlic cloves from their skins.

Cruciferous Vegetables:

Cauliflower: Wash the cauliflower well and cut it into florets a few centimetres high and a couple wide. Roast them for 20-25 minutes, until they’re tender and going brown.

Broccoli: Can be roasted the same way as cauliflower.

Brussels Sprouts: Remove some of the outer leaves and cut the brussels sprouts in half. Roast for 25-30 minutes, until soft and going brown.

Red Cabbage: Wash the cabbage and cut into lengthwise into cross sections about a centimetre thick. Roast for 25-30 minutes, until soft.

Kale: Chop width-wise into two centimetre long pieces and roast for 15-20 minutes, until crisp.

Squashes:

Zucchini: Wash and slice into circles about a centimetre think. Roast for 20 minutes, until soft and browning.

Butternut: Peel and cut into two centimetre wide cubes. Roast for 30-30 minutes, until soft and going golden.

Eggplant: Wash and cut into one centimetre thick cross sections. Roast for 20-25 minutes, until soft and going golden brown.

Other (aka I don’t know where these go)

Cherry Tomatoes: Wash and roast for 10-15 minutes, until very soft and getting slightly charred.

Tomatoes: Wash and cut into quarters. Roast for 15-20 minutes, until slightly charred.

Peppers: Wash, remove the stems and cut into chunks a few centimetres wide. Roast for 20 minutes, until soft.

Asparagus: Wash and cut off the very bottoms of the stems and any mushy parts. Roast for about 20-25 minutes, until fork tender but still a bit firm. The one vegetable that I would most hate to have mushy is asparagus!

Snap Peas: Wash and roast for 15-20 minutes, until soft.

Mushrooms: Apparently washing mushrooms make them absorb water that will come out when cooking them, so wiping your mushrooms with a paper towel might be a better cleaning method. You can slice the mushrooms and roast them for 15-20 minutes, or leave them whole and roast for 20-25 minutes. Either way, the mushrooms should be soft when done.

Chickpeas (from the can): Drain and rinse the chickpeas, then roast for 20 minutes, until crispy.

And there you have it! Talking about these veggies makes me want some:) If you like roasting any other kinds of veggies, let me know so I can try them out!

Yours Truly,

Olivia;)

Tofu Sandwich

I promised I’d be back with more sandwiches, and I keep my promises. Today I have a delicious tofu sandwich for you that’s a bit simpler to make than my Epic Veggie Sandwich, but no less epic. It’s delicious and satisfying and will definitely have you looking forward to lunchtime. I like using sprouted grain bread, but any bread will do. This sandwich would be great on rye:)) Hope you enjoy!

Tofu Sandwich

Serves: 2

Total Time: 15 minutes

Ingredients:

  • 4 slices of sprouted grain bread, toasted
  • 1 tbsp olive oil
  • 1 175g block of extra firm tofu, drained (see Soy Marinated Tofu for more info on tofu)
  • 1/2 an avocado
  • 1 tomato, sliced
  • handful of sprouts
  • 2 pickles, sliced

Directions:

  1. Cut the tofu lengthwise to create four tofu “steaks”. Heat the olive oil in a pan and place the tofu in it. Cook until browned on one side, about 2 minutes, then flip and cook for an additional 2 minutes on the other side. Remove from the heat and let cool.
  2. Mash the avocado in a bowl. Scoop half of it onto a piece of bread and spread it around. Place two of the tofu “steaks” on top, along with half of the sliced tomato, half of the sprouts and one sliced pickles. Place another piece of bread on top.
  3. Repeat step 2 to make another sandwich, then enjoy!

Now you have another awesome veggie sandwich added into your repertoire!! These are my new favourite thing to make for lunches;))

Yours Truly,

MyDayIsBooked;)))