Chocolate Date Puffed Wheat Squares

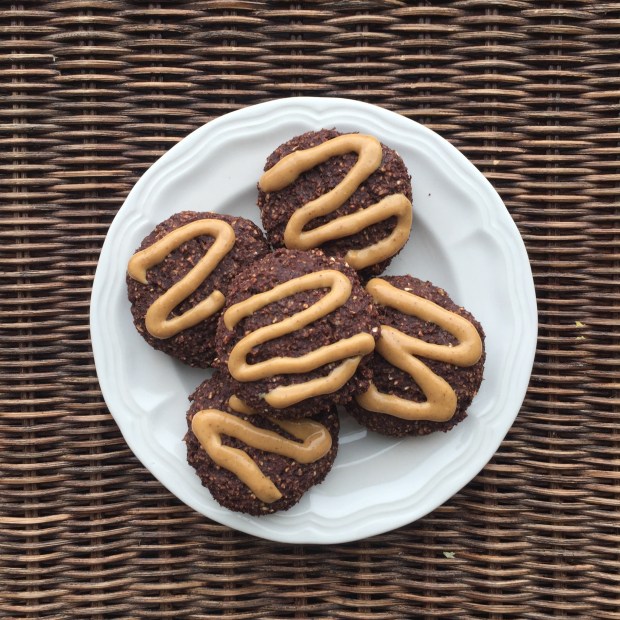
How’s it going guys? Oh, you’re asking what you should do today? Well I have a great answer because you NEED to make these Chocolate Date Puffed Wheat Squares!

I don’t buy dates very often because they’re a tad expensive, but someone gave me a bunch a little while ago so I knew I had to do something special with them. I’ve been eating them by themselves (which is amazing), and I’ve also heard that they’re spectacular with peanut butter, but there are so many awesome desserty things you can do with dates. I decided to make these CHOCOLATE DATE PUFFED WHEAT SQUARES. Sweet, gooey, and a little crunchy, they’re the perfect treat!

These squares are pretty easy to make, too. You just soften up some dates in warm water, them blend them up to make a kind of paste. Then you mix that with cocoa, maple syrup, coconut oil and vanilla, heat it up a bit, and mix it in with puffed wheat. I let mine harden in the fridge overnight after I pressed them into a greased pan, but you should be good to go in a few hours. That simplicity mixed with the fact that these squares taste AMAZING and have no refined sugar makes them a winner in my book.

So yeah, go make these squares and you WILL NOT regret it:)

Chocolate Date Puffed Wheat Squares

Serves: Makes 9 squares

Total Time: 30 minutes, plus at least 3 hours cooling time.

Ingredients:

  • 10 large Medjool Dates
  • 1/4 cup maple syrup
  • 2 tbsp cocoa powder
  • 1 tsp vanilla
  • 2 tbsp coconut oil
  • 3 cups puffed wheat

Directions:

  1. Heat some water in a small pot over the stove until it just begins to simmer. Remove from the heat and add in the dates. Let them sit for about 10 minutes to soften them up.
  2. Remove the pits from the dates and add them into a blender or food processor. Blend until a kind of paste forms, but don’t worry, it doesn’t have to be completely smooth.
  3. Transfer the date paste back into the small pot and add the cocoa powder, maple syrup, coconut oil, and vanilla. Place over low heat on the stove for about 2 minutes as you stir to combine.
  4. Remove the date mixture from the heat. Dump the puffed wheat into a large bowl and mix in the chocolatey dates. Press the soon-to-be puffed wheat squares into an 8×8 pan greased with coconut oil.
  5. Cover the pan with plastic wrap and chill in the fridge until firm enough to eat; around 3 hours. You can try and speed up this process by throwing the squares into the freezer.
  6. Once the puffed wheat mixture has cooled, cut it into 9 squares and enjoy!
  7. Store in the fridge.

Hope you enjoy this recipe!

Yours Truly,

Olivia;))

Chocolate Dipped Pumpkin Seed Cookies

So, we have a lot of pumpkin seeds. Like A LOT. We got the 1.2 kilogram bag from Costco. I wanted to make some pumpkin seed butter out of them, because I don’t really like to eat them by themselves. But halfway through the blending process, my vitamix quit on me! This happens sometimes because it’s pretty old, and seeds are a pretty intense thing to blend. So I was like, now what? What can you make out of half-blended pumpkin seeds? It turns out that you can make something pretty fricking amazing.

I added some maple syrup to the seeds, pressed em into cookies, and TRIPLE DIPPED them in chocolate. That’s right. TRIPLE. DIPPED. These cookies are legit amazing. They’re so rich and nutty and sweet and just awesome! You only need four ingredients to whip them up, and if you have a really old blender no prob! It only needs to work for about two minutes.

My go-to chocolate dipping sauce is maple syrup, cocoa powder, and coconut oil. Super simple and so good. All you have to do is melt the ingredients together and you’re good. This sauce could also be used for pretty much anything else, like oatmeal, strawberries, other fruits, nice cream; the list goes on and on. On these cookies, it lends another hit of richness that is definitely welcome. If you’re not feeling the chocolate though, you can always omit and just eat the cookies by themselves. HA! That was a joke! DEFINITELY include the chocolate. I don’t know why you clicked on this post if you don’t like chocolate.

That’s my spiel for the day! I really hope you give these cookies a try because they will change your life. For the better.

Chocolate Dipped Pumpkin Seed Cookies

Serves: Makes 10-12 cookies

Total Time: 60 minutes

Ingredients:

  • 2 1/2 cups shelled and roasted pumpkin seeds (I used salted)
  • 2 tbsp + 1 tbsp maple syrup
  • 2 tbsp coconut oil
  • 1 tbsp cocoa powder
  • I’m not kidding that’s it

Directions:

  1. In a STRONG blender or food processor, blend the seeds until they start releasing oil but aren’t too loose. You want the mixture to be something you could form a ball with.
  2. Transfer the blended seeds into a bowl and stir in 2 tbsp of the maple syrup.
  3. Scoop the pumpkin seed mixture by heaping tablespoons and form into balls. Place on a parchment lined baking sheet or pan, and press down to make cookies about a centimetre thick.
  4. Place the cookies in the freezer for at least half an hour. You want them to be pretty frozen so that they’re easy to dip.
  5. Make the chocolate sauce right after you pop the cookies in the freezer. Melt together the cocoa powder, coconut oil and maple syrup in a small pot over low heat. Remove from the burner and let stand until the cookies are ready.
  6. After thirty minutes has passed, take out the cookies and dip them one by one halfway into the chocolate mixture, placing them back on the baking sheet. By the time you’ve reached the last cookie, the chocolate on the first cookies should be hardened because of the cold. Dip all of the cookies halfway again, and then once more to ensure optimal coverage.
  7. Place the cookies back in the freezer for another 10 minutes before serving. Store in an airtight container in the fridge.

Enjoy these little bites of deliciousness!

Yours Truly,

Olivia

Lemon French Toast

Hey there! I’m kind of starting to settle into a rhythm of schoolwork and just hanging out, which usually means that I make some toast or a yogurt bowl for breakfast. But sometimes I’m in the mood for something more fun, which calls for some French Toast! French Toast is so tasty and super simple, and to make it even better I added some lemon to mine. This version is vegan, but if you don’t have any plant milk on hand feel free to just use regular milk. Anyways, what’s really special about this breakfast is the carameliaztion that happens because of the bananas in the batter. Do you call it a batter? I guess it’s more of a dredge or a dip….. I just looked it up- it’s a custard. Yeah, the bananas in the custard give it some nice sugar that’s just DYING to get all brown and crisp. And the lemon just gives it some interest and zing. Some blueberries and maple syrup would be perfect with this French Toast. Give it a try and break up your monotonous breakfast cycle!

Lemon French Toast

Serves: 2

Total Time: 30 minutes

Ingredients:

  • 4 slices of sprouted grain bread (or any kind of bread you like)
  • 1 ripe banana
  • 1/2 cup of almond milk
  • 1 tsp lemon juice
  • Zest of half a lemon
  • 1 tsp vanilla

Directions:

  1. Mash the banana in a medium sized bowl. Mix in the almond milk, vanilla, lemon juice and zest.
  2. Heat a small pan over medium-low heat. Soak both sides of a piece of bread in the almond milk mixture, making sure that it’s fully coated, but don’t soak it for so long that the middle becomes mushy.
  3. Cook the bread in the pan until golden brown, about 1-2 minutes, and then flip, doing the same on the other side. Check the French Toast every so often to make sure that it doesn’t burn.
  4. Soak and cook the remaining slices of bread, then serve warm with more lemon zest, berries, and maple syrup:)

Enjoy!

Yours Truly,

Olivia;)

Chocolate Peanut Butter Drizzle Cookies

Hi guys! Hope you’re all doing well;)) It’s been steady desserts for the past little while, and I’m not complaining! I have a pretty big sweet tooth. And, as always, I need to find a way to satisfy my peanut butter addiction. So, I present to you (insert drum roll here) Chocolate Peanut Butter Drizzle Cookies! They’re sweet and so chocolatey, and make the perfect snack. Then there’s that PEANUT BUTTER DRIZZLE. I mean, don’t even get me started. This is a match made in cookie heaven. Also, I tried using raw brown sugar, which isn’t as processed as white sugar, for the first time, and I actually really like it! You can probably sub normal brown sugar or coconut sugar if you want though. Excuse my rambling, I understand if you just want to get to the cookies already. Scroll down for the recipe!

Chocolate Peanut Butter Drizzle Cookies

Serves: Makes 10-12 cookies

Total Time: 60 minutes

Ingredients:

  • 1 1/2 cups oat flour
  • 1/3 cup cocoa powder
  • 1/4 cup raw brown sugar
  • 1 tsp baking powder
  • 1 tsp vanilla
  • 1 egg
  • 1 ripe banana, mashed
  • Peanut butter, for drizzling (or dipping, I won’t judge)

Directions:

  1. Mix together the dry ingredients in a large bowl.
  2. Add in the mashed banana, vanilla, and egg, and stir until combined. Cover the bowl with plastic wrap and let chill in the fridge for 30 minutes. Sometimes you can be a rebel and skip steps like this, but I would not recommend that unless you want to spend ten years trying to form nice balls.
  3. Preheat your oven to 350 degrees Fahrenheit. Scoop out heaping tablespoons of the dough and form into round balls. Place them on a baking sheet and make a criss-cross pattern with your fork to flatten them out a bit.
  4. Bake for 15 minutes, then remove from the oven and let them cool completely.
  5. To make the drizzle, spoon a little bit of natural peanut butter into a small ziploc bag, and cut a little hole in the corner. Use it as a piping bag, and drizzle away. PS. THIS STEP IS NOT OPTIONAL. THE PEANUT BUTTER DRIZZLE IS ESSENTIAL TO THE STRUCTURAL INTEGRITY OF THIS COOKIE.

So yeah, there you go! Let me know if you make these beauties and how they turned out;)

Yours Truly,

Olivia

Baked Apples

I’ve been craving a lot of sweet stuff recently, probably because of Easter, but I don’t feel like eating something heavy. If you’re in the same boat, then these apples are about to change your life! They’re rubbed with spices and then baked until soft and sweet, making them the perfect light snack or dessert. Also, I love how simple they are. You won’t need to run out to the grocery store for these babies! If you have a little nice cream or yogurt on hand, then that’s a bonus because it would pair well with a steaming hot apple right from the oven…. did you hear that? It sounded like angels were singing from heaven as I described these apples. I don’t blame them. Here’s the recipe!

Baked Apples

Serves: 4 (but lets be honest here; you’re going to want at least 2 halves so the legit number of servings is 2)

Total Time: 40 minutes

Ingredients:

  • 2 apples (I used gala but I think any kind would work)
  • 1 tsp coconut oil
  • 1/2 tsp ground cinnamon
  • 1/4 tsp ground ginger
  • 1/4 tsp ground nutmeg
  • 1/4 tsp ground allspice

Directions:

  1. Preheat your oven to 350 degrees Fahrenheit.
  2. Cut the apples in half, remove the stems, and use a spoon to remove the cores. Put aside.
  3. Mix together the spices and coconut oil in a small bowl. Rub the 4 apple halves with the mixture until they’re evenly coated.
  4. Place the apples skin down in a glass baking dish, and bake for 15 minutes.
  5. Once 15 minutes have passed, raise the oven’ s temperature to 375 degrees Fahrenheit, and continue baking for another 15 minutes.
  6. Remove the apples from the oven and serve with hot with nice cream or greek yogurt;))

Enjoy these apples!

Yours Truly,

MyDayIsBooked;)))