Roasted Chickpea Salad

Hey guys! I’m super sorry that I haven’t posted in awhile. I hope that this recipe makes up for it! I was kind of experimenting with different ideas until I came out with the final product. In the end, though, it turned out really good! Here’s the recipe.

Ingredients:

For the Chickpeas: (3 servings)

  • 1 can (19 oz) of chickpeas
  • 2 teaspoons olive or avocado oil
  • 1/2 teaspoon garlic powder
  • 1/2 teaspoon onion powder
  • 1 teaspoon salt
  • 1/4 teaspoon pepper

For the Salad: (1serving)

  • 1 small tomato
  • 2 cups spring mix
  • 1 sprig of chives
  • 1/2 a bell pepper
  • 1/2 a cucumber

For the Dressing: (1 serving)

  • 1 1/2 tablespoons Greek Yogurt
  • 1 teaspoon parsley
  • 1 teaspoon Apple cider vinegar
  • 1 1/2 tablespoons lemon juice

Directions:

  1. Preheat your oven to 425 degrees Fahrenheit. Drain and rinse the chickpeas, then put into a bowl and pat dry with a paper towel. Add the oil, salt, pepper and garlic and onion powder and stir to combine.
  2. Dump the peas onto a greased baking sheet and bake for 15-20 minutes, until they’re crunchy.
  3. Chop the tomato, cucumber, chives and peppers and place into a bowl with the spring mix.
  4. Mix all of the dressing ingredients together in a bowl.
  5. Finally, put some chickpeas in top of the salad and top it off with the dressing.

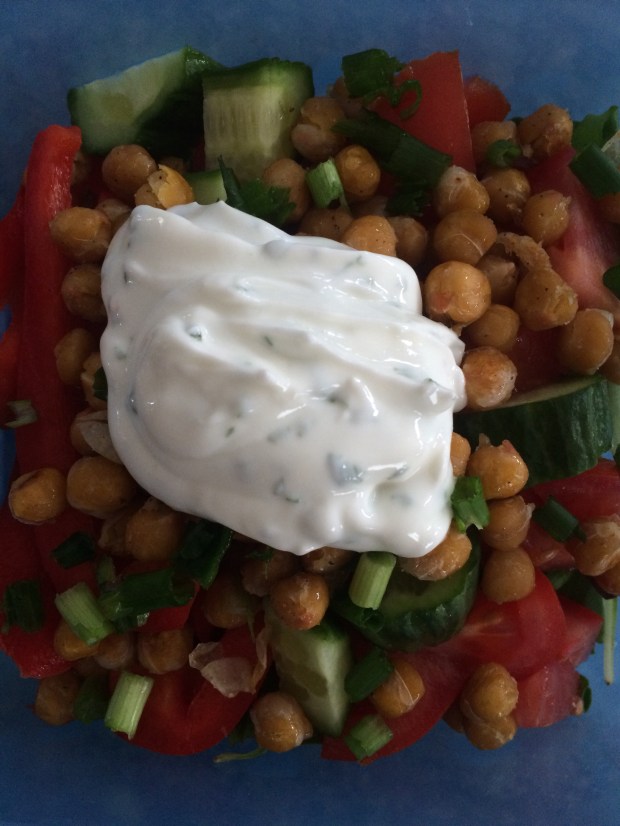
I hope you enjoy this salad! The chickpeas can also be enjoyed alone for a healthy snack. See you Wednesday!;)

Yours Truly, MyDayIsBooked

Very Berry Frozen Yogurt

Hey peoples! Happy Wednesday! We’re halfway through the week-you can do it! I’m always looking for healthy treats, and I found this Frozen Yogurt on Pinterest a little while ago. There’s no added sugar or other unwanted additives with names so long that you can’t pronounce ( I would name a few but I don’t think that I can spell any of them right), and also tastes delicious! Thanks to Gimme Delicious at gimmedelicious.com for this recipe!

Ingredients:

  • 2 cups frozen berries
  • 1/2 cup Vanilla or Plain Greek Yogurt
  • 1-2 Tablespoons of Honey
  • Dash of vanilla
  • A bit of lemon juice (optional)

Directions:

  1. Put all ingredients into a blender.
  2. Blend until smooth.
  3. Eat is straight from the blender, or put it in the freezer for a bit for a harder alternative.
  4. That’s it!

So simple and so delicious! I haven’t tried it with different frozen fruits, but I’m sure it would work just as well. Let me know if you’ve tried any!

Yours Truly, MyDayIsBooked

Healthy Cinnamon Dried Apples

Hey guys! I’m super sorry about not posting for awhile- a horrible way to start off 2018, I know. Hopefully I can make it up to you with these delicious dried apples- they’re one of my favourite snacks! With no added sugar and plenty of apple-pie flavour, they’re sure to please any sweet-tooth while providing you with a healthy snack. Lets get into the recipe!

Ingredients:

  • 2-3 large apples
  • As much cinnamon as you want!


Directions:

  • Preheat your oven to 250 degrees Fahrenheit
  • Wash your apples
  • Slice the apples. This is the tricky part, because you want to get the thickness just right. If you want your apples to be super crispy, since the very thin, but if you would like them a bit chewier leave them thicker. If its you’re first time making this recipe, I suggest that you do a few thin and a few thick to see what you like best.img_8533
  • Place the apples on a parchment-covered baking sheet so that they don’t stick to the pan.
  • Now it’s time for the cinnamon! Sprinkle some on each since and then rub it around with your finger for an even coating. If you’re not a big fan of cinnamon, you can leave it off, but it really adds to the flavour of the apples.
  • Bake the apples for about 2 hours. About halfway through, take out the pan and flip the slices over so that you can put some more cinnamon on the other side. Again, if you would prefer to leave the cinnamon off, you can, but you still need to flip the apples.
  • Take out of the oven and enjoy! Store these in an airtight container in the fridge.


That’s all! Super simple and super delicious. I promise that there will be 2 more pots this week- a bookish one and a crafty one! Enjoy these apples and I’ll see you then!!

Yours Truly, MyDayIsBooked;)))

Quinoa Salad

This Quinoa Salad is great for school lunches if you make it the night before! It’s bright, flavourful,  and bursting with veggies. For protein, you can add in any kind of meat that you want! best of all, it’s super easy. So, before you start drooling all over your screen, let me get into the recipe.;))

Ingredients:

  • 1/4 cup quinoa
  • 1/2 cup diced cucumber
  • 1/2 cup diced peppers
  • 1 sprig of green onion
  • 1 teaspoon dill
  • 1 teaspoon parsley
  • 1 teaspoon cilantro
  • The juice of 1/2 a lemon
  • Protein of your choice


Directions:

Follow the cooking instructions on the package of your quinoa. Once you’re done, it should look something like this:

IMG_8272

Looks super appetizing, right? Don’t worry, once you add all of the veggies and herbs, it looks way better. While the quinoa is cooling down, dice your pepper, cucumber and green onion into mid-sized pieces and cut your lemon in half, like this:

IMG_8270

Now take your quinoa and add the cilantro, dill, and parsley to it, followed by the veggies. Finally, squeeze the lemon juice into the salad. Store this in a container in the fridge and enjoy it for lunch the next day!

IMG_8274

As for protein, you can really add anything you want. I usually put hemp seeds in mine, but chicken would go great as well.

I hope that you like this recipe! Make sure that you let me know what you think of it in the comments section! See you tomorrow for Day 10 of 12 Days of Awesome Ways to Be Healthier.;))

Yours Truly, MyDayIsBooked

Healthy Homemade Granola

Don’t you just love a good granola? I absolutely adore granola. But the store bought versions are full of sugar and other stuff that you can’t pronounce. This is a delicious version of granola that has all the good taste with none of the unhealthy ingredients! the fact that it is super versatile and easy to make is even better. This is the recipe!

Healthy Homemade Granola

Time: 15 minutes Makes: About 3 servings of 3/4 cup

Ingredients:

  • 2 cups of rolled or quick oats
  • 1/3 cup of chopped almonds (or other nuts, coconut works too)
  • 2 tbs peanut butter (preferably all natural)
  • 2 tbs coconut oil (or olive oil)
  • 3 tbs honey (or maple syrup)

Directions:

 Preheat your oven to 375° Fahrenheit.

Put the oats in a large mixing bowl. Next, chop your nuts. IMG_8252Try not to make them too small, but not so big that you’ll have a hard time chewing them (life with braces!). Dump the nuts into the oats and mix until combined.

Scoop the peanut butter, coconut oil, and honey into a microwave -safe bowl. If you don’t have coconut oil, use olive, but I highly suggest you get some. It’s a great healthy swap for butter, and you can use it in sugar scrubs and multiple other homemade beauty products!

IMG_E8254

Pop the bowl into the microwave for about thirty seconds, just enough to get the mixture melted and combined. Once the pb, oil and honey are ready, pour it into the oats and nuts and stir well!

IMG_E8255

After making sure the dry and wet ingredients are well mixed, place the mixture on a sheet pan.

IMG_E8261

Spread it out a fair bit, but not so much that it will burn quickly, so make sure that it’s in a layer about a half a centimetre thick. Pop the pan in the oven for about ten minutes, stirring the granola halfway through so that it doesn’t burn. make sure to let it cool before eating it, because it will be hot! Store it in an airtight container in your fridge.

IMG_E8263

And Voíla! Beautiful granola! Eat this stuff over yogurt, with milk, or even on your Greek Yogurt Smoothie Bowls!

This is a great healthy snack that goes along with Day 1 and 2 of 12 Days of Awesome Ways to Be Healthier! I hope you enjoy it and leave some comments so I know what kind of recipe to share next!

Yours Truly, MyDayIsBooked(: