All-Purpose Shawarma Spice

Hello, you amazing people! I’m hoping that you’ve tried shawarma before, because it’s delicious, but if you haven’t, it’s basically meat roasted with middle eastern spices, usually served with pita, rice and pickled veggies. I could eat this stuff all day, and so I created a spice mix that almost perfectly recreates the real thing. I say that it’s “all-purpose” because that’s totally what it is. You can use this blend of spices on chickpeas, in soups and stews, or on chicken (my personal favourite).  This recipe is simple and you probably have all of the spices that you need right in your pantry. Here it is!

All Purpose Shawarma Spice

Makes: About 1/4 cup of spice

Total Time: 5 minutes

Ingredients:

  • 1 tbs garlic powder
  • 1 tsp cinnamon
  • 1 tsp allspice
  • 1 tsp cayenne powder
  • 1 tbs cumin
  • 1 tsp salt
  • 1 tbs paprika

Directions:

  1. Mix all of the seasonings in a bowl. Store in a sealable plastic bag.
  2. Enjoy on chickpeas (see a roasted chickpea recipe here), chicken, or in mediterranean cooking.


So yeah, today I had kind of a quicker recipe to share with you guys, but it’s delicious nonetheless;) Let me know what cool recipes you guys use this spice mix in!


Yours Truly, MyDayIsBooked:))))))


Healthier Thanksgiving Dinner

I can’t even begin to tell you how much I love Thanksgiving dinner! Stuffing, mashed potatoes, turkey, the whole shebang. But what I don’t love is the heavy feeling you get after eating all of that stuff. So, just in time for Thanksgiving, I’ve created three side dishes that are DELICIOUS while still being healthier than their traditional counterparts. My recipes for Sprouted Grain Bread Stuffing, Garlic Mashed Sweet potatoes, and Simple Roasted Veggies are easy to make, and serve as great accompaniments to turkey breast. Let’s get into this Thanksgiving feast!


Sprouted Grain Bread Stuffing

img_9544.jpg

Makes 2 Servings

 Total Time: 15 minutes

Ingredients:

img_9543.jpg

  • 2 slices of sprouted grain bread
  • 1 stalk of celery, diced
  • 1/4 of an onion (white or yellow), diced
  • 1 clove of garlic, minced
  • 1/2 tbs avocado oil
  • 1/2 tsp oregano
  • 1/2 cup organic veggie broth
  • 1/2 tsp salt
  • 1/2 tsp pepper

Directions:

  1. Toast the grain bread until it’s golden brown on either side. Cut it into cubes and set aside.
  2. Heat the oil over medium heat in a small pot and cook the celery, garlic and onion for about 6-8 minutes, or until the onion is translucent.
  3. Add the broth, oregano, salt and pepper into the pot and bring to a boil. Dump in the cubed grain bread and stir.
  4. Continue to cook the mixture until the liquid has evaporated, but the bread is still soft. Serve immediately, or cool completely and then store in an airtight container in the fridge.
  5. Enjoy!


Garlic Mashed Sweet Potatoes

img_9546.jpg

Serves 2

Total Time: 12 minutes

Ingredients:

  • 1 large sweet potato
  • 1 clove of garlic, minced
  • Salt and pepper to taste

Directions:

  1. Wash and peel the sweet potato.
  2. Take a few sheets of paper towel and wet them under the tap. Wring them out so that they’re just damp, and wrap the sweet potato in them. img_9545.jpg
  3. On a small plate, microwave the sweet potato for 3 minutes and 30 seconds. Then flip it over and microwave it for another 3 minutes and thirty seconds. Remove the potato from the microwave and cut it in half. If it’s soft all the way through, then it’s ready. If not, microwave it in 30 second increments until it is. This will all depend on  the size of your sweet potato.
  4. Place the sweet potato in a bowl and mash with a fork or potato masher. You will notice that the outside of the potato is still hard and won’t mash well. Remove these parts from the mash.
  5. Add in the minced garlic, salt and pepper, and keep mashing until the potatoes are smooth. Serve immediately or cool completely store in an airtight container in the fridge.
  6. Enjoy!


Simple Roasted Veggies

Serves: 2

Total Time: 25 minutes

Ingredients:

  • 1 cup of your favourite veggies (mushrooms, cauliflower, carrots)
  • 1/2 tbs avocado oil
  • 1/2 tsp salt
  • 1/2 tsp pepper

Directions:

  1. Preheat your oven to 400 degrees Fahrenheit.
  2. Wash and dry your veggies. Cut them into bite-sized pieces. I used mushrooms, and cut them into quarters.
  3. Place your veggies on a sheet pan covered in parchment paper. Toss them in the oil with your hands. Sprinkle on the salt and pepper.
  4. Bake the veggies for about 20 minutes. Serve immediately, or cool completely and store in an airtight container in the fridge.
  5. Enjoy!


Now all you need is some turkey, and you’re off to the races! I hope that these sides give you the homey flavours of Thanksgiving, but still leave you feeling like you could run a few laps around the pumpkin patch! Anyways, I hope you all have an awesome long weekend. Thanks for checking out this post;).


Yours Truly, MyDayIsBooked

October Bullet Journal Set-Up

Hello! I wanted to do a theme that was Halloweenish for this month, but that wasn’t straight up ghosts and jack o’ lanterns (I have nothing against ghosts and jack o’ lanterns, I just didn’t feel like drawing them for a whole month). So I finally decided on- drumroll please……. a Harry Potter theme! This theme took me a really long time to do, but it was definitely a labour of love, mostly because there are so many possibilities with Harry Potter and it’s one of my favourite book series of all time!  And I know that I said that my September spreads were my favourite of all time; not anymore! So, without further ado, let’s get into my October Bullet journal Set-Up!

img_9529

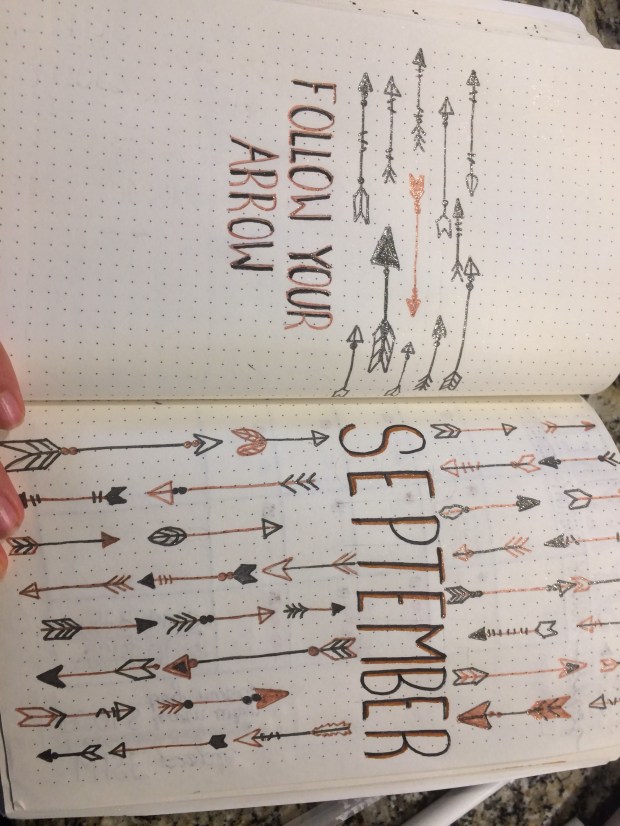
I stuck to the layout that I’ve been doing for the past few months for my title page- doodles and the name of the month on one side, and a quote on the other. This month I drew Hogwarts- which actually wasn’t as hard as it looks! Pinterest has a lot of Harry Potter themed doodles that you can reference (my fancy word for copy). For my quote I wrote one that I love from Albus Dumbledore aka JK Rowling; “Happiness can be found even in the darkest of times, if only one remembers to turn on the light.”.  All in all, I think that these pages turned out great!

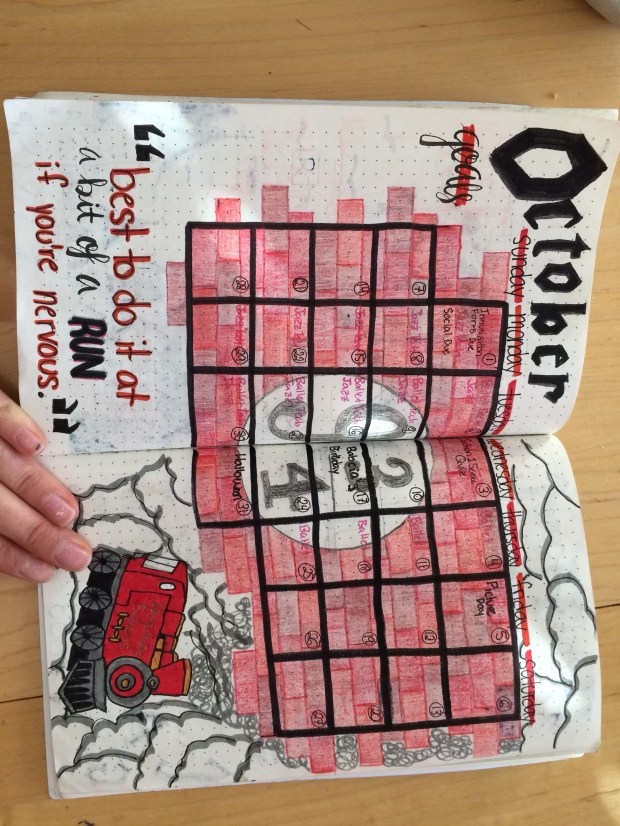
Now on to my October calendar. I did this one Platform 9 3/4 style! There’s a simple brick background, Harry Potter style lettering, a drawing of the Hogwarts Express, and another JK Rowling quote: “Best to do it at a bit of a run if you’re nervous.” which I love because it totally applies to just life in general.

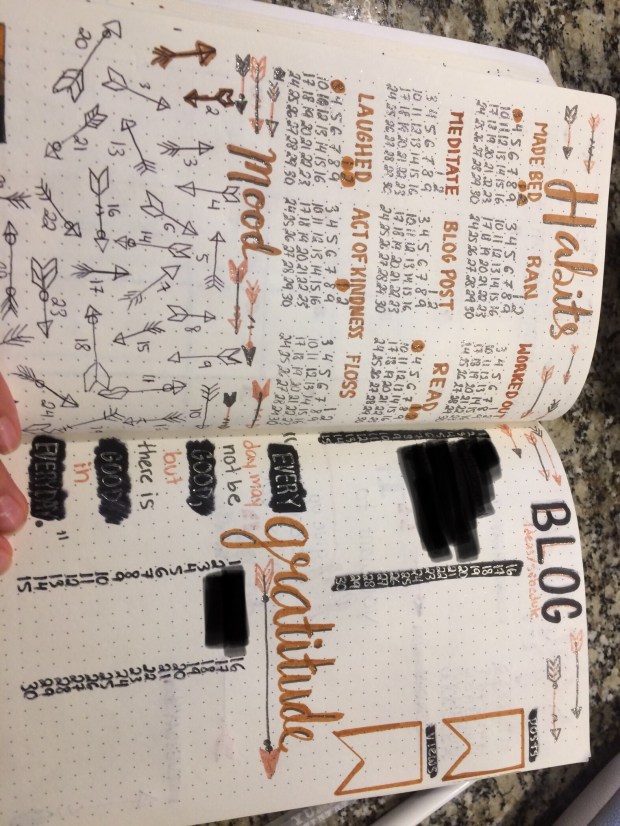
For my habit and mood trackers, I decided to have some fun. Here we have the Habit House Cup, and a Snitch mood tracker! I have four habit categories; physical, mental, organization, and other, and they each represent a Hogwarts House. I have about four habits in each category, and different amounts of points are assigned to every one. So, for example, if I made my bed one day, I would draw one little gem inside the organization category (Slytherin), representing one House point. At the end of the month, I’ll be able to see which House “won” with the most points, and which House “lost” with the least house points. My mood tracker is a bit simpler; each feather on the wings represents a day of the month, and I’ll colour them in according to my mood and the legend on the side.

Here’s my gratitude tracker, along with a space for blog post planning at the bottom of the page. For each day in October, I drew a little envelope, where I’ll write something that I’m grateful for each day in green ink (that’s what Hogwarts uses in the books). In the center there’s an owl with another envelope in it’s mouth. My blog ideas section is made to look like an old piece of parchment, with a drawing of a quill and ink pot on the side.

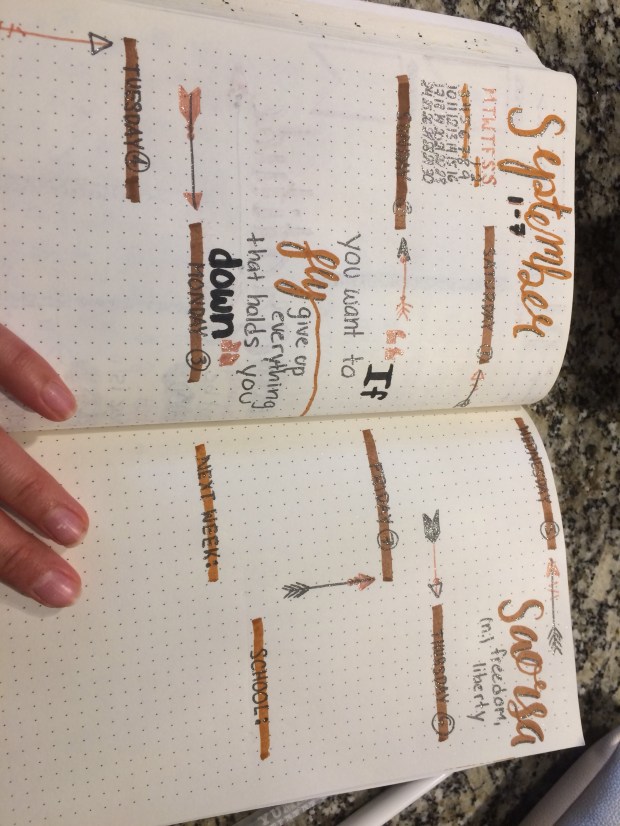
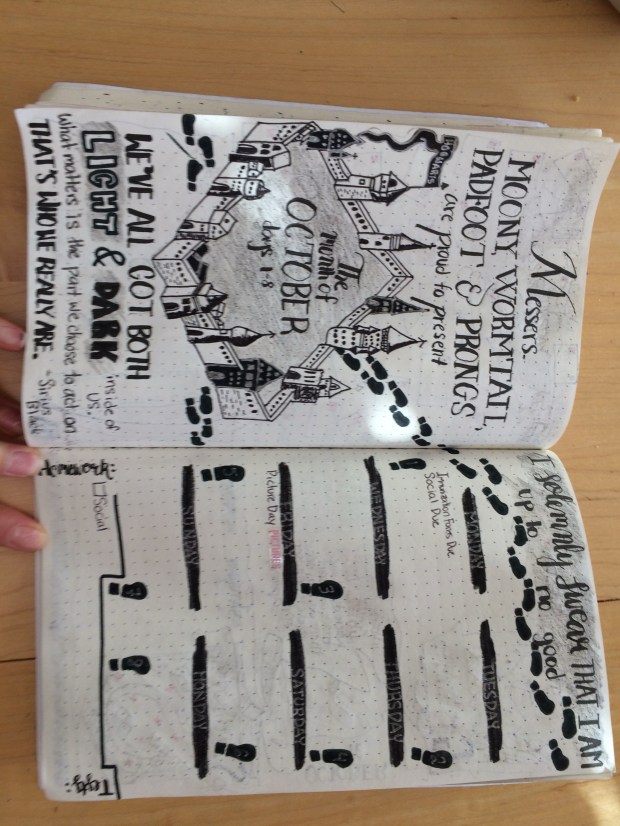
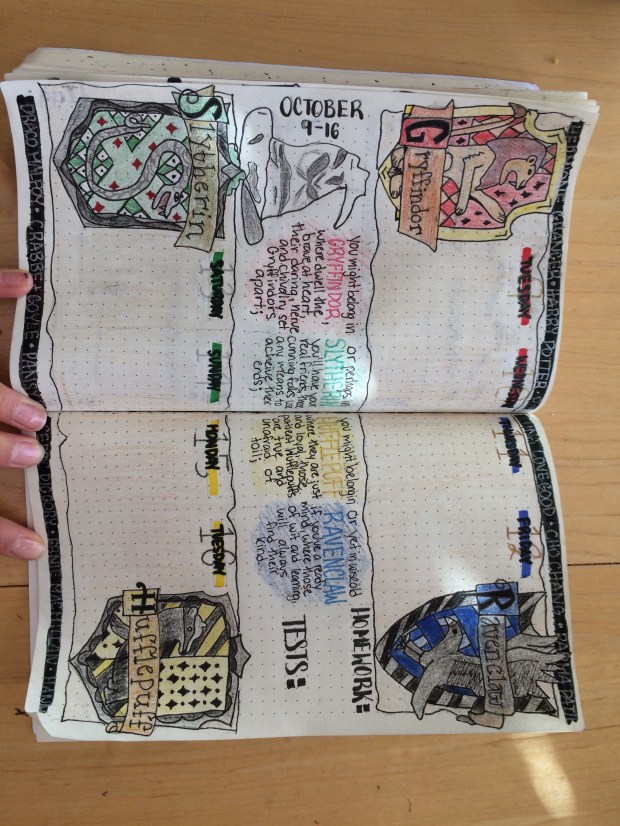
As for my first couple of weekly spreads, they’re pretty self-explanatory, so I’ll let you take a look at them yourselves….

Alrighty then! I hoped you liked and felt inspired by my October Bullet Journal Set-Up! I had so much fun with it and couldn’t wait to share it with you guys. Buy for now!

Yours Truly, MyDayIsBooked;)))

September Bullet Journal Set-up

Hi there! This month I can’t wait to show you my bullet journal spread! I’ve decided to go with an arrow theme, which was easy to do and turned out really nice! I feel like I organized this month way better than previous ones, and I’ll be able to plan more efficiently, which is good because I definitely need my journal more during the school year than I do during the summer. I also find it easier to keep up with my trackers during this time, because I get back into a bit of a routine. So I felt a bit of pressure to create something awesome this month!! Let’s get into my spreads:

This is legit my favourite title page. I did the same thing that I did in August, with the word September on one page and a quote on the other. The arrows took a little while to draw, but it was fun and worth it in the end! I think that it turned out great, and I’m happy with my colour scheme of brown and black. When you’re drawing things like this it really helps if you have lines to guide you, and this is why I like dotted journals.

Here’s my calendar, which is a bit different from my August one. Instead of drawing individual boxes, I drew one big box and split it up into 30 squares. Plus, I didn’t make any mistakes and actually started it on a Monday, which is nice! At the bottom there’s a space for my school schedule, which will come in handy in class;) I also included a quote and a spot for my monthly goals in this spread.

These pages changed a lot compared to last month. I got a little crazy with the amount of pages I used in August, so I had to cut down a little bit this month! So here I squeezed in a habit tracker, mood tracker, blog planner (or any kind of planner you want it to be;)) and my gratitude log. I actually switched to an individual habit tracker from the grid style one, so we’ll see how that goes. I just colour a number if I did a particular habit that day instead of colouring in a square. My mood tracker pretty much stayed the same, except I’ll outline an arrow in various colours referring to the little chart near the bottom, instead of watermelons. All in all, these are some of my favourite trackers that I’ve done!

And here we have my weekly spread, which I have fallen in love with. I feel like my calligraphy is improving, and it really shows in this spread. I kept these pages kind of simple, and included a quote, word of the week, and spots where I can write down school tasks and whatever is coming up next week. I continued my arrow theme and colour scheme throughout this month. I love this spread so much because it’s practical yet pretty, and also, I just love it.;)

So yeah. If you couldn’t tell, I’m obsessed with this month’s spreads. I hope you find some inspiration in this post and create a beautiful, efficient lay-out for September!

Yours Truly, MyDayIsBooked;)))

Nutty Apple Crumble

Hey guys! I for one love a good apple crumble, and with fall coming up (ewww), I thought that this would be the perfect time for this post. This crumble turned out great, and I ended up using peanut butter instead of the recommended coconut oil (surprise surprise), which makes it unique. But you can totally use coconut oil if you prefer. Almonds give a nice crunch, and using oat flour instead of regular flour makes it healthier.  Scroll down for the recipe.;)

Serves 4-6

Ingredients:

  • 4 Gala Apples, peeled and sliced
  • 1 cup rolled oats
  • 1 cup oat flour (make by grinding oats in your blender)
  • 1 tsp cinnamon
  • 1/4 tsp allspice
  • 1/4 cup melted natural peanut butter (or sub melted coconut oil)
  • 1/4 tsp salt (omit if you’re using salted peanut butter)
  • 1/4 cup whole almonds
  • Drizzle of honey (optional)


Directions:

  1. Preheat the oven to 350F.
  2. Mix together the oats, oat flour, cinnamon, allspice, salt and almonds in a medium sized bowl.img_9245
  3. Add in the peanut butter (or coconut oil) and mix until combined. You may need to get in there with your hands to get rid of chunks of peanut butter or oil.
  4. Place the peeled and sliced apples in a parchment lined baking dish.img_9246
  5. Sprinkle the oat mixture over the apples evenly.
  6. Place the crisp in the oven for about 40 minutes, until the apples are soft.
  7. After 40 minutes in the oven, take out the crisp and drizzle a little but of honey on it. Place it back in the oven for another 5 minutes. (If you’re not using honey, just bake it for a full 45 minutes;)).
  8. Remove the crisp from the oven and enjoy with ice-cream, peanut butter, or more honey. Or all of the above!b50d553f-1135-4d82-b8c7-dd4d3cdd468c-1340-0000004593f2a867_file

Boom! Simple, easy, healthy and delicious! I hope that you enjoy my version of this classic fall dish!


Yours Truly, MyDayIsBooked;)))