Neapolitan Nice Cream

Hello everyone! Summer is here and I’m craving some sweet treats! So I brought out my blender and made some delicious Neapolitan Nice Cream😋. Nice Cream has a texture and taste similar to ice cream, but it’s generally made with frozen bananas. It’s light and refreshing, perfect for a hot summer day! This Nice Cream is super easy to make, and only requires 4 ingredients (not including water) to make all three flavours; vanilla, strawberry and chocolate. Make sure you give yourself time before serving to freeze your ingredients, as well as the final product. Here’s the recipe!

Neapolitan Nice Cream

Serves: 3-4

Total Time: 4 hours

Ingredients:

  • 6 medium bananas
  • 6 strawberries, washed
  • 1 tbs vanilla extract
  • 2 tbs unsweetened cocoa powder
  • Water

Directions:

  1. Chop up the bananas into round slices, keeping each banana separate. Split them evenly into three ziploc bags; two chopped bananas per bag. This is so that you can make each flavour of Nice Cream separately.
  2. Remove the stems from the strawberries and cut them into small slices. Put them in with one of the bags of bananas. This bag will be for the strawberry Nice Cream.
  3. Place all of the bags in the freezer, and freeze for at least 3 hours, or until all of the fruit is completely frozen.
  4. Once the strawberries and bananas are frozen, remove the bags from the freezer.
  5. Empty one bag of just bananas into your blender, along with the 1 tbs of vanilla and one tbs of water. This is for the vanilla Nice Cream. Blend until a smooth texture forms. It should look something like this:
  6. Scoop out the Nice Cream from the blender and use it to fill up one third of a lined loaf pan. Put the loaf pan in the freezer while blending up the other flavours.
  7. For the strawberry flavour, empty the bag with the bananas and strawberries into the blender and blend until you reach the same consistency as the vanilla. Scoop it into the loaf pan to fill another third of it, then put it back into the freezer.
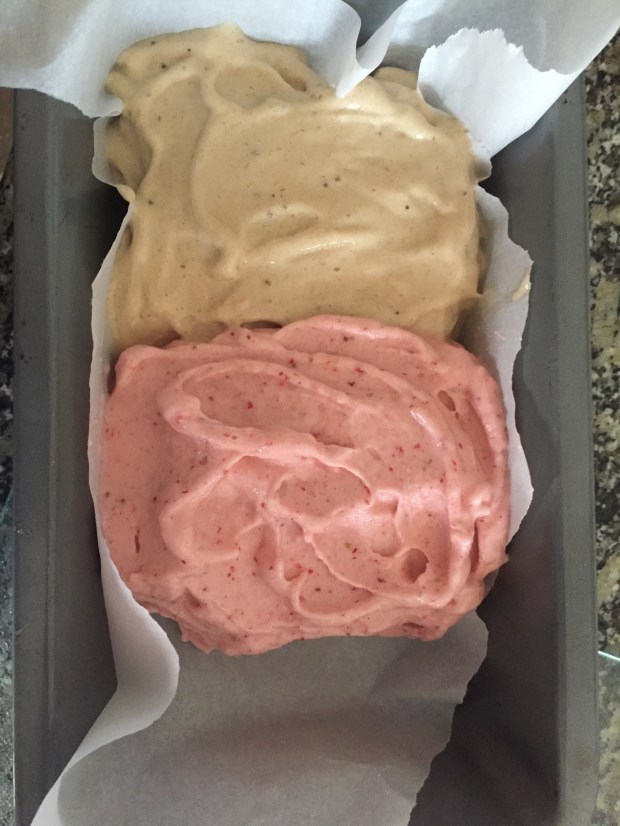
  8. Now it’s time for chocolate! Put the last bag full of bananas into the blender with the 2 tbs of cocoa powder and 1 tbs of water, and again blend until you reach that perfect consistency. Fill up the last third of the loaf pan with the chocolate Nice Cream.
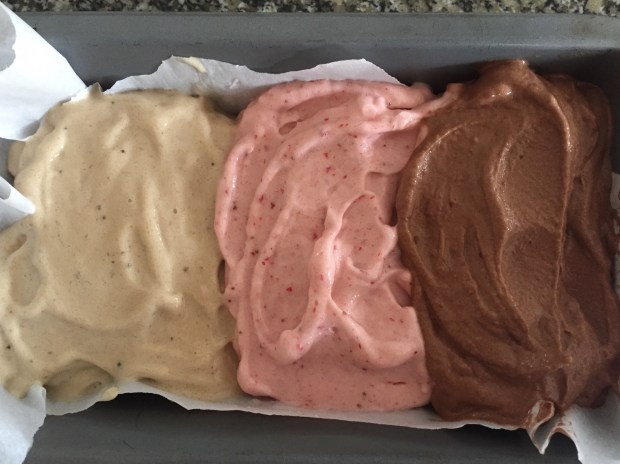
  9. Place the loaf pan in the freezer for about 30-45 minutes before serving, to get the perfect texture. If your Nice Cream gets to hard, let it thaw on the counter for a bit before digging in. Enjoy!
  • I hope you like this healthy summer treat! To be honest, I think chocolate was my favourite flavour, but the other ones were great too:) I gave my dog a little scoop of the strawberry and he loved it! Have an awesome week😊😊🍦🍦

Yours Truly,

MyDayIsBooked;)


Peanut Butter and Jam Tarts

Hi peoples! I’ve had a great weekend so far; I ate a fantastic avocado egg salad sandwich, did some bullet journaling, baked and decorated sugar cookies, painted eggs with my family, and today I made healthy and delicious Peanut Butter and Jam Tarts.

I was looking around Pinterest and Instagram for some Easter treat ideas, but pretty much all of the ones I found called for either coconut oil, dates, cocoa butter or maple syrup, all of which I don’t have at the moment. So I decided to get creative and come up with my own version of a healthy dessert: Peanut Butter and Jam Tarts.

These tarts are ridiculously easy to make and call for super simple ingredients. The shells are made up of the same formula as my Chocolate PB Banana Energy Balls; just bananas, oats, oat flour and a dash of vanilla. A berry filling is then poured over top of a teaspoon of peanut butter at the bottom of the shells, and voila, you have some beautiful tarts! They’re perfect as a snack, dessert, or quick breakfast. I hope you like them as as much as I do!

Peanut Butter and Jam Tarts

Makes: About 6 tarts

Total Time: 45 minutes

Ingredients:

For the tart shells:

  • 2 ripe bananas, mashed
  • 1 cup oat flour (ground up oats)
  • 1/2 cup rolled oats
  • 1/2 tsp vanilla
  • any kind of oil, for greasing the muffin tin

For the filling:

  • 2 cups frozen berries
  • 1 tsp vanilla
  • 1/4 cup water
  • 1 tbsp plus 6 tsp peanut butter
  • 2 tsp oat flour

Directions:

  1. Preheat your oven to 350 degrees Fahrenheit
  2. Grease 6 holes in a normal sized muffin tin with the oil. I used olive, but coconut or avocado would work too.
  3. Mix together the oats, oat flour, mashed bananas and vanilla in a bowl. Then use a tablespoon to scoop the mixture into six muffin holes. Use your fingers to spread it around and create a cup shape. Make sure that the mixture is evenly distributed and not too thick or thin in some parts.
  4. Bake for 10-15 minutes, until golden brown. Remove them from the muffin tin using a butter knife to pry them out and let cool.
  5. Stir together the frozen berries, vanilla, water, oat flour and 1 tbsp peanut butter in a small pot. Place over high heat, bring to a boil, and then let simmer for 5-10 minutes, until thickened. Make sure to stir the berries every once in a while so that they don’t burn. Place in the refrigerator to cool and set up a bit more.
  6. Spoon a teaspoon of peanut putter into the bottom of each tart. Then fill the rest of every tart with the berry filling.
  7. Enjoy!

Thanks for checking out my recipe! Have a great weekend and a Happy Easter!

Yours truly,

MyDayIsBooked:))))

Dark Chocolate Chunk Banana Bread

Hi everyone! This week I had a bunch of ripe bananas lying around my house, so I decided to make some banana bread. I looked up a recipe on Pinterest, and thanks to The Happier Homemaker, I baked up a tasty treat! However, I did change some of the ingredients to make it a bit healthier. In my version, there’s no refined sugar and I used oat flour. I also added in some dark chocolate chunks. Yum! I hope that you enjoy this lightened up recipe.

Super Moist Banana Bread

Makes: 6-8 servings

Total Time: 80-90 minutes

Ingredients:

  • 3-4 ripe bananas
  • 1/3 cup melted coconut oil
  • 1/4 cup maple syrup
  • 1 chia egg (made by soaking 1 tbs of chia seeds in 1/3 cup water for 15 minutes)
  • 1 tsp vanilla
  • 1 tsp baking soda
  • 1 tsp cinnamon
  • A pinch of salt
  • 1 1/2 cups oat flour
  • 1/2 cup dark chocolate chunks

Directions :

  1. Mash the bananas in a large mixing bowl.
  2. Add in the melted coconut oil, egg, vanilla and maple syrup and mix well.
  3. Next, measure out the oat flour, baking soda, cinnamon, salt and dark chocolate and stir into the banana mixture.
  4. Pour the batter into a loaf pan greased with coconut oil. Bake for at least 45 minutes.
  5. If you notice that the outside is browning but the inside looks a bit raw still, don’t worry. Remove the loaf from the oven, let cool, wrap with tinfoil and place in the fridge. Once the loaf has been in the fridge for a bit, the inside will firm up.
  6. Enjoy!

I hope you like this healthy, incredibly moist banana bread! Thanks again to The Happier Homemaker for the inspiration for the recipe! I’m going to go have some right now…

Yours Truly,

MyDayIsBooked;))

Nutty Apple Crumble

Hey guys! I for one love a good apple crumble, and with fall coming up (ewww), I thought that this would be the perfect time for this post. This crumble turned out great, and I ended up using peanut butter instead of the recommended coconut oil (surprise surprise), which makes it unique. But you can totally use coconut oil if you prefer. Almonds give a nice crunch, and using oat flour instead of regular flour makes it healthier.  Scroll down for the recipe.;)

Serves 4-6

Ingredients:

  • 4 Gala Apples, peeled and sliced
  • 1 cup rolled oats
  • 1 cup oat flour (make by grinding oats in your blender)
  • 1 tsp cinnamon
  • 1/4 tsp allspice
  • 1/4 cup melted natural peanut butter (or sub melted coconut oil)
  • 1/4 tsp salt (omit if you’re using salted peanut butter)
  • 1/4 cup whole almonds
  • Drizzle of honey (optional)


Directions:

  1. Preheat the oven to 350F.
  2. Mix together the oats, oat flour, cinnamon, allspice, salt and almonds in a medium sized bowl.img_9245
  3. Add in the peanut butter (or coconut oil) and mix until combined. You may need to get in there with your hands to get rid of chunks of peanut butter or oil.
  4. Place the peeled and sliced apples in a parchment lined baking dish.img_9246
  5. Sprinkle the oat mixture over the apples evenly.
  6. Place the crisp in the oven for about 40 minutes, until the apples are soft.
  7. After 40 minutes in the oven, take out the crisp and drizzle a little but of honey on it. Place it back in the oven for another 5 minutes. (If you’re not using honey, just bake it for a full 45 minutes;)).
  8. Remove the crisp from the oven and enjoy with ice-cream, peanut butter, or more honey. Or all of the above!b50d553f-1135-4d82-b8c7-dd4d3cdd468c-1340-0000004593f2a867_file

Boom! Simple, easy, healthy and delicious! I hope that you enjoy my version of this classic fall dish!


Yours Truly, MyDayIsBooked;)))


Chickpea Nutella

Hello again! I’m back, and this time you only had to wait ten days in-between posts! I think that’s a new record. Seriously though, this “Nutella” is amazing. If you’re skeptical about the whole chickpea thing, don’t worry, I was too. But the end result was this delicious chocolatey spread that goes well with just about everything. There is an option to add some peanut butter, which I obviously did, but if you’re sick of all the peanut butter recipes on this site than feel free to take a break from it! Personally, I don’t think I’ll ever get tired of peanut butter. Before I give you the recipe, I want to commemorate shaneandsimple.com for coming up with it:)

Ingredients:

  • 1 15oz can of chickpeas, drained, rinsed, and patted dry
  • 1/4 creamy natural peanut butter (optional)
  • 1 small ripe banana
  • 1/4 cocoa powder
  • 1 tsp vanilla
  • a pinch of salt
  • 2 tbsp water (or more; add until you reach your desired consistency)


Directions:

  1. Add all ingredients to a high-speed blender and blend until desired consistency is reached. Add more water if needed.


And……………. wow, that’s pretty much it. I think that’s the simplest recipe ever! Enjoy this spread on toast, with fruit, or anything else that needs chocolate on it! (Which is pretty much everything.) Thank for checking out this recipe! I’ll definitely be posting more in the summer – this darn invention called “studying for final exams” is killing my free time! Enjoy this spread in the meantime!


Yours Truly, MyDayIsBooked;))