Slaw is so good guys! It goes on so many things- like sandwiches, bowls, and TACOS- and makes a delicious side! Today I’m sharing an amazing, fresh slaw recipe that’s lightened up with a super tasty dressing using avocado. Yum!
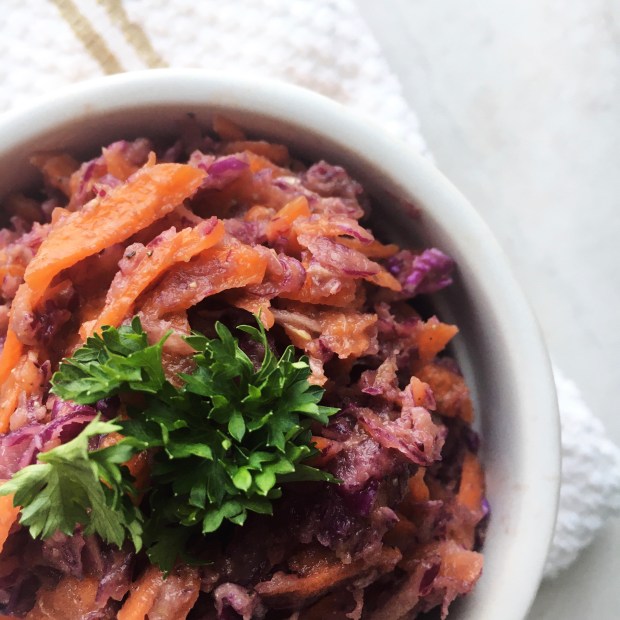
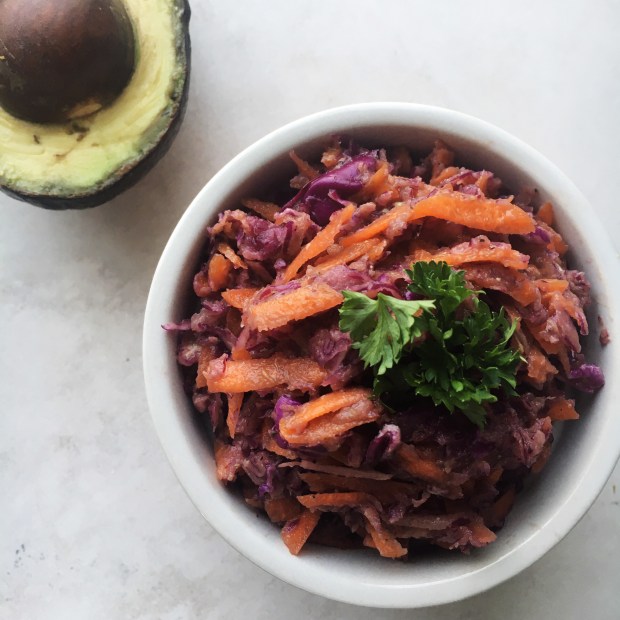
We’re keeping it super simple and using just one kind of cabbage and some carrots in this slaw. And if we’re going to pick just one cabbage, it’s gotta be purple cabbage! I grated up some purple cabbage and my carrots and combined them in a large bowl. This step doesn’t take very long at all, but if you’re looking for a speedier option, you can always grab a bag of pre-shredded cabbage mix at the grocery store.
The dressing is really what makes this slaw- it doesn’t require any blender whatsoever, and is so tangy and delish! I mashed up half of an avocado and mixed in some lemon juice, apple cider vinegar, garlic powder, and lots of salt and pepper. So easy, right? When mixed in with the veggies, the dressing loses its green colour, and so you don’t even notice that you’re eating avocado- all you taste is a fresh and amazing slaw!
This is a great addition to any supper, and would be so good on my Veggie Tacos, Epic Veggie Sandwich, or as a finishing touch to a bowl or salad! It’s so healthy, delicious, and bright, and I love how simple it is to make!
Just posted these super delicious Quick and Easy Banana Pancakes not too long ago, so I thought I should probably get a waffle recipe up here, because I know lots of people love waffles more than pancakes. Personally, I can’t decide! I love both pancakes and waffles- and I wouldn’t say not to either of these delicious recipes.
These Protein Waffles only require a few ingredients, are SO TASTY, and are, of course, full of protein. I recently got my hands on some protein powder for the first time in a little while, and so I’m so excited to use it! It makes my smoothie bowls and oats super creamy, and also is a great addition to pancakes, muffins, other baked goods, and these waffles. Protein is important for recovery after working out, building muscle, and just keeping your body functioning. The one I used is vegan, but there are many different kinds out there! If you’re looking for more info you can find it here. Adding protein like this at breakfast is a great way to start your day and fill you up! Eggs and Greek yogurt are also great sources of breakfast protein, but when you want to switch it up a bit, protein powder can be delicious. Especially in WAFFLE FORM.
All of the batter ingredients get mixed up in one bowl for the least amount of dishes possible (you’re welcome), and then simply poured into a waffle iron. Make sure that you spray your iron with a bit of cooking oil before adding the batter, so that you can remove your waffles as easy as possible! I forgot to spray the top of mine and had a bit of trouble- that’s why I’m here, so you can learn from my mistakes. My waffles were in the iron for about 2 minutes, and got nice and golden brown on the outside, and super fluffy on the inside!
I used vanilla protein powder in this recipe, because I love the flavour that it lends. But if all you have is another flavour- like chocolate- feel free to try it out! Chocolate waffles would also be very tasty.
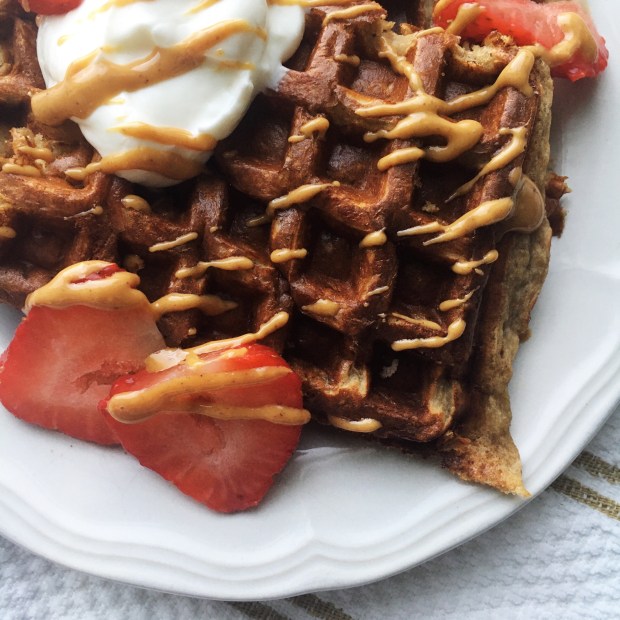
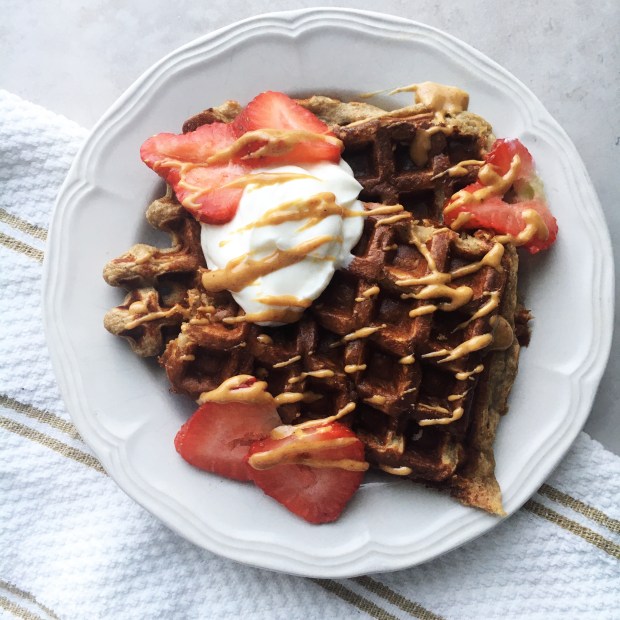
After removing these beautiful waffles from the iron, I topped them with a dollop of Greek yogurt, some sliced strawberries, and a drizzle of peanut butter. SO. DANG. GOOD. This recipe makes 1 serving, or about 2 waffles, but if you want to share this amazingness, go ahead and double it. I did not want to share.
I hope you enjoy these Vanilla Protein Waffles! There are so many occasions to enjoy them- whether it’s breakfast on a Saturday morning, a nice Valentine’s Day brunch, or a delicious snack. Making a big batch and freezing them for weekday mornings is a great idea as well! Way better than Eggos:) Also- don’t forget to let me know if you prefer pancakes or waffles in the comments!
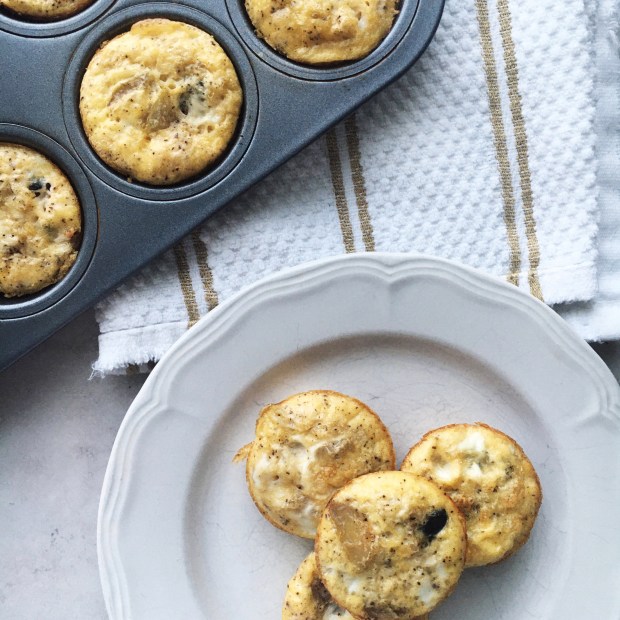
I love my eggs! I usually have a couple for either breakfast or lunch to get in that protein and all those amazing omega-3s. My preferred egg cooking methods are scrambling and boiling- but that can be a problem during busy mornings. And so I present you with these amazing Baked Egg Cups!
They’re cute little bites of breakfast goodness, and are super easy to take to-go! Just grab a couple of these on your way out the door along with some toast, and you’ve got a balanced and filling breakfasts. These would also be great in a bowl or salad, or wrap for meal prep! And of course, when you want a high protein snack, these egg cups have got your back.
Ok, so it’s the weekend and you are MEAL PREPPING because that’s how you roll. And while you’re whipping up a bunch of delicious food, why not throw these egg cups into the mix? Start by sauteeing some diced onion and black beans in a little olive oil, until those onions get soft and a little brown. Next you’re going to remove that from the heat and mix in some diced tomatoes, and scoop a little bit of this veggie mixture into each cup of some mini muffin tins! So cute:)) Fill the tins with some perfectly seasoned whisked egg and throw them in the oven for 10-12 minutes, and you’ve got yourself breakfast and snacks for the whole week!
These Baked Egg Cups are so tasty- those onions and tomatoes give a lot of flavour. Plus, those black beans add a bit more heartiness and some additional protein! Dipping these in salsa or making a breakfast burrito out of them would be so good!
You can store them in the fridge if you’re going to eat them all throughout the week, but you can also throw them in a Ziploc bag and freeze them for whenever you need! Just throw them in the microwave for 1-2 minutes before devouring.
Hopefully these lil egg cups help you with your breakfast meal prepping! Enjoy:)
-Cooking spray or a bit more olive oil to grease the muffin tins.
Directions
1. Heat the olive oil over medium heat in a pan. Add in the onions and black beans, and cook until the onions are translucent and slightly browned, about 4-5 minutes. Season with salt and pepper.
2. Preheat your oven to 350 degrees Fahrenheit.
3. Remove the pan from the heat and stir in the diced tomatoes. Spray two mini muffin tins lightly with the cooking spray, or grease each tin with some olive oil.
4. In a bowl, whisk together the eggs and season generously with salt and pepper.
5. Scoop about a 1/2 tbsp of the bean, onion and tomato mixture into each mini muffin cup. Cover the mixture with the beaten eggs, filling the mini muffin cups almost to the top.
6. Place the muffin tins in the oven and bake the egg cups for about 10-12 minutes, until they appear solid.
7. Remove from the oven, and let cool completely before eating or freezing.
I’m SO excited for this post because sushi is my absolute favourite food. I would consider going vegan but I don’t think I could give up sushi! That sashimi- or raw fish- is just too good. Going out to sushi restaurants is always so fun, but right now depending on where you live you might not be able to go to a restaurant. So in this post I’m going to detail how to make your very own sushi at home!
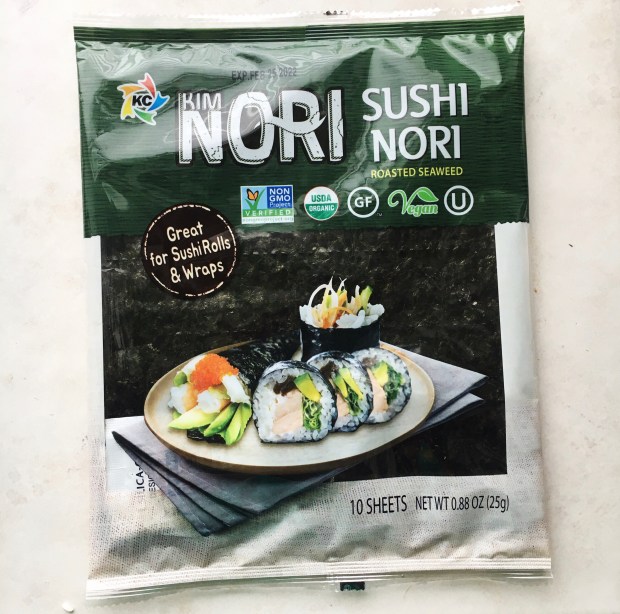
Making sushi can seem complicated, but it doesn’t have to be. All you need is a few simple ingredients that you can find in the International or Asian aisles!
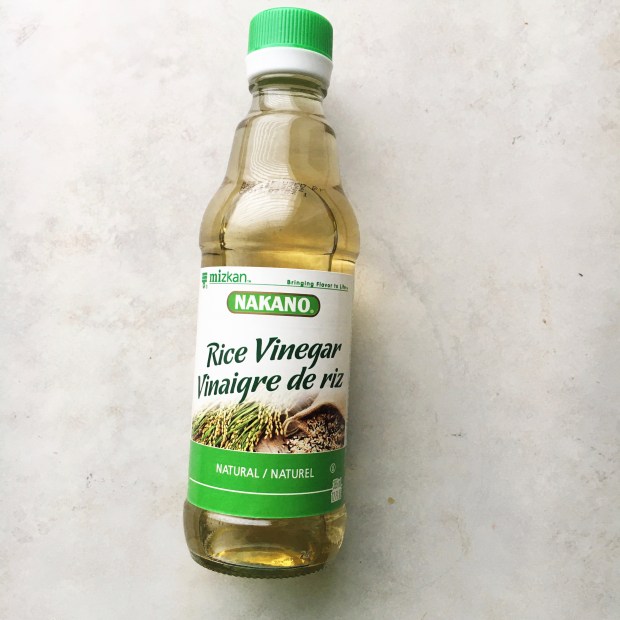
Sushi Rice – this is usually a Californian or Japanese short or medium grain rice, but will be labelled as sushi rice. It’s important that you use sushi rice because it’s more starchy and sticky than regular rice, which is important when spreading it onto your nori.
Sushi Nori (roasted seaweed) – these are rectangles of roasted seaweed that the rice gets spread onto, and everything gets rolled inside.
Rice Vinegar – rice vinegar is used to season up your sushi rice! If you’re making your sushi gluten free, make sure you purchase a gluten free rice vinegar.
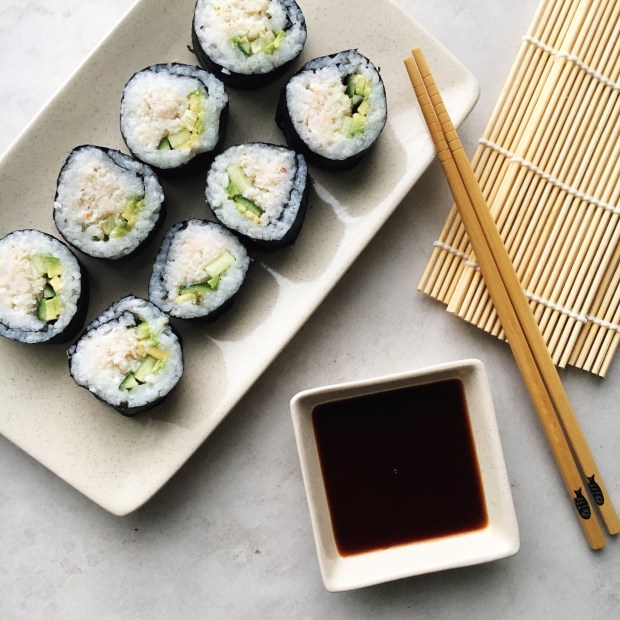
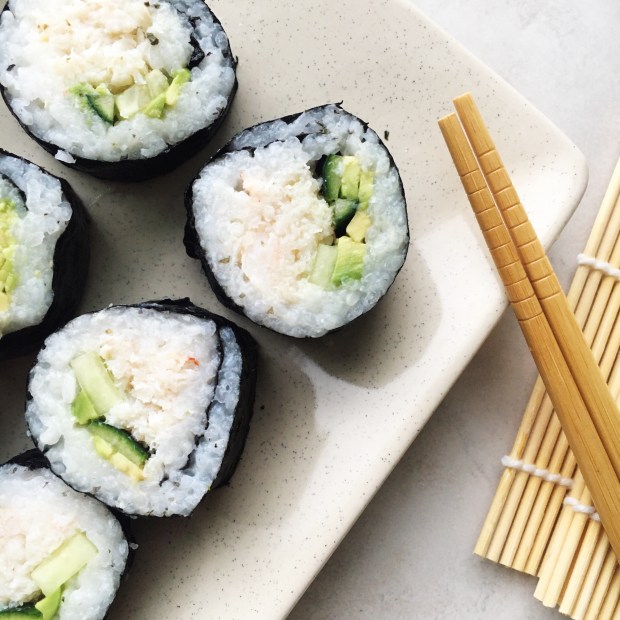
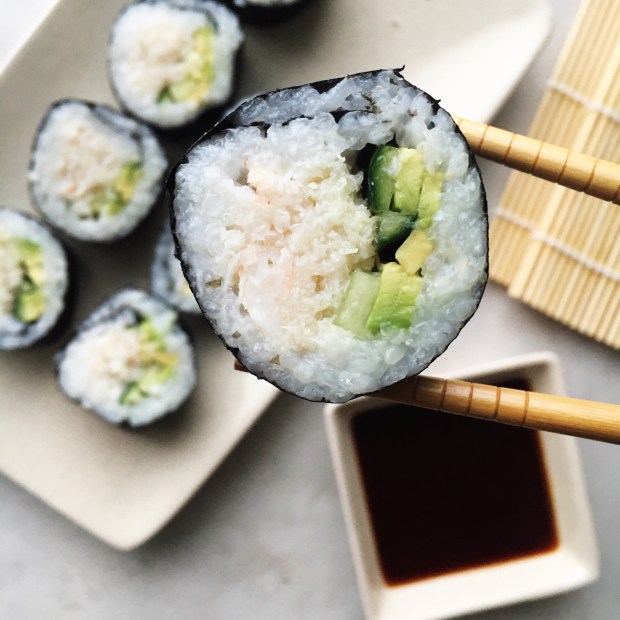
With those ingredients as your base, you can proceed to choose any fillings you’d like. I went with some avocado, cucumber, and canned (not imitation) crab to make some great California rolls. There are so many delicious combinations you can try though- and I hope to get my hands on some sushi grade fish soon!
Some more roll ideas include:
Vegetarian- fill your rolls with mushrooms cooked in soy sauce, just avocado, carrot, or cucumber, or some combination of the four.
Sushi Grade Fish- slice up some sushi grade salmon or tuna and pair it with some creamy avocado.
Cooked Shrimp, Crab or Tuna- fill your rolls with cooked shrimp, canned crab, or canned tuna mixed with soy and avocado (see my Tuna and Avocado Poke Bowls)
Ok, so now we’ve got all of our ingredients rounded up- now it’s time to make some rolls! The first and most important step is cooking your rice.
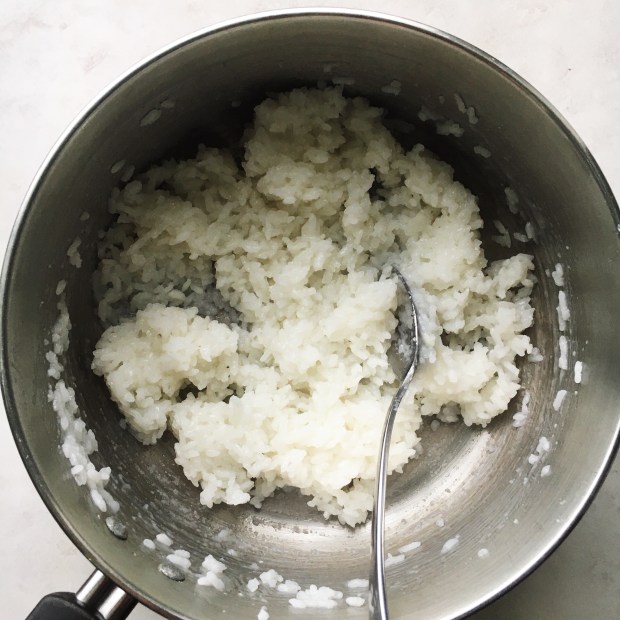
It’s very important to rinse your rice first, to get rid of some of that starchiness. Otherwise, your rice with be too mushy. I placed mine and a bowl and rinsed and drained it about 4-5 times, swirling it around with my fingers, under the water is clear when I mixed it. I then filled the bowl with more water and let the rice soak for about 10 minutes.
Once the rice is good to go, it goes into a pot with some more water and simmers for about 10-15 minutes, until it’s cooked all the way through. I then let it cool for a bit before mixing in some rice vinegar for flavour.
Get ready to get rolling! To roll your sushi rolls, you’ll need a bamboo sushi mat- these are easily found on Amazon for around ten dollars or so. I got out my mat, covered it with a piece of plastic wrap, and placed one sheet of nori down.
I then scooped out some sushi rice onto the nori, and spread it around with my fingers to cover the whole sheet in a nice, even layer. You don’t want to see too much of the nori underneath, but you also don’t want the rice layer to be to thick, so find a good middle ground. Leave about a centimetre strip at the top empty, however, so that it can seamlessly seal the end of the roll. This picture does not illustrate this very well- do better than me!
For the rolls, you can choose if you want to have the rice on the inside, or the outside. In this demonstration I flipped my nori over so that the rice would be on the outside, but in the photos I took of my final product were of my second batch of rolls, where the rice was on the inside. I found that these were easier to roll and held together more nicely, but you can choose whichever you like best! Here I proceeded to add in my filling right on top of the rice in a straight line, leaving some space at the bottom.
To roll up the sushi, you’re going to fold over the bamboo mat from the bottom, until that overhang you left at the bottom covers the filling ingredients to form a roll. Press firmly so that everything gets held together, and keep rolling until the full sheet of sushi covered nori is rolled into a nice cylinder. You may need to pause a few times to adjust the plastic and the mat during this process. Once everything is rolled up, you can use a bit of water on your finger to seal the nori on the outside of the roll.
All that’s left is to cut the sushi into nice even pieces, dip em into some soy sauce, and enjoy! It can take a little while to get a hang of the rolling, so don’t be discouraged if your first few rolls aren’t turning out so nice- my first rolls were a bit rough. Making sushi is an art that takes years to perfect, but these homemade rolls are great for a little something different at home, and they’re super fun to make as well!
Definitely play around with filling combinations, dipping sauces, and toppings too, to make these rolls your own. If you have any questions feel free to leave a comment! Enjoy:)
1. Add the rice to a small bowl, fill it with water, and swirl it around with your fingers. You should see the water turn white and cloudy as the starch from the rice is released. Drain the rice and repeat this process 4-5 times, until the water remains clear.
2. Fill the bowl with water once more and let the rice soak for 10 minutes to remove additional starch. Drain and add the rice to a pot.
3. Add the 1 cup of water to the pot and bring to a boil, then turn the heat to low, cover, and let the rice simmer for 10-15 minutes, until cooked through. Set aside and let cool before mixing in the rice vinegar.
4. Lay your bamboo sushi mat flat on your counter and cover it with a piece of plastic wrap. Place a sheet of nori down, and proceed to spread out about half of the rice on it in an even layer, leaving an empty space of about one centimetre at the top for sealing.
5. Either flip the nori over so that the rice will be on the outside of your sushi, or leave it so that the rice will be on the inside. In a straight line about an inch away from the bottom of the nori, lay down half of the crab, cucumber, and avocado.
6. Begin rolling the sushi by folding over your mat from the bottom, an pressing firmly to make a tight roll once the empty space at the bottom of the nori has completely encircled the filling. Continue to roll your sushi by rolling the mat, pausing to adjust the plastic or the mat when needed.
7. Seal the roll by brushing a little bit of water onto the nori with your finger. Slice into 8 even rolls.
8. Repeat steps 4-7 with your remaining ingredients.
Coming at you with another quick and easy lunch idea! This one uses cauliflower rice, which I’ve recently discovered and is pretty dang good! It also is loaded with veggies and includes some eggs to get in that protein.
There are so many options for a base when it comes to making “fried rice”- normal white rice, brown rice, and quinoa are all tasty options. But this cauliflower rice just lightens everything up while also being super delicious! The flavour of the cauliflower adds so much to the dish. In addition to that cauliflower, the rainbow of veggies in this speedy meal includes carrots, celery, red pepper, purple cabbage, and red onion. So good!
All of that yummy veg is sauteed first so that they have a chance to get nice and tender. Once they do, everything moves pretty quickly, so make sure you have your ingredients handy. The cauliflower rice gets added- I used some I had in the freezer- along with the eggs, and then everything is seasoned with salt and pepper. The cauliflower only needs to be sauteed for the amount of time it takes the eggs to cook, so that it doesn’t get super mushy, and is still rice like.
I seasoned this dish very simply with just some salt and pepper, to really let all of those beautiful veggies shine! It’s so tasty, fresh, healthy and delicious, and is perfect for meal prepping the night before school, as a quick dinner, or a simple lunch at home. I love the eggs in here because of the great protein they offer! However, if you want to veganize this dish, you can easily substitute for chickpeas or beans.
Hope you like this fast and tasty take on a simple dish!
-1 1/2 cups cauliflower rice, fresh or frozen (grate or process cauliflower florets)
-2 eggs
-Salt and pepper to state
Directions
1. Heat the olive oil over medium heat in a pan. Add in the veggies, except for the cauliflower rice, and sautee until tender, about 6-8 minutes.
2. Add in the cauliflower rice and the eggs, and scramble the eggs with a wooden spoon as you stir the rice into the veggies. Continue to sautee until the eggs are cooked through.