Posts

Chocolate Peanut Butter Drizzle Cookies

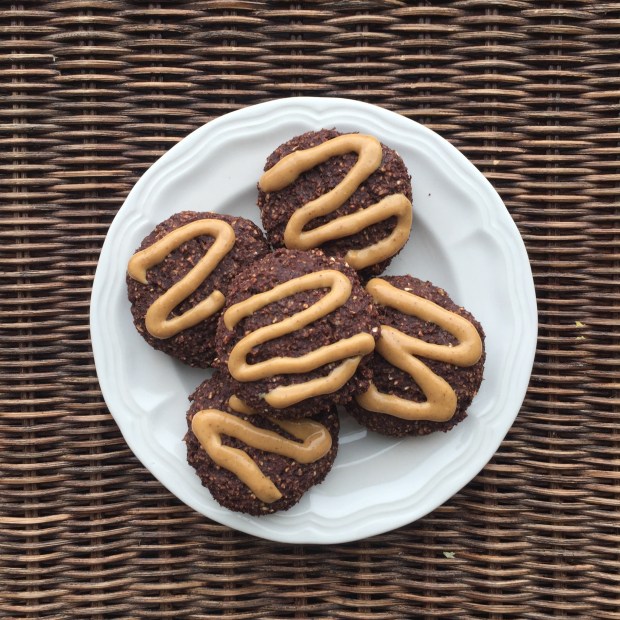
Hi guys! Hope you’re all doing well;)) It’s been steady desserts for the past little while, and I’m not complaining! I have a pretty big sweet tooth. And, as always, I need to find a way to satisfy my peanut butter addiction. So, I present to you (insert drum roll here) Chocolate Peanut Butter Drizzle Cookies! They’re sweet and so chocolatey, and make the perfect snack. Then there’s that PEANUT BUTTER DRIZZLE. I mean, don’t even get me started. This is a match made in cookie heaven. Also, I tried using raw brown sugar, which isn’t as processed as white sugar, for the first time, and I actually really like it! You can probably sub normal brown sugar or coconut sugar if you want though. Excuse my rambling, I understand if you just want to get to the cookies already. Scroll down for the recipe!

Chocolate Peanut Butter Drizzle Cookies

Serves: Makes 10-12 cookies

Total Time: 60 minutes

Ingredients:

  • 1 1/2 cups oat flour
  • 1/3 cup cocoa powder
  • 1/4 cup raw brown sugar
  • 1 tsp baking powder
  • 1 tsp vanilla
  • 1 egg
  • 1 ripe banana, mashed
  • Peanut butter, for drizzling (or dipping, I won’t judge)

Directions:

  1. Mix together the dry ingredients in a large bowl.
  2. Add in the mashed banana, vanilla, and egg, and stir until combined. Cover the bowl with plastic wrap and let chill in the fridge for 30 minutes. Sometimes you can be a rebel and skip steps like this, but I would not recommend that unless you want to spend ten years trying to form nice balls.
  3. Preheat your oven to 350 degrees Fahrenheit. Scoop out heaping tablespoons of the dough and form into round balls. Place them on a baking sheet and make a criss-cross pattern with your fork to flatten them out a bit.
  4. Bake for 15 minutes, then remove from the oven and let them cool completely.
  5. To make the drizzle, spoon a little bit of natural peanut butter into a small ziploc bag, and cut a little hole in the corner. Use it as a piping bag, and drizzle away. PS. THIS STEP IS NOT OPTIONAL. THE PEANUT BUTTER DRIZZLE IS ESSENTIAL TO THE STRUCTURAL INTEGRITY OF THIS COOKIE.

So yeah, there you go! Let me know if you make these beauties and how they turned out;)

Yours Truly,

Olivia

Stuffed Pepper Stew

Hey there! Hope you’re all doing well;)) I find that cooking is a great way to stay busy, so I’ve been trying to at least plan out new recipes every day. I wanted to make stuffed peppers, because they’re so comforting and delicious. But it turns out that I only had one big pepper, and two mini ones. Here’s where some quarantine problem solving comes in! This Stuffed Pepper Stew combines all of the flavours of a stuffed pepper, but in stew form. It’s so good and uses super simple ingredients! It actually might be better than a stuffed pepper, because it reminds me of an amazing Hungarian pepper dish that my Mom and Grandma make. Plus, there’s lots of protein in there from lentils. I also used some soy sauce to boost the savoury flavour, which is a trick I learned from The Stingy Vegan. All the veggies get simmered in a delicious broth that’s loaded with herbs and spices, and it’ll make your house smell really good;)) This stew is also one of those things that tastes better the next day, because all of the flavours sit together overnight. Check out the recipe down below;))

Stuffed Pepper Stew

Serves: 4

Total Time: 90 minutes

Ingredients:

  • 1 tbsp olive oil
  • 1 small onion, diced
  • 2 bell peppers, any colour, chopped
  • 1 clove of garlic, minced
  • 1 sprig of oregano, finely chopped (or 1/2 tbsp dried oregano)
  • 1/2 tbsp basil
  • 1 tbsp soy sauce
  • 1/2 tsp cumin
  • 1/4 tsp allspice
  • 1/2 cup green lentils
  • 1 can of diced tomatoes
  • 1 tbsp of tomato paste
  • Salt and pepper to taste

Directions:

  1. Heat the olive oil in a large pot. Add in the onion and cook until translucent, about 6 minutes.
  2. Add in the peppers and garlic, and cook for another six minutes until the peppers are soft.
  3. Dump the diced tomatoes, spices, soy sauce, herbs, and lentils into the pot and stir until combined. Bring the mixture to a boil, then turn the heat to low and simmer for about an hour, until the lentils have cooked through.
  4. Once the lentils are cooked, stir through the tomato paste and season with salt and pepper.
  5. Enjoy with rice, quinoa, some bread, or by itself!

Keep cooking and creating!

Yours Truly,

MyDayIsBooked

Baked Apples

I’ve been craving a lot of sweet stuff recently, probably because of Easter, but I don’t feel like eating something heavy. If you’re in the same boat, then these apples are about to change your life! They’re rubbed with spices and then baked until soft and sweet, making them the perfect light snack or dessert. Also, I love how simple they are. You won’t need to run out to the grocery store for these babies! If you have a little nice cream or yogurt on hand, then that’s a bonus because it would pair well with a steaming hot apple right from the oven…. did you hear that? It sounded like angels were singing from heaven as I described these apples. I don’t blame them. Here’s the recipe!

Baked Apples

Serves: 4 (but lets be honest here; you’re going to want at least 2 halves so the legit number of servings is 2)

Total Time: 40 minutes

Ingredients:

  • 2 apples (I used gala but I think any kind would work)
  • 1 tsp coconut oil
  • 1/2 tsp ground cinnamon
  • 1/4 tsp ground ginger
  • 1/4 tsp ground nutmeg
  • 1/4 tsp ground allspice

Directions:

  1. Preheat your oven to 350 degrees Fahrenheit.
  2. Cut the apples in half, remove the stems, and use a spoon to remove the cores. Put aside.
  3. Mix together the spices and coconut oil in a small bowl. Rub the 4 apple halves with the mixture until they’re evenly coated.
  4. Place the apples skin down in a glass baking dish, and bake for 15 minutes.
  5. Once 15 minutes have passed, raise the oven’ s temperature to 375 degrees Fahrenheit, and continue baking for another 15 minutes.
  6. Remove the apples from the oven and serve with hot with nice cream or greek yogurt;))

Enjoy these apples!

Yours Truly,

MyDayIsBooked;)))

Seedy Energy Squares

Sure, you’re probably doing school from home right now and haven’t been out of the house in awhile, but who says staying inside is easy? It takes a lot of fuel to be productive at home, and so that’s why I made these delicious Seedy Energy Squares. They’re full of healthy fats, with some protein in there, too, to keep you going all day long! These squares are also super flexible, so as long as you have oats and bananas, which are two of my staples, you can customize this recipe to your heart’s content. Dried fruit and nuts would be great in these. I used hemp hearts and pumpkin seeds;)) If you want something dense, subtly sweet and seriously addictive, this is the recipe for you!

Seedy Energy Squares

Serves: Makes 20-25 squares

Total Time: 35 minutes

Ingredients:

  • 2 ripe bananas
  • 2 1/2 cups rolled oats
  • 1/3 cup roasted pumpkin seeds
  • 1/3 cup hemp hearts
  • 1 tsp cinnamon
  • 1 tbsp vanilla
  • 1/4 cup coconut oil

Directions:

  1. Preheat your oven to 375 degrees Fahrenheit.
  2. Mash the bananas in a large bowl, then mix in the oil, vanilla and cinnamon until well combined.
  3. Add in the oats, pumpkin seeds and hemp hearts into the bowl and stir until well mixed.
  4. Dump the mixture into a parchment lined 8×8 baking pan, and spread it evenly around the bottom. Bake in the oven for about 20 minutes, until the sides are golden brown.
  5. Remove from the oven and cool completely before cutting into 20-25 squares.
  6. Enjoy!

Hopefully these help you to power through your day and show that school work who’s boss!! Happy snacking;))

Yours Truly,

MyDayIsBooked;))

Mediterranean Sweet Potato Toasts

Hey guys! Hope you had a good weekend. The days are all starting to blur together, and everyday feels like a Saturday, but hopefully you at least had a break from online classes to give you some weekend vibes;)) Personally, I’m loving that I don’t have to pack lunches anymore and can eat on my own schedule, which gives me time to make awesome stuff like these Mediterranean Sweet Potato Toasts. You only need a sheet pan and a little prep time, and you just throw them in the oven and let the veggies get delicious and caramelized while you go back to watching Netflix or reading or whatever your favourite quarantine activity is. Also, they’re REALLY GOOD. The sweet potatoes get to that place where they’re like, a tiny bit burnt on the edges but perfectly soft in the centre, and then you’ve got your delicious Mediterranean spiced veggies, plus a dollop of tzatziki on top. I mean, come on man. Pretty dang good for a meal that basically makes itself. Here’s the recipe;))

Mediterranean Sweet Potato Toasts

Serves: 2

Total Time: 45 minutes

Ingredients:

  • 1/2 a large sweet potato
  • 1 can of chickpeas, drained and rinsed
  • 1 red bell pepper, cut into strips
  • 1/2 a red onion, thickly sliced
  • 2 tbsp olive oil, plus a little bit more for rubbing the sweet potatoes with
  • 2 tsp cumin
  • 1/2 tsp allspice
  • 1 tsp oregano
  • 1 tsp paprika
  • 1 1/2 tsp garlic powder
  • Salt and pepper to taste
  • Tzatziki (see Dill Tzatziki) prepared in advance (or sub hummus)

Directions:

  1. Preheat your oven to 400 degrees farenheit.
  2. Cut the sweet potato lengthwise into slabs about 1/4 of an inch thick (you should make about 4 toasts). Place them on a parchment lined baking sheet and rub them on both sides with a bit of olive oil.
  3. Mix together the chickpeas, sliced onions and peppers, spices and olive oil in a large bowl. Spread them evenly onto the same parchment lined pan as the sweet potatoes, trying not to overlap anything. Roast for about 30 minutes. Halfway through the baking time, remove the pan from the oven and flip the sweet potatoes before continuing to roast.
  4. Take the pan out of the oven, and serve the toasts with the roasted veggies, tzatziki, and maybe some Greek salad;))

Hope you enjoy this quick and easy lunch or dinner! Stay safe guys;)

Yours Truly,

MyDayIsBooked;))