Posts

Vanilla Protein Waffles

Just posted these super delicious Quick and Easy Banana Pancakes not too long ago, so I thought I should probably get a waffle recipe up here, because I know lots of people love waffles more than pancakes. Personally, I can’t decide! I love both pancakes and waffles- and I wouldn’t say not to either of these delicious recipes.

These Protein Waffles only require a few ingredients, are SO TASTY, and are, of course, full of protein. I recently got my hands on some protein powder for the first time in a little while, and so I’m so excited to use it! It makes my smoothie bowls and oats super creamy, and also is a great addition to pancakes, muffins, other baked goods, and these waffles. Protein is important for recovery after working out, building muscle, and just keeping your body functioning. The one I used is vegan, but there are many different kinds out there! If you’re looking for more info you can find it here. Adding protein like this at breakfast is a great way to start your day and fill you up! Eggs and Greek yogurt are also great sources of breakfast protein, but when you want to switch it up a bit, protein powder can be delicious. Especially in WAFFLE FORM.

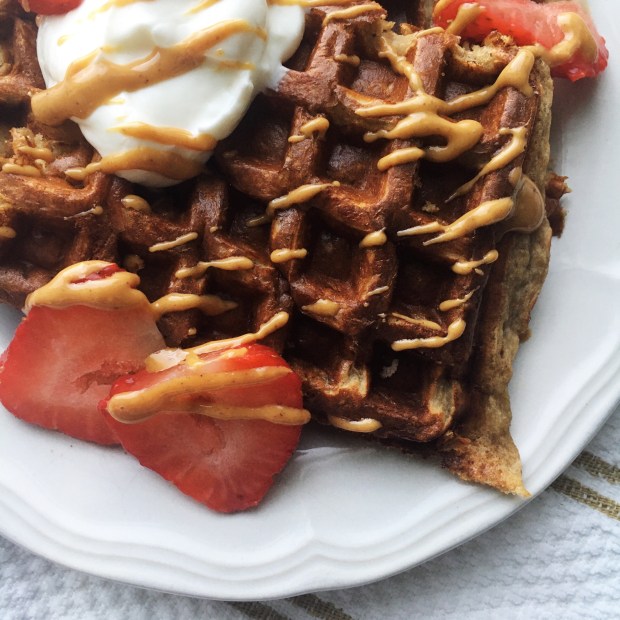
All of the batter ingredients get mixed up in one bowl for the least amount of dishes possible (you’re welcome), and then simply poured into a waffle iron. Make sure that you spray your iron with a bit of cooking oil before adding the batter, so that you can remove your waffles as easy as possible! I forgot to spray the top of mine and had a bit of trouble- that’s why I’m here, so you can learn from my mistakes. My waffles were in the iron for about 2 minutes, and got nice and golden brown on the outside, and super fluffy on the inside!

I used vanilla protein powder in this recipe, because I love the flavour that it lends. But if all you have is another flavour- like chocolate- feel free to try it out! Chocolate waffles would also be very tasty.

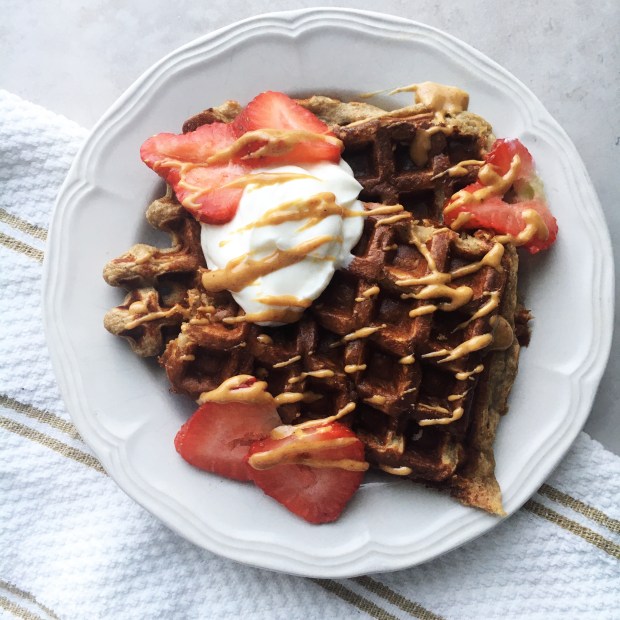
After removing these beautiful waffles from the iron, I topped them with a dollop of Greek yogurt, some sliced strawberries, and a drizzle of peanut butter. SO. DANG. GOOD. This recipe makes 1 serving, or about 2 waffles, but if you want to share this amazingness, go ahead and double it. I did not want to share.

I hope you enjoy these Vanilla Protein Waffles! There are so many occasions to enjoy them- whether it’s breakfast on a Saturday morning, a nice Valentine’s Day brunch, or a delicious snack. Making a big batch and freezing them for weekday mornings is a great idea as well! Way better than Eggos:) Also- don’t forget to let me know if you prefer pancakes or waffles in the comments!

Yours Truly,

Olivia:)))

Vanilla Protein Waffles

  • Servings: 1
  • Print

Ingredients

-1 scoop (34g) vanilla protein powder

-1/2 a ripe banana

-1 egg

-2 tbsp almond milk

-1/2 tsp baking powder

-1/4 tsp cinnamon

-cooking spray


Directions

1. Heat up your waffle iron.

2. Mash the banana in a small bowl. Whisk in the egg, and then add in the remaining ingredients (except for the cooking spray).

3. Spray the top and bottom of your waffle iron with the cooking spray. Scoop the waffle batter into the iron to fill 2 of the waffle moulds.

4. Clamp down the waffle iron and cook your waffles for about 2 minutes, until golden brown.

5. Carefully use a for to pry your waffles out of the iron, and serve warm with your favourite toppings.


Baked Egg Cups

I love my eggs! I usually have a couple for either breakfast or lunch to get in that protein and all those amazing omega-3s. My preferred egg cooking methods are scrambling and boiling- but that can be a problem during busy mornings. And so I present you with these amazing Baked Egg Cups!

They’re cute little bites of breakfast goodness, and are super easy to take to-go! Just grab a couple of these on your way out the door along with some toast, and you’ve got a balanced and filling breakfasts. These would also be great in a bowl or salad, or wrap for meal prep! And of course, when you want a high protein snack, these egg cups have got your back.

Ok, so it’s the weekend and you are MEAL PREPPING because that’s how you roll. And while you’re whipping up a bunch of delicious food, why not throw these egg cups into the mix? Start by sauteeing some diced onion and black beans in a little olive oil, until those onions get soft and a little brown. Next you’re going to remove that from the heat and mix in some diced tomatoes, and scoop a little bit of this veggie mixture into each cup of some mini muffin tins! So cute:)) Fill the tins with some perfectly seasoned whisked egg and throw them in the oven for 10-12 minutes, and you’ve got yourself breakfast and snacks for the whole week!

These Baked Egg Cups are so tasty- those onions and tomatoes give a lot of flavour. Plus, those black beans add a bit more heartiness and some additional protein! Dipping these in salsa or making a breakfast burrito out of them would be so good!

You can store them in the fridge if you’re going to eat them all throughout the week, but you can also throw them in a Ziploc bag and freeze them for whenever you need! Just throw them in the microwave for 1-2 minutes before devouring.

Hopefully these lil egg cups help you with your breakfast meal prepping! Enjoy:)

Yours Truly,

Olivia:))

Baked Egg Cups

  • Servings: Makes 18 Mini Egg Cups
  • Print

Ingredients

-1 tsp olive oil

-1/4 of a white onion, diced

-1/2 cup canned black beans, drained and rinsed

-1/2 a tomato, diced

-5 eggs

-Salt and pepper to taste

-Cooking spray or a bit more olive oil to grease the muffin tins.


Directions

1. Heat the olive oil over medium heat in a pan. Add in the onions and black beans, and cook until the onions are translucent and slightly browned, about 4-5 minutes. Season with salt and pepper.

2. Preheat your oven to 350 degrees Fahrenheit.

3. Remove the pan from the heat and stir in the diced tomatoes. Spray two mini muffin tins lightly with the cooking spray, or grease each tin with some olive oil.

4. In a bowl, whisk together the eggs and season generously with salt and pepper.

5. Scoop about a 1/2 tbsp of the bean, onion and tomato mixture into each mini muffin cup. Cover the mixture with the beaten eggs, filling the mini muffin cups almost to the top.

6. Place the muffin tins in the oven and bake the egg cups for about 10-12 minutes, until they appear solid.

7. Remove from the oven, and let cool completely before eating or freezing.


February 2021 Reading List

Hi guys! I don’t know about you, but right now I’m absolutely overwhelmed by the amount of books on my book list. I think I’ve mentioned this before but I keep a running list of books I want to read on my phone, and it’s so long right now! Definitely not complaining because this is a great problem to have.

I did a bunch of research on books that can fill in my prompts for my 2021 Reading Challenge, and I found lots of great ones! So I think I’ll finish my challenge a bit easier this year- last year it was a bit down to the wire. I honestly couldn’t decide which books to read this month because there are SO many good ones, but I think I came up with a nice list! The bookstore gift cards that I got for Christmas are really coming in handy.

I’m so much more open to reading different genres and obscure authors now, and I think that my reading lists are way more interesting and diverse than they ever have been! This year, when my gift cards run out, I think I want to start purchasing more used books as well. On Amazon there is usually an option to buy books used, and they’re a bit less expensive. Generally they’re not too worn, but I don’t really mind if they are. I love the concept of giving a book a new home, and there’s something special about having a book that’s been passed from hand to hand a few times- like every book has it’s own story. If you’re looking to save money on books this is a great option! Of course, there’s always the library, but I don’t know there’s just something better about owning a book that I can’t put my finger on.

Hopefully this list gives you some reading inspiration if you’re in a funk! If you still can’t find a great book to read, feel free to check out my many previous reading lists, or even message me in the comments and I will help you find a great novel!

The Help

This novel follows three women in Mississippi in 1962. Skeeter, who recently graduated from University and is puzzled by the absence of her maid Constantine once she returns home. Aibileen, who is devoted to raising the child she is hired to look after as a maid, although troubled by the death of her own son. And Minny, whose sharp tongue can only allow her to be hired by the town’s newcomer- who is hiding secrets of their own. These three, who feel oppressed by the confines of their own and position, come together to work on a covert project that will change their community forever. This book is sitting in our office at home, and it came to mind when I was trying to think of a book “that is yellow” for my challenge. It has amazing reviews, and was actually turned into a movie a little while ago, which I haven’t seen but I know it was nominated for at least one Oscar. Anyways, this looks like a really promising read!

Lord of the Flies

This was on my March reading list I think last year? I know that I was planning to read it but never did. This book is also very yellow, but it fits into my challenge because I need a book written by a Nobel prize winner. William Golding won the Nobel Prize for Literature in 1983, for his work in writing novels that highlighted the human condition. Lord of the Flies is probably his most well known book, and it chronicles what happens when a group of boys is stranded on a desert island together. How they organize themselves, survive, and change throughout the book should be very fascinating! I feel like it’ll be kind of like Animal Farm- short and to the point but full of insight into who we are and what we do.

The Light Between Oceans

This book is “set in Australia” and so fits into my challenge quite nicely! A soldier returns to Australia after serving for four years in the war, and brings his wife Isabel with them. They take up residence on Janus Rock, tending to the light house, where a supply boat comes only once per season. After their failed attempts to have a child, a boat washes up containing a dead man and an live infant, which Isabel desperately want to keep. When the child is two they go back to the Australian mainland- and find that they’ve devastated someone on shore. This looks like a heartwarming read and has a glowing review from Markus Zusak, author of The Book Thief, which I loved:) It’s not a super long book either, so I should be able to finish it in a decent amount of time!

That’s my list for the month! I’m just giving myself three books to read since it’s a short month and The Help is a bit of a longer book. I’m really excited for all of these! (when am I not).

Yours Truly,

Olivia:))

Homemade California Rolls

I’m SO excited for this post because sushi is my absolute favourite food. I would consider going vegan but I don’t think I could give up sushi! That sashimi- or raw fish- is just too good. Going out to sushi restaurants is always so fun, but right now depending on where you live you might not be able to go to a restaurant. So in this post I’m going to detail how to make your very own sushi at home!

Making sushi can seem complicated, but it doesn’t have to be. All you need is a few simple ingredients that you can find in the International or Asian aisles!

  • Sushi Rice – this is usually a Californian or Japanese short or medium grain rice, but will be labelled as sushi rice. It’s important that you use sushi rice because it’s more starchy and sticky than regular rice, which is important when spreading it onto your nori.
  • Sushi Nori (roasted seaweed) – these are rectangles of roasted seaweed that the rice gets spread onto, and everything gets rolled inside.
  • Rice Vinegar – rice vinegar is used to season up your sushi rice! If you’re making your sushi gluten free, make sure you purchase a gluten free rice vinegar.

With those ingredients as your base, you can proceed to choose any fillings you’d like. I went with some avocado, cucumber, and canned (not imitation) crab to make some great California rolls. There are so many delicious combinations you can try though- and I hope to get my hands on some sushi grade fish soon!

Some more roll ideas include:

  • Vegetarian- fill your rolls with mushrooms cooked in soy sauce, just avocado, carrot, or cucumber, or some combination of the four.
  • Sushi Grade Fish- slice up some sushi grade salmon or tuna and pair it with some creamy avocado.
  • Cooked Shrimp, Crab or Tuna- fill your rolls with cooked shrimp, canned crab, or canned tuna mixed with soy and avocado (see my Tuna and Avocado Poke Bowls)

Ok, so now we’ve got all of our ingredients rounded up- now it’s time to make some rolls! The first and most important step is cooking your rice.

It’s very important to rinse your rice first, to get rid of some of that starchiness. Otherwise, your rice with be too mushy. I placed mine and a bowl and rinsed and drained it about 4-5 times, swirling it around with my fingers, under the water is clear when I mixed it. I then filled the bowl with more water and let the rice soak for about 10 minutes.

Once the rice is good to go, it goes into a pot with some more water and simmers for about 10-15 minutes, until it’s cooked all the way through. I then let it cool for a bit before mixing in some rice vinegar for flavour.

Get ready to get rolling! To roll your sushi rolls, you’ll need a bamboo sushi mat- these are easily found on Amazon for around ten dollars or so. I got out my mat, covered it with a piece of plastic wrap, and placed one sheet of nori down.

I then scooped out some sushi rice onto the nori, and spread it around with my fingers to cover the whole sheet in a nice, even layer. You don’t want to see too much of the nori underneath, but you also don’t want the rice layer to be to thick, so find a good middle ground. Leave about a centimetre strip at the top empty, however, so that it can seamlessly seal the end of the roll. This picture does not illustrate this very well- do better than me!

For the rolls, you can choose if you want to have the rice on the inside, or the outside. In this demonstration I flipped my nori over so that the rice would be on the outside, but in the photos I took of my final product were of my second batch of rolls, where the rice was on the inside. I found that these were easier to roll and held together more nicely, but you can choose whichever you like best! Here I proceeded to add in my filling right on top of the rice in a straight line, leaving some space at the bottom.

To roll up the sushi, you’re going to fold over the bamboo mat from the bottom, until that overhang you left at the bottom covers the filling ingredients to form a roll. Press firmly so that everything gets held together, and keep rolling until the full sheet of sushi covered nori is rolled into a nice cylinder. You may need to pause a few times to adjust the plastic and the mat during this process. Once everything is rolled up, you can use a bit of water on your finger to seal the nori on the outside of the roll.

All that’s left is to cut the sushi into nice even pieces, dip em into some soy sauce, and enjoy! It can take a little while to get a hang of the rolling, so don’t be discouraged if your first few rolls aren’t turning out so nice- my first rolls were a bit rough. Making sushi is an art that takes years to perfect, but these homemade rolls are great for a little something different at home, and they’re super fun to make as well!

Definitely play around with filling combinations, dipping sauces, and toppings too, to make these rolls your own. If you have any questions feel free to leave a comment! Enjoy:)

Yours Truly,

Olivia:))

Homemade California Rolls

  • Servings: 2-4
  • Print

Ingredients

-3/4 cup sushi rice

-1 cup water

-3 tbsp rice vinegar

-1/4 of an avocado, sliced

-1/4 of a cucumber, julienned

-1 170g can of real crab meat

-2 sheets of sushi nori


Directions

1. Add the rice to a small bowl, fill it with water, and swirl it around with your fingers. You should see the water turn white and cloudy as the starch from the rice is released. Drain the rice and repeat this process 4-5 times, until the water remains clear.

2. Fill the bowl with water once more and let the rice soak for 10 minutes to remove additional starch. Drain and add the rice to a pot.

3. Add the 1 cup of water to the pot and bring to a boil, then turn the heat to low, cover, and let the rice simmer for 10-15 minutes, until cooked through. Set aside and let cool before mixing in the rice vinegar.

4. Lay your bamboo sushi mat flat on your counter and cover it with a piece of plastic wrap. Place a sheet of nori down, and proceed to spread out about half of the rice on it in an even layer, leaving an empty space of about one centimetre at the top for sealing.

5. Either flip the nori over so that the rice will be on the outside of your sushi, or leave it so that the rice will be on the inside. In a straight line about an inch away from the bottom of the nori, lay down half of the crab, cucumber, and avocado.

6. Begin rolling the sushi by folding over your mat from the bottom, an pressing firmly to make a tight roll once the empty space at the bottom of the nori has completely encircled the filling. Continue to roll your sushi by rolling the mat, pausing to adjust the plastic or the mat when needed.

7. Seal the roll by brushing a little bit of water onto the nori with your finger. Slice into 8 even rolls.

8. Repeat steps 4-7 with your remaining ingredients.

9. Serve with soy sauce.


February 2020 Bullet Journal Set-Up

Hey there! First month of 2021 done- it actually felt pretty long to me! February is probably going to fly by though since it’s a short month:)

This month I kind of struggled again with setting up my journal- I wasn’t very inspired AT ALL. I knew what theme I wanted to do, but I didn’t really know how to translate it onto the page. So the end result is a pretty simple and, to be honest, it’s not my favourite set-up ever, but it’ll do.

I went with a Paris theme, which I thought was really fitting for February since Paris is the city of love:) There are so many different doodle ideas that you could use for a Paris theme, but since the amazing buildings really stand out to me, that’s what I went with. I was fortunate enough to visit Paris a while ago, and I absolutely loved it! In addition to the doodles I did, I threw in some pink hearts and little grey accents to tie everything together and bring in that Valentine’s Day flair. The first few pages I started with using washi tape, but them my dog chewed it up so that was a problem. I’m going to have to order some more soon!

For my colour scheme this month, we’ve got this nice pink zebra fineliner, a grey zebra fineliner, and then just my black fineliners. I enjoyed using only zebra fineliners last month because the thickness of them is great for the size of my journal, and I also love how the colours are a bit muted- they all have a great tone to them. I used these markers to do sort of a monoline cursive, and an uppercase font.

Throughout the month I did a combo of both French and English quotes, to switch things up a bit! I’ll do some translating when needed.

I think this is a great reminder that when you’re not feeling the inspiration, you can just keep things simple and go back to the basics so that you don’t get overwhelmed by elaborate spreads. I’ve really been noticing how much my bullet journal helps me plan my life- my blog stuff especially- and I don’t want to take away from that by feeling forced to create super complicated pages. Hope you enjoy this set-up, and maybe draw some inspiration from it if you’re in a slump yourself!

Title page first! I drew really simple renditions of the Eiffel Tower, the Arc de Triomphe, the Notre Dame, and the Louvre museum. These are all places that I got to visit, and I think that they are absolutely beautiful- I love European architecture! I gave the buildings all a bit of a drop shadow with that grey marker, and also did a border around the page. “February” is written out in cursive in pink, and I added a some washi tape to finish it off! On the opposite page I wrote out a French quote, which says “I accept the great adventure that is me.”. I love this because the human experience is truly a journey- and I want to find our more about myself and who I am! On that quote page you can see those little heart doodles and grey accents.

Next is my calendar spread. Sticking with that little one page calendar, I drew some more doodles around it, along with a grey border, pink title, and more hearts and accents. On the opposite page I have little boxes for my goals, events, tasks, and school stuff for the month. This was the last spread I made before my washi tape was so rudely eaten- I love how it looks on these pages!

Now for my trackers! Going real simple again- I find that this layout makes it super easy for me to see and fill out all of my habits, mood, and productivity. I did a few more building doodles, and stuck with that pink cursive for all of the titles. When I wrote out “productivity” it didn’t all fit on one line- which kind of bugs me but it could be worse. I also noticed that the scale of my Eiffel Towers kind of change throughout the set-up, oh well! Anyways, I think this spread is overall pretty cute.

A really simple gratitude log and habit tracker here, but the border, hearts, and accents spice it up a bit. I really enjoy all of the space that I have to plan blog stuff- it’s so helpful! You could use this page for anything you’d like though- school stuff, a brain dump, or just everyday journaling. At the bottom of the page I wrote out “La vie est belle”- life is beautiful, to remind me that there’s something to be grateful for everyday!

Lastly, we’ve got my first weekly spread! I did some simple boxes and wrote out the days of the week in pink. There are a couple of doodles, and my quote is “Paris is always a good idea”- and it totally is! I’ll have lots of space to plan out my week with this spread.

That’s my set-up for the month! Even though it’s maybe not my best, it’s still super functional and is going to help me a lot with staying organized, which is what matters. See you next week!

Yours Truly,

Olivia:))