Quick Pickled Carrots

I love pickles! Don’t you? They’re vinegary and crunchy and are the perfect addition to any bowl, salad or sandwich. Today we’re going to expand our pickle horizons with these Quick Pickled Carrots! This was a great way for me to use up some of the carrots in my fridge, because for some reason we have a LOT right now.

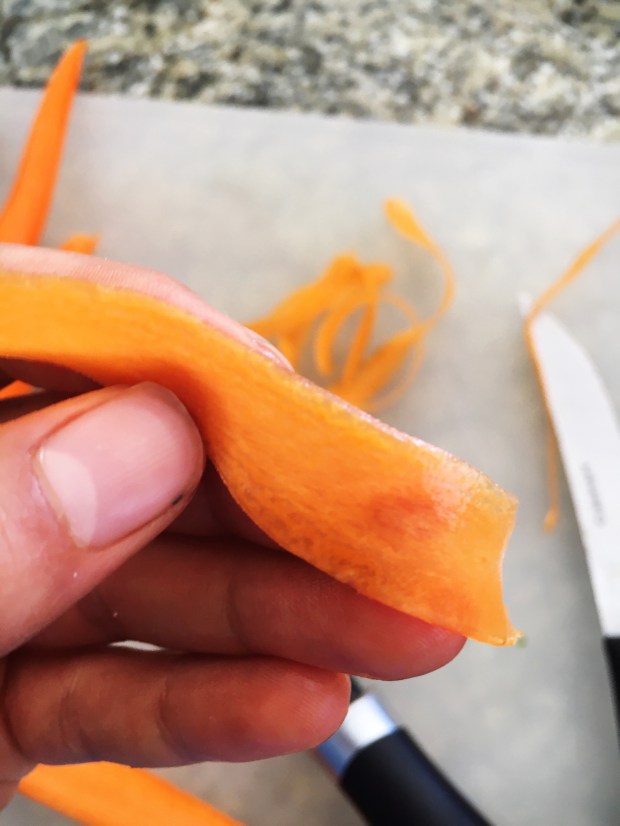
I brought out my old friend the veggie peeler to get nice, thin, and even carrot slices for these pickles. Doing it with a peeler is also super fast and easy. After I had a nice pile of carrot ribbons, I placed them in a mason jar, added vinegar, some garlic, and red chilli flakes, then put some plastic wrap on top and threw them in the fridge. Want to know the minimum pickling time? 30 MINUTES! That’s right, in just 30 minutes you can have a nice jar of pickled carrots that go well with just about anything. Add them to a veggie bowl, a sandwich, or as a side with some meat. They’re so versatile and taste amazing:))

Cucumbers have definitely stolen the show for too long! Be sure to whip up some of these pickled carrots ASAP because you’re missing out.

Quick Pickled Carrots

Serves: 4

Total Time: 45 Minutes

Ingredients:

  • 2 small to medium sized carrots, peeled and washed
  • 3/4 cup white vinegar
  • 1 clove of garlic, minced
  • 1 tsp of red chilli flakes

Directions:

  1. Use a veggie peeler to create thin carrot “ribbons”, dragging it from the top of the carrot down. You’ll be left with a flat piece of carrot at the centre that you can snack on later:)

2. Place the carrots in a mason jar. Add garlic, chilli flakes, and vinegar. Make sure that vinegar completely covers the carrots; if not add some more.

3. Cover the top of the jar with a lid or some plastic wrap, and place in the fridge for at least 30 minutes.

4. Remove from the fridge and enjoy!

**Just a note: These are quick pickles, and will not last as long as pickles that have been sealed. Use within a week:))**

Enjoy these pickles! See you Friday with my September Bullet Journal Set-Up:)

Yours Truly,

Olivia:)))

BBLT Sandwich

I was just thinking the other day how I need more sandwiches in my life. They’re awesome! They’re fast, versatile, delicious, and contain BREAD:) Definitely great for school, or whenever you need something tasty. Today I’m serving up the recipe for this BBLT sandwich- that’s black bean, lettuce, and tomato people. It may not sound like much, but trust me, it’s pretty darn good.

I’ve made some sandwiches in the past, like my EPIC Veggie Sandwich, that require a little more time and effort. This BBLT is as simple as it gets though; it’s specially designed for busy people (aka me). That doesn’t mean we’re compromising on taste. The base of the sandwich is black beans mixed with some avo, soy sauce, garlic powder and chilli powder for some added savoury deliciousness. I would eat that in a sandwich by itself, but the fresh tomato and crisp lettuce really bring it home. Stuff it all between my favourite sprouted grain bread, and it’s a no brainer.

All the ingredients in this sandwich are super common and nutritious, making for an easy, protein-filled lunch. I know you’ve got a can of black beans in your pantry with your name on it, so grab it and get in the kitchen! Enjoy:))

BBLT Sandwich

Serves: 1

Total Time: 10 minutes

Ingredients:

  • 1/2 a ripe avocado
  • 3/4 cup cooked black beans
  • 1/2 tsp soy sauce
  • 1/2 tsp chilli powder
  • 1/2 tsp garlic powder
  • 1/2 a tomato, sliced
  • a leaf of lettuce
  • 2 slices of sprouted grain bread, toasted

Directions:

  1. In a small bowl, mash the avocado and mix in the soy sauce, chilli powder, and garlic powder. Add in the black beans and stir to combine, mashing them slightly.
  2. Scoop the black bean avocado mixture onto a piece of toasted sprouted grain bread. Top with the sliced tomato and lettuce, then press on the other piece of bread. Cut in half and enjoy!!

So quick! I’ll be making this a lot during the school year:))

Yours Truly,

Olivia:))

Roasted Cauliflower Wraps with Red Pepper Sauce

I’m back! I went on a little vacation and wasn’t super active on my blog or social media, but I’m coming back with a BANG, aka these Roasted Cauliflower Wraps with Red Pepper Sauce. Portable lunches are going to have to start becoming a thing again soon, so these beauties are going to help you get one step ahead. Simply roast, wrap, press, and then boom, you’ve got yourself an amazing, nutritious lunch.

The cauliflower, red onions, and red peppers all get roasted up on the same pan, then the peppers are tossed in the blender with garlic, oil, and lots of cilantro to make a bea-u-tiful sauce. I spread it on a wrap, then added the cauliflower, onions, some avocado, and some spinach. YUM. After rolling, my wrap got the VIP treatment in my panini press. Once you start pressing your wraps and getting those perfect grill marks on there, you’re not going back. It also helps the wrap stay together- perfect for lunchbags.

These would be great prepared the night before, or if you prep all of the ingredients and then just roll and press as needed. This recipe makes 1 wrap but lots of extra sauce, which is awesome in bowls, more wraps, salads, more wraps, for dipping things in, and in more wraps. I hope you enjoy this recipe and keep an eye out for more meal prep ideas coming soon!!

Roasted Cauliflower Wraps with Red Pepper Sauce

Serves: 1 (with extra sauce)

Total Time: 40 minutes

Ingredients:

For the Red Pepper Sauce:

  • 2 small red bell peppers, chopped
  • 2 tbs + 1 tsp olive oil
  • 1/2 cup cilantro, loosely packed
  • 1 clove of garlic, minced
  • Salt and Pepper to taste

For the Wraps:

  • 1 Whole Wheat Wrap
  • 1/2 cup cauliflower florets, cut into small pieces
  • 1/4 of a red onion, sliced
  • 1/2 an avocado, thinly sliced
  • a small handful of spinach leaves
  • 1 tbsp Red Pepper Sauce
  • 2 tsp olive oil
  • Salt and pepper to taste

Directions:

  1. Preheat your oven to 400 degrees Fahrenheit.
  2. Place the cauliflower, red peppers, and red onion on a parchment lined baking sheet. Toss each with 1 tsp of olive oil and some salt and pepper. Roast in the oven for about 20 minutes, until soft and slightly charred.
  3. Remove the pan from the oven and add the red peppers, along with the rest of the Red Pepper Sauce ingredients, into a blender and blend until smooth. Set aside.
  4. Preheat a panini press and begin assembling your wrap. Spread 1 tbs of sauce onto a whole wheat wrap, then add the cauliflower, onions, spinach, and avocado, and fold tightly, tucking the two vertical edges in, then rolling away from you.
  5. Place the wrap on the press and bring the lid down on it. Let gravity do its work and leave your wrap in the press for about a minute.
  6. Carefully remove your wrap from the press and enjoy!!

Happy munching and I’ll see you Wednesday!:)

Yours Truly,

Olivia:))

Veggie Fried Quinoa

I ate the whole pan of this fried quinoa. It’s seriously so good because of all of the flavour and all of the veggies. I don’t know, there’s just something about a big plate of sauteed veggies, beans and quinoa that’s just so comforting and simple and homey. And it’s true that it doesn’t get much simpler than this- basically all you need to do is toss some stuff around in a pan, add a bit of other stuff, and you get delicious stuff.

In the ingredients list, I’m going to put down all the veg as “roughly chopped”, because I didn’t put a whole lot of effort into making it look nice. It’s all about flavour and ease here, people. This dish is also a great fridge cleaner. You know, when you have those week old carrots, that half an onion in a ziploc bag, and some tomatoes that are looking just the teeniest bit questionable. In my case, I also had some black beans in a tupperware container. Usually I have some leftover quinoa lying around, but I didn’t so I made some right before. But yeah, just toss all of these forgotten but beautiful things into a pan with some olive oil, then add your flavour boosters. Namely soy sauce, garlic, pepper, and maple syrup. Yes, I put maple syrup in a take on fried rice. Trust me, it works.

Since, if you’re a speedy chef, you could whip this up in about 7.5 minutes, this Veggie Fried Quinoa could be made in the morning before school, or as a really quick dinner. I would say a more accurate timeline for making this quinoa would be about 10-15 minutes, which is still pretty fast. Just make sure you have your quinoa cooked before hand, cause that’s really a game changer. If you don’t need it to be vegan, you could add some egg or chicken for some extra protein. However or whenever you make it, this Veggie Fried Quinoa is definitely a winner because of it’s quick, easy, and really tasty. Hope you enjoy!!

Veggie Fried Quinoa

Serves: 2 (or 1 really hungry person aka me;)

Total Time: 15 minutes

Ingredients:

  • 1 tbsp olive oil
  • 1 cup cooked quinoa
  • 1/2 a tomato, roughly chopped
  • 1/2 a red onion, roughly diced
  • 1 large carrot, roughly chopped
  • about 1/4 cup of sliced mushrooms
  • 2/3 cup black beans, drained and rinsed
  • 2 tbsp soy sauce
  • 1/2 tsp maple syrup
  • 1 clove of garlic, minced
  • Pepper, to taste

Directions:

  1. Heat the olive oil in a large pan over medium heat. Add in the tomatoes, onions, carrots, black beans and mushrooms and cook for about 3 minutes, until starting to get soft.
  2. Add the quinoa to the pan and stir, continuing to cook for another 5 minutes, until most of the water from the veggies has evaporated.
  3. Next, add the soy sauce, garlic, pepper, and maple syrup, and stir to combine. Cook for a few more minutes, allowing the carrots to become tender.
  4. Remove from the heat and enjoy!

One of my favourite quick and easy recipes:) I’ll see you guys on Friday!!

Yours Truly,

Olivia:))

Soy-Maple Roasted Sweet Potatoes

By now you probably know that I have a weakness for sweet potatoes. They’re one of my favourite things ever and I’m always looking for new delicious ways that I can eat them. Usually they taste the best when they’re super caramelized and soft- and this recipe DEFINITELY gives you that. These potatoes have so much good flavour and colour, and go great in bowls or salads, or as a side for your dinner.

Usually I peel my sweet potatoes, but today I left the skin on for some extra textural action. All I did was cut my potato into little medallions, then tossed them with some olive oil and threw them in the oven. While they were becoming golden brown and amazing, I just mixed up the THREE INGREDIENT sauce that gets brushed on to the medallions, infusing them with deliciousness and also helping with the caramelization process. Just keep an eye on these because they can burn pretty quickly.

These Soy maple Roasted Sweet Potatoes were the PERFECT addition to my lunch bowl today. I then proceeded to eat the rest of them right off the pan. Be sure to try out this recipe and let me know what you think!!

Soy Maple Roasted Sweet Potatoes

Serves: 1

Total Time: 40 minutes

Ingredients:

  • 1 small sweet potato
  • 1 tbsp olive oil
  • 3 tbsp soy sauce
  • 1/2 tsp garlic powder
  • 1 tsp maple syrup

Directions:

  1. Preheat your oven to 400 degrees Fahrenheit.
  2. Wash the sweet potato well, then proceed to cut it width-wise into small medallions, a little less than a centimetre thick.
  3. Place the medallions onto a parchment lined baking sheet and toss them with the olive oil, making sure that they’re evenly coated. Put the pan in the oven and roast for 10 minutes.
  4. Remove the pan, flip over the sweet potatoes, and roast for an additional 15 minutes.
  5. While the sweet potatoes are in the oven, mix together the soy sauce, garlic powder and maple syrup in a small bowl. Set aside.
  6. Take the pan out of the oven, flip the medallions over again, and use a pastry brush to brush on a layer of the soy sauce mixture onto each one. Put back into the oven for 5 minutes.
  7. Remove the pan, flip over the sweet potatoes (there’s lots of flipping going on), brush on some sauce, and then roast for another 5 minutes.
  8. For a last final crisp, flip the sweet potatoes once more and bake for 5 minutes again.
  9. Take the sweet potatoes out of the oven, let cool and enjoy!

I can’t wait for you to try this recipe! So simple and delish:)) Have a great weekend and I’ll see you Monday!!

Yours Truly,

Olivia:))