10 Healthy Freezer Meals

Lots of places are starting to open up again, which means a gradual return to our busy lives. I found out a few days ago that I’m going back to school in September, and I’m really excited about it! Hopefully sports and activities can begin again soon too. But something I’ve really enjoyed over these past months is all the time that I had to cook. Now that I’ll have a somewhat full schedule again, I might not have the luxury of taking an hour to make an awesome dinner each night! Not to mention I’ll have to make school lunches again. So I thought I’d do a roundup of a bunch of Healthy Freezer Meals that I’ve posted.

I always like having a few things in my freezer that I can take out for my lunch the night before. Having freezer meals on hand is also handy for busy nights when we’re rushing to different things, and don’t have time to cook. I know things aren’t going to be completely back to normal, so maybe I won’t be THAT busy, but sometimes I’m tired and don’t feel like cooking anyways. My point is, it’s not a bad idea to have some delicious food stocked up and ready to go.

On this list, we’ve got everything from soups and stews to curries and falafel. Not all of these recipes have freezing details in them, but you can pretty much throw any of these meals into a resealable bag and freeze them like that. To reheat frozen soups, stews and curries, just run the bags under some cold water for a bit, then pop the frozen meal into a pot with a bit of water to melt. It also helps if you place the bags in the fridge to defrost the night before; that way you just have to heat up your meal. These freezer meals are all super nutritious as well, which is a bonus for when you need fuel before or after sports.

I like to take a day or two to just make big batches of a few recipes on this list, and throw them in the freezer for emergencies. It’s a fun and productive thing to do on a rainy day! I hope this post helps you out;))

10 Healthy Freezer Meals

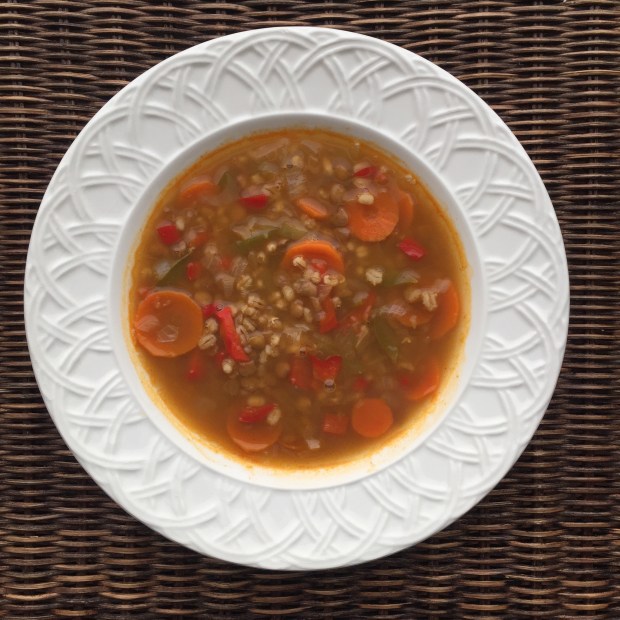
Lentil and Barley Stew This Stew is so hearty and comforting! It’s packed with protein and complex carbs to fuel you through your day.

Cauliflower Soup This soup is full of flavour and makes for a great light lunch:))

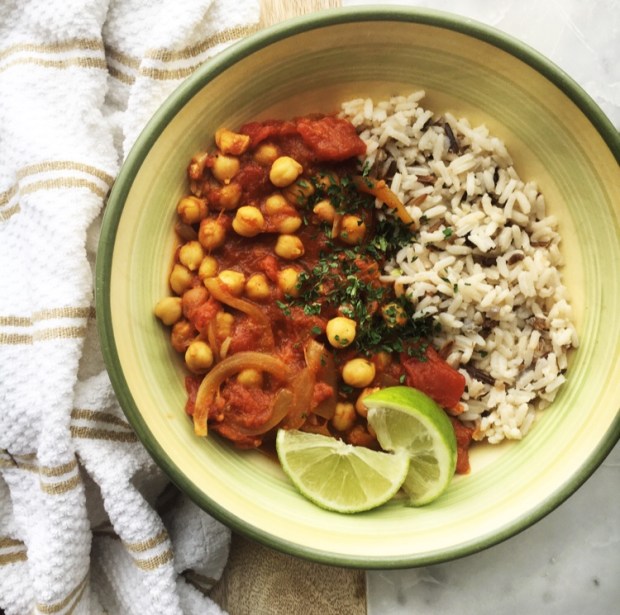
Soul-Warming Chickpea Curry Curry is one of my favourite meals to make and eat, and this one has so much flavour and texture from the chickpeas. Defrost and serve with pre-cooked quinoa for a quick weeknight dinner, or pack it in your thermos for an awesome school lunch.

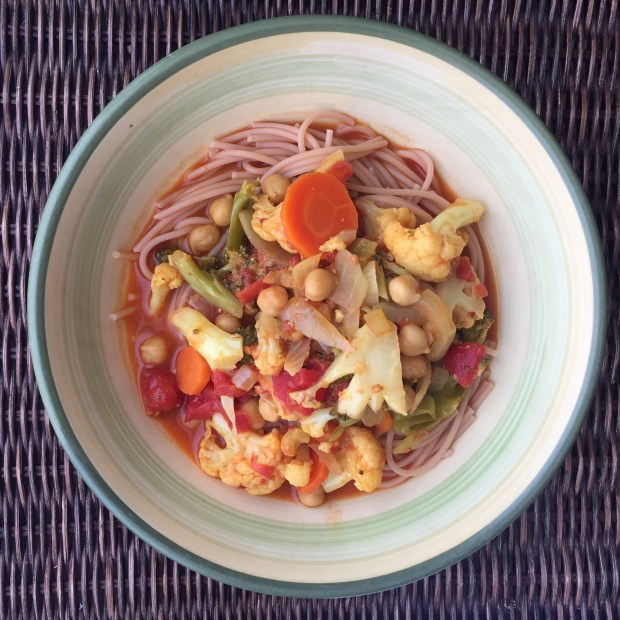
Vegetable and Coconut Curry A delicious meal that’s packed with veggies and deliciousness. Add some noodles for an easy lunch.

Falafel These falafel are full of protein, and when defrosted make a great addition to salads, bowls, wraps, and sandwiches! They’re so great to have on hand.

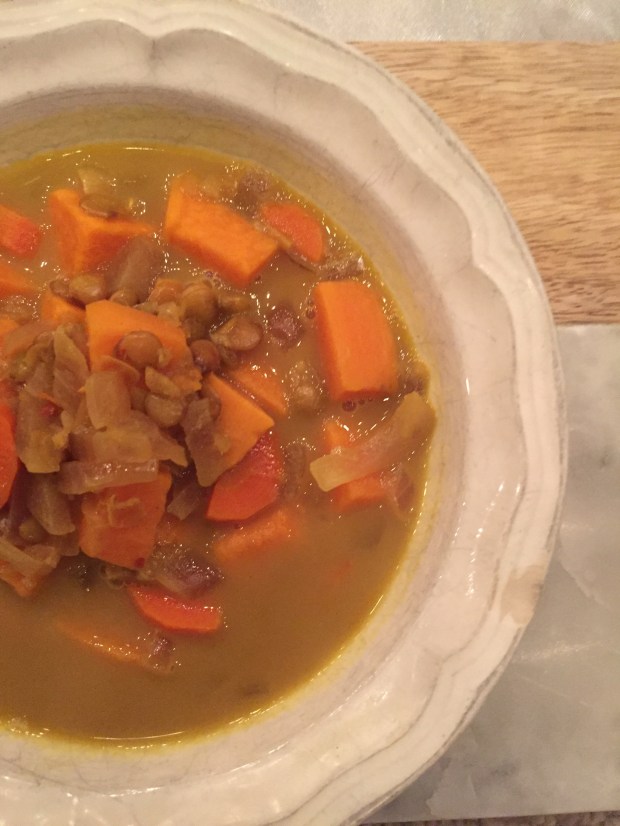
Golden Lentil and Coconut Soup Such a velvety, flavourful, and gorgeous soup! This will definitely both warm you and fill you up! It’s so good:)

Stuffed Pepper Stew Another hearty stew that’s super tasty as well:)) It would go great with a piece of toast.

Lentil and Coconut Curry I love this curry SO MUCH because of its creaminess and flavour. Freeze some for when you want a kick-ass meal!

Beans and Broccoli This is a vegan take on beef and broccoli that is great with rice, quinoa, or in salads, wraps and bowls.

Moroccan Style Chickpea Stew This stew is super delicious and has big chunks of hearty veggies with warm middle-eastern spices. Love it!

Definitely stock up your freezer with a bunch of these recipes! Hope you enjoy them:))

Yours Truly,

Olivia:))

Soy-Maple Roasted Sweet Potatoes

By now you probably know that I have a weakness for sweet potatoes. They’re one of my favourite things ever and I’m always looking for new delicious ways that I can eat them. Usually they taste the best when they’re super caramelized and soft- and this recipe DEFINITELY gives you that. These potatoes have so much good flavour and colour, and go great in bowls or salads, or as a side for your dinner.

Usually I peel my sweet potatoes, but today I left the skin on for some extra textural action. All I did was cut my potato into little medallions, then tossed them with some olive oil and threw them in the oven. While they were becoming golden brown and amazing, I just mixed up the THREE INGREDIENT sauce that gets brushed on to the medallions, infusing them with deliciousness and also helping with the caramelization process. Just keep an eye on these because they can burn pretty quickly.

These Soy maple Roasted Sweet Potatoes were the PERFECT addition to my lunch bowl today. I then proceeded to eat the rest of them right off the pan. Be sure to try out this recipe and let me know what you think!!

Soy Maple Roasted Sweet Potatoes

Serves: 1

Total Time: 40 minutes

Ingredients:

  • 1 small sweet potato
  • 1 tbsp olive oil
  • 3 tbsp soy sauce
  • 1/2 tsp garlic powder
  • 1 tsp maple syrup

Directions:

  1. Preheat your oven to 400 degrees Fahrenheit.
  2. Wash the sweet potato well, then proceed to cut it width-wise into small medallions, a little less than a centimetre thick.
  3. Place the medallions onto a parchment lined baking sheet and toss them with the olive oil, making sure that they’re evenly coated. Put the pan in the oven and roast for 10 minutes.
  4. Remove the pan, flip over the sweet potatoes, and roast for an additional 15 minutes.
  5. While the sweet potatoes are in the oven, mix together the soy sauce, garlic powder and maple syrup in a small bowl. Set aside.
  6. Take the pan out of the oven, flip the medallions over again, and use a pastry brush to brush on a layer of the soy sauce mixture onto each one. Put back into the oven for 5 minutes.
  7. Remove the pan, flip over the sweet potatoes (there’s lots of flipping going on), brush on some sauce, and then roast for another 5 minutes.
  8. For a last final crisp, flip the sweet potatoes once more and bake for 5 minutes again.
  9. Take the sweet potatoes out of the oven, let cool and enjoy!

I can’t wait for you to try this recipe! So simple and delish:)) Have a great weekend and I’ll see you Monday!!

Yours Truly,

Olivia:))

3 Flavours of Crispy Chickpeas

Chickpeas are just the best. They have to be one of the most versatile ingredients out there. You can make hummus, falafel, edible cookie dough, cookies, or blondies from them, and you can even make meringues if you whip up the water or aquafaba from the can. But today we are celebrating the humble chickpea by just crisping them up in the oven- one of my favourite methods of preparing them.

These crispy chickpeas are the PERFECT addition to your salads, bowls, and wraps, plus they make a great snack on their own. Also, have you ever tried a chickpea salad sandwich?!!? Mix up your roasted chickpeas with some mashed avo and green onion, throw it in between two pieces of bread, and you’ve got yourself a LUNCH!

While just roasting chickpeas with salt and pepper is pretty delish, I’ve come up with three spice combos that take them to the next level. We’ve got taco-spiced chickpeas, curry-spiced chickpeas, and some soy-maple chickpeas. I think the soy-maple ones have to be my favourite, but the other two are pretty darn good as well. You could use the taco-spiced ones as a replacement for beef in tacos, and the curry-spiced chickpeas are a great snack by themselves. Make sure you try all three and let me know which one is your fave!!

3 Flavours of Crispy Chickpeas

Total Time: 40 minutes

Ingredients:

Taco-Spiced Chickpeas:

  • 1/2 a can of chickpeas, drained and rinsed
  • 1 tsp olive oil
  • 1 tsp cumin
  • 1 tsp chilli powder
  • 1/2 tsp paprika
  • 1/2 tsp oregano
  • 1/4 tsp cayenne powder
  • 1/2 tsp garlic powder
  • Sprinkle of salt and pepper

Curry-Spiced Chickpeas:

  • 1/2 a can of chickpeas, drained and rinsed
  • 1 tsp olive oil
  • 1/2 tsp garlic powder
  • 1/2 tsp cumin
  • 1 tsp curry powder
  • 1/2 tsp coriander
  • Sprinkle of salt and pepper

Soy-Maple Chickpeas:

  • 1/2 a can of chickpeas, drained and rinsed
  • 1/2 tsp garlic powder
  • 1 tsp soy sauce
  • 1/2 tsp maple syrup
  • 1/2 tsp ground ginger
  • Sprinkle of chilli flakes
  • Sprinkle of salt and pepper

Directions:

  1. Preheat your oven to 400 degrees Fahrenheit.
  2. In three separate bowls, mix together the chickpeas with the spices and oil for each flavour. Dump the chickpeas onto a parchment lined baking sheet.
  3. Bake the chickpeas for about 30 minutes, until they’re nice and crispy. Remove from the oven and enjoy!!

Have fun with this simple snack recipe!!

Yours Truly,

Olivia:))

Lentil and Quinoa Salad

I haven’t had lentils in a looooooong time, mainly because I usually reach for chickpeas or other beans. Lentils take a little bit longer to cook, so that’s probably why. I guess I could buy the canned variety, but they’re just not the same. Yesterday I was kind of craving them, which is something I thought I’d never say. Honestly though, I wanted a good lentil salad where the lentils still had a bit of bite and there was a good freaking dressing! So I got in the kitchen because when I’m craving something, I get to work.

We didn’t have a lot of veg in our fridge, but we had everything you need for a good lentil salad. Quinoa, red onion, parsley, hummus, balsamic, olive oil, and of course, lentils. Yes, I included hummus in the dressing. Hummus makes EVERYTHING better, and in this case it adds flavour and some volume to the dressing. The parsley and red onion add some great colour to this salad. Oh, and I used red quinoa, which is fun! As far as I can tell it tastes the same as regular quinoa, it just has a nice colour. Try it out!

The lentils only took about 25 minutes to get tender. I took them off as soon as they were soft, because I didn’t want them to get too mushy. Then I mixed them up with the quinoa, parsley, onion, and that awesome hummus and balsamic dressing! So simple and so yum and so fresh. On the side of my salad I had some more hummus (duh) and sweet potato, which went really well. If you want your salad a bit heartier you could try tossing the sweet potato right in there.

Hope you enjoy this light salad that’s perfect for a quick lunch or side dish!!

Lentil and Quinoa Salad

Serves: 2 as a main, 4 as a side dish

Total Time: 40 minutes

Ingredients:

  • 1 cup cooked quinoa
  • 1/2 cup dry green lentils
  • 1/4 of a red onion, thinly sliced
  • 1/2 cup fresh parsley
  • 1 tbsp hummus
  • 2 tbsp olive oil
  • 2 tbsp balsamic vinegar
  • Salt and pepper to taste

Directions:

  1. Give your lentils a little rinse, then toss them in a small pot with 2 cups of water. Bring to a boil, then turn the heat down a bit and let the lentils simmer for about 25-30 minutes, until they’re tender but still have some bite, and most of the water has been absorbed.
  2. In a small bowl, whisk together the hummus, olive oil, balsamic vinegar, and some salt and pepper.
  3. Toss together the quinoa, cooked lentils, parsley, and red onion with the dressing. Serve with more hummus, and some roasted sweet potatoes.
  4. Enjoy!

This is one of my favourite simple salads to make, and I’ll definitely be making it again sometime soon. See ya later!

Yours Truly,

Olivia:))

Tuna and Sweet Potato Cakes

Hey guys! I’m like REALLY excited about this recipe- it’s a good one. I had the idea to make these Tuna and Sweet Potato Cakes a while ago and got all psyched up about it, but then I realized we didn’t have tuna! But now we have some so it’s all good, and I was able to whip up these super tasty cakes.

This recipe takes a little while to make, but I promise you it’s worth it. You’ve got the sweetness from the sweet potato and red onion, some garlic powder, and fresh herbs, which all totally transform that canned tuna into an AMAZING fish cake. I used an egg as a binder which I don’t normally do, but it helped these beauties bake up and get some nice colour on the outside.

I served up these cakes in a nice salad bowl, but they’re honestly SO versatile. Throw them in a wrap or sandwich, or just eat them by themselves for a quick protein-filled snack. That’s another great thing about these tuna cakes; they have lots of protein from both the tuna and the egg, plus some good complex carbs from the sweet potato. Healthy and delicious all in one! Hope you enjoy;))

Tuna and Sweet Potato Cakes

Serves: Makes about 9 cakes

Total Time: 60 minutes

Ingredients:

  • 1/2 a large sweet potato, peeled and diced into small cubes
  • 1 can of light chunk tuna, well drained
  • 1/4 cup fresh chopped parsley
  • 1/4 of a red onion, diced
  • 1 tsp garlic powder
  • 2 tsp oats
  • Salt and pepper to taste
  • 1 egg

Directions:

  1. In a medium sized pot, bring a little bit of water to a simmer and place a veggie steamer inside. Dump the chopped up sweet potatoes in there, cover, and steam for about 20-25 minutes, until they’re very soft and mashable.
  2. Preheat your oven to 375 degrees Fahrenheit.
  3. Mash the cooked sweet potatoes in a large bowl. Add in the tuna, parsley, red onion, garlic powder, and oats, and season to taste with salt and pepper.
  4. Add the egg to the sweet potato and tuna mixture and mix until combined. Scoop out heaping tablespoons, form into about 9 patties, and place them on a parchment lined baking sheet.
  5. Bake the cakes for 10 minutes, then remove from the oven and use a spatula to flip them over. Proceed to bake for another 10 minutes.
  6. Remove the cakes from the oven and use the spatula to flatten them even further. This will help to cook the insides. Place back into the oven to cook for 5 minutes, then remove, flip, and cook for a final five minutes. (total baking time: 30 minutes)
  7. Take the cakes out of the oven (finally) and let them cool before enjoying in bowls, salads, wraps, sandwiches, or just by themselves!

I love this recipe so much and I hope you love it too! These cakes have such a beautiful flavour, colour and texture. See you Wednesday!

Yours Truly,

Olivia:))