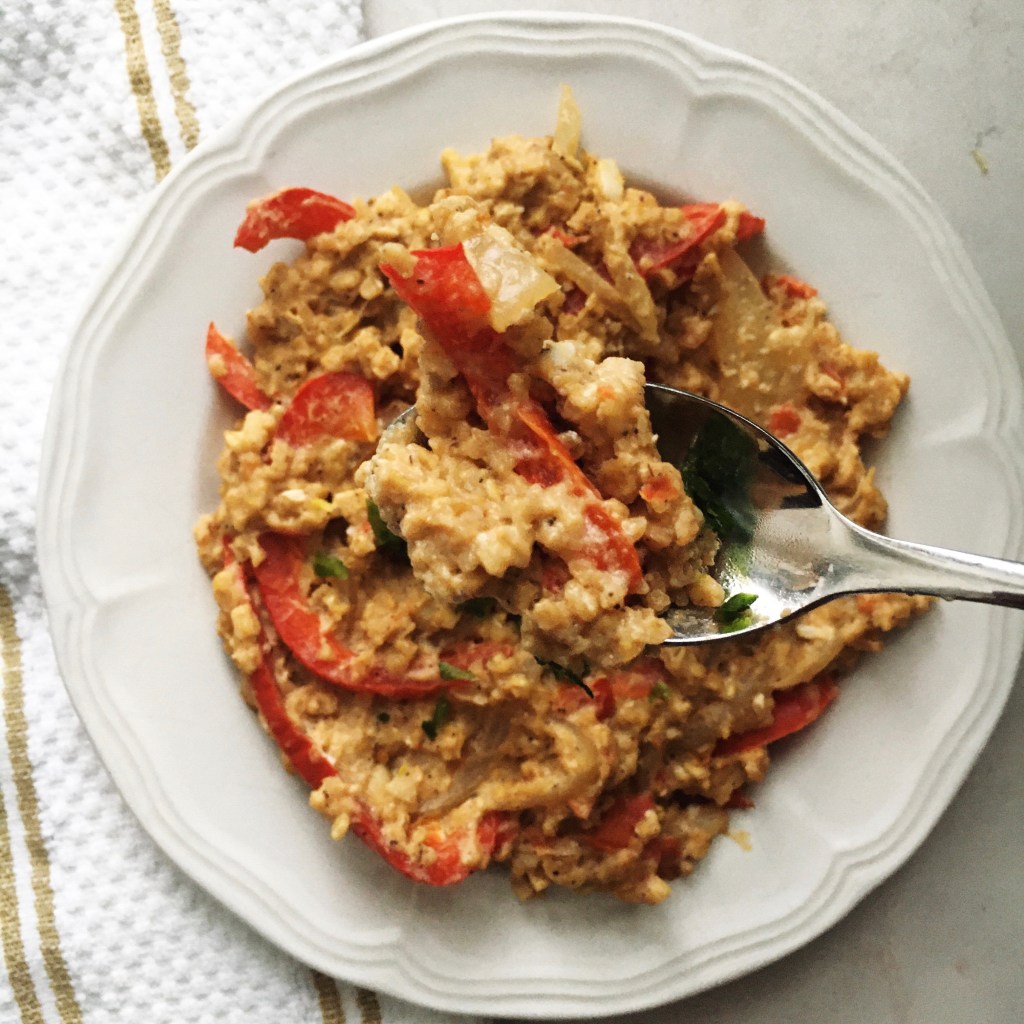
Hey guys! I’ve made savoury oats before and honestly they weren’t very good- just sort of bland and blah. But I got some inspiration from Grace, @_thefreshavocado on Instagram, to make these delicious Red Pepper Savoury Oats!
These oats are definitely like risotto, but healthier, faster, and easier to make. Some red pepper hummus and an egg white makes them SUPER creamy, and of course they start with some sautéed garlic and onion, because that’s how all good things begin😍
I started by cooking up those onions and some chopped garlic, as well as thinly sliced red pepper. As soon as those get nice and soft and caramelized, the oats go in with equal parts water and almond milk for some extra creaminess. The egg white, hummus, and lots of salt and pepper get stirred in as well, and you’re going to simmer until your oats are cooked through but still creamy.
I used some quick-cooking steel cut oats for this recipe, which were perfect! They took around seven minutes until they were ready. But if all you have are quick oats or rolled oats, adjust the cooking time accordingly and this recipe will still be delicious:)
Enjoy these oats as a side, as a vessel for more veggies or some chicken or shrimp, or as a delicious savoury breakfast with a runny egg on top! They have so much flavour and the texture is everything🥰 Enjoy!
1. In a pot, heat the olive oil over medium heat. Add in the onion, pepper, tomato and garlic and cook until the onion is translucent and the pepper is soft, about 7 minutes.
2. Add in the oats, almond milk, water, hummus, egg white and salt and pepper and stir to combine. Bring the mixture to a low simmer and cook, continuing to stir until the oats are cooked through but still creamy, adding more almond milk as needed.
3. Season with additional salt and pepper to taste, and enjoy warm!
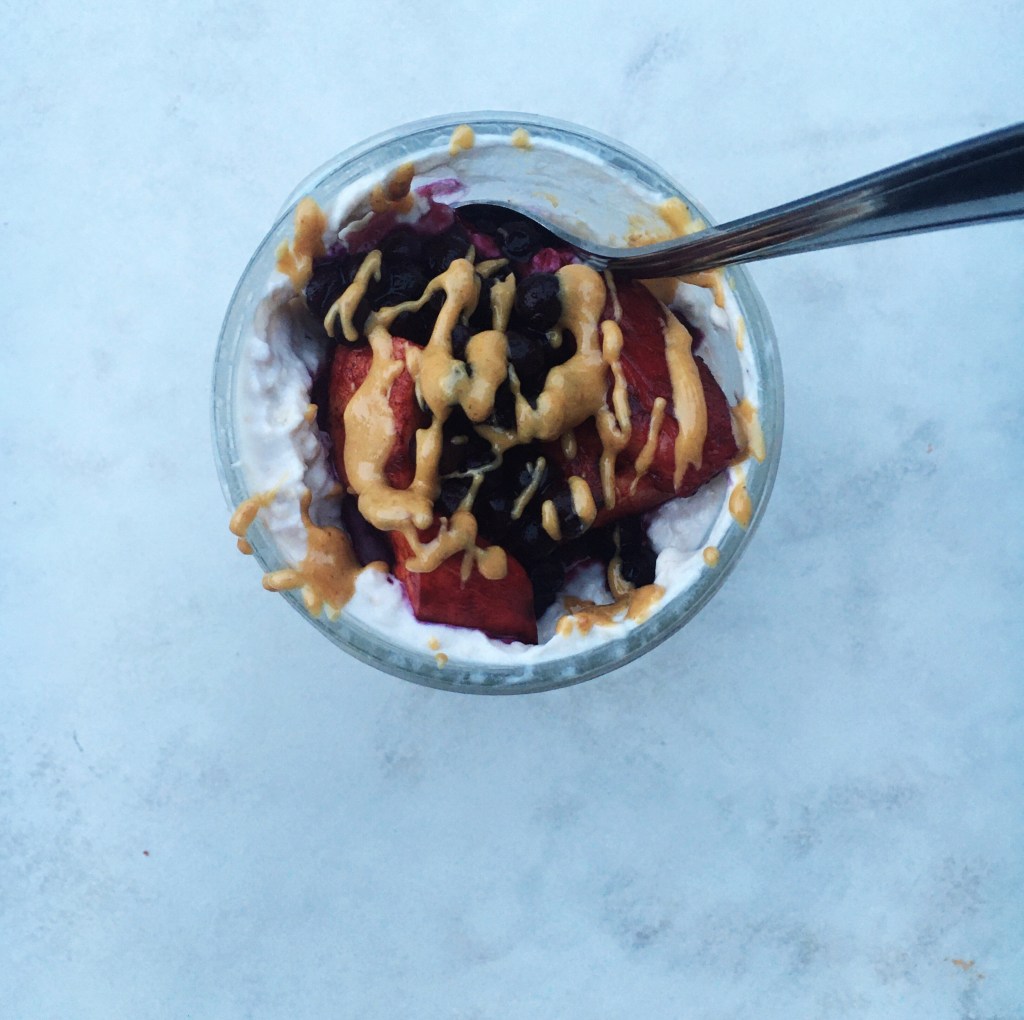
Hi friends:) I don’t know why but this week has felt way more hectic than usual, and so I’ve been making overnight oats for the first time in a while- they’re SO helpful.
There was a time when I had overnight oats every single day for breakfast, and honestly I can see why😂 Actually I definitely used to go through breakfast “phases”, like for I would say almost a year I had Greek yogurt with a banana and peanut butter for breakfast every day; I had an overnight oat phase, last summer it was smoothie bowls and now I’m into some oats with Greek yogurt in the side. I do try and switch up my breakfasts more now though because there are so many delicious options and I want to get to eat them all😋
Anyways, overnight oats are super tasty and make the perfect grab and go breakfast. Usually I eat my breakfasts in the car, so with these I can just take em out of the fridge, bring a spoon and I’m good to go. I use this cute mason jar which had a wide top so I can get my spoon in there, and it fits in my school bag nicely after as well! I for sure recommend using a jar because it’s easy to grab and take with you in the mornings, but a small Tupperware container or even a bowl with plastic wrap over it will work too.
Pretty much all you’ve gotta do to make these delicious oaties is mix all of the ingredients in your container, and then let them sit overnight! For these blueberry and mango ones I started by mashing half of a banana in my jar. I then added my oats, some Greek yogurt, the mango and blueberries, and some almond milk. The mason jar lid got screwed on and I shook that baby so that everything got mixed together! The next morning I took my jar out of the fridge, added a few more fruits and some peanut butter, and I was good to go. You can save even more time by adding your toppings in the night before.
I absolutely LOVE the yogurt in these oats- it makes them so creamy and adds a ton of amazing protein. Then you’ve got those fruits, and the mashed banana for sweetness, and everything’s just👌. So good!
Hope you enjoy this easy and tasty recipe! Definitely going to be taking advantage of these more and coming up with some new great flavour combos🥰
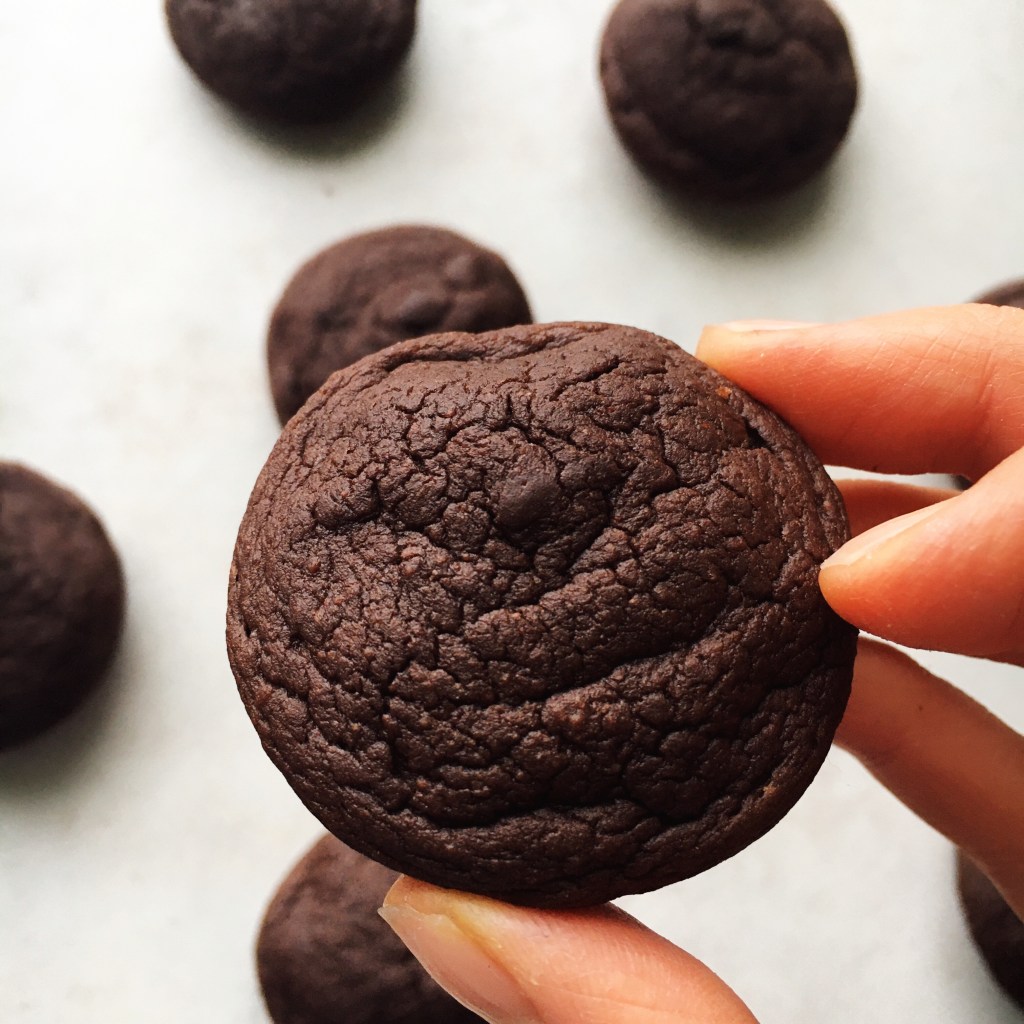
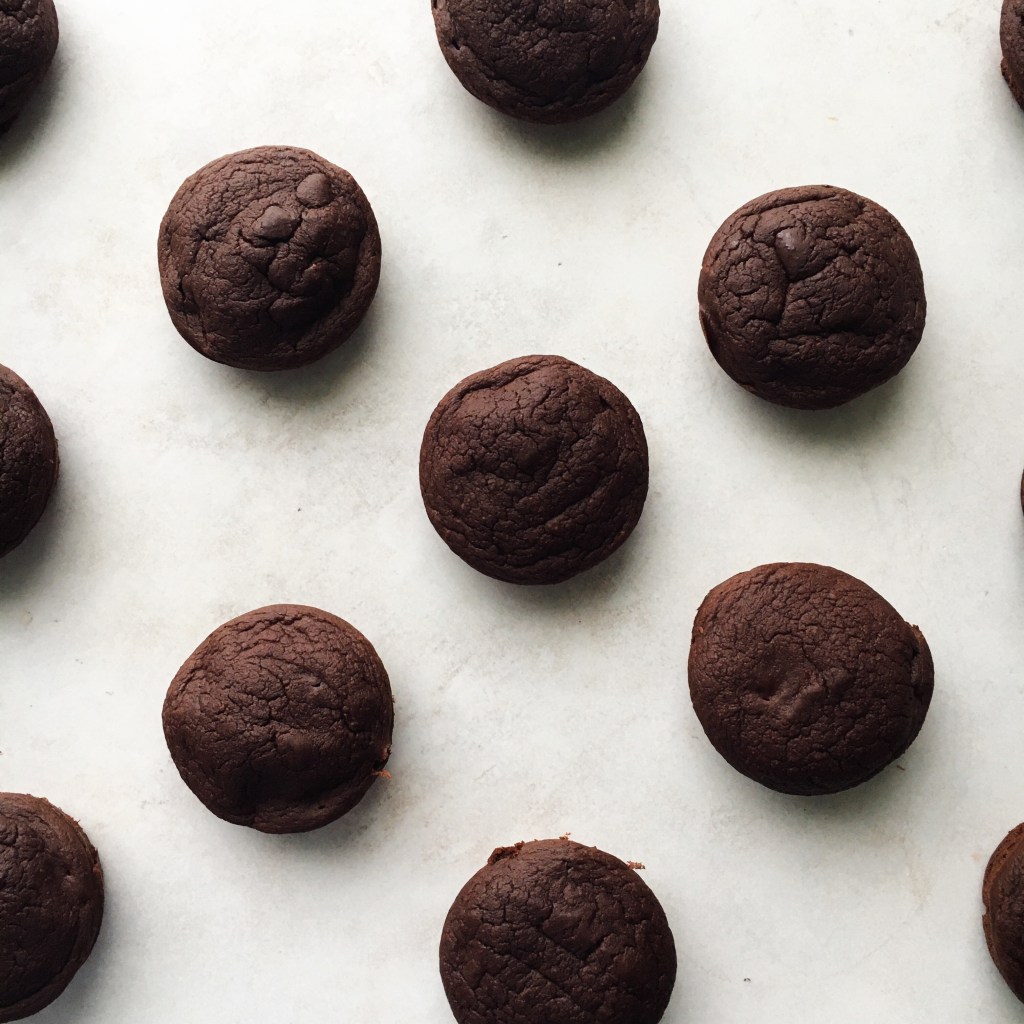
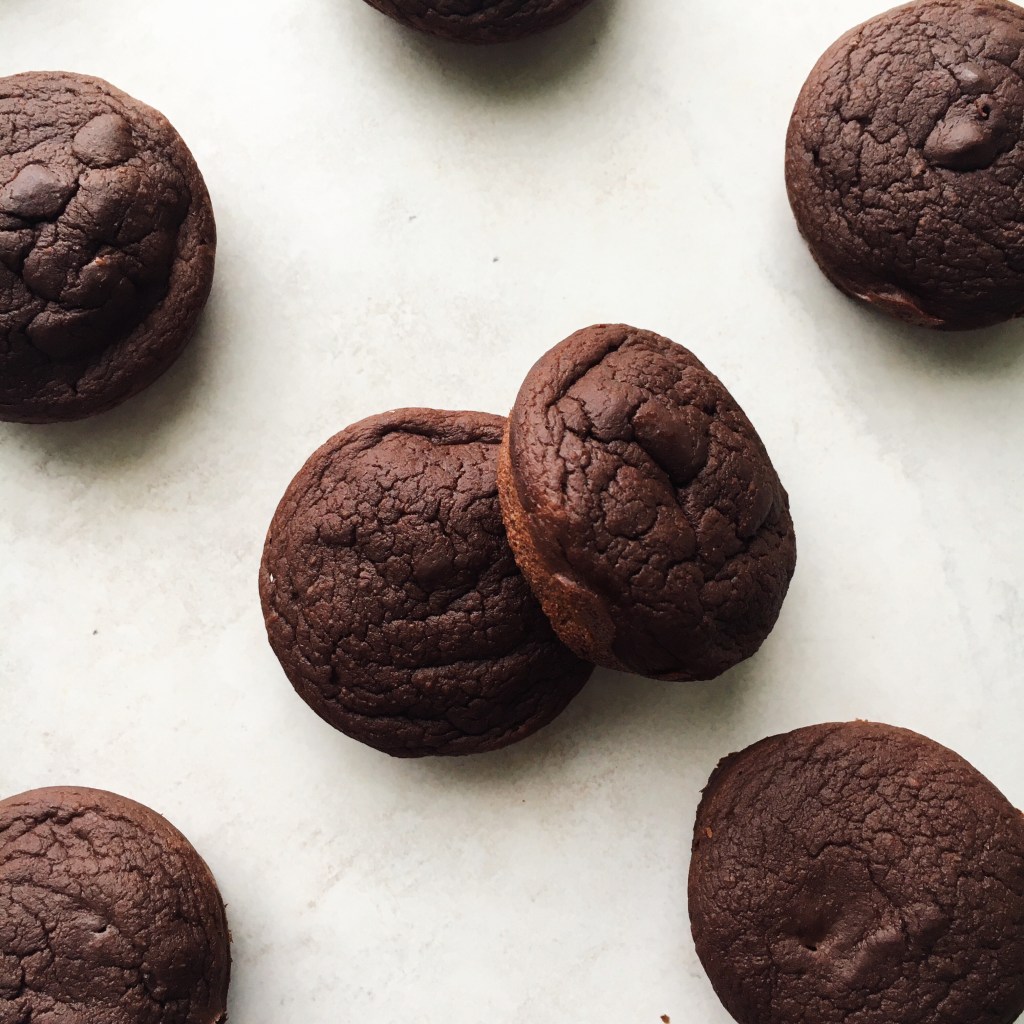
Hey there guys! Everyone loves chocolate, and today I’ve got a quick and easy chocolate muffin recipe that is FLOURLESS, REFINED SUGAR FREE and VERY TASTY.
I tried to pack as much protein into these as I could, without using protein powder, because I know sometimes I don’t have access to it and I wanted to make sure that both you and I could make these with minimal ingredients. So I turned to one of my favourite, super versatile ingredients- chickpeas! They’re full of protein and give the density to these muffins that is otherwise missing because of the lack of flour. I promise that you can’t taste them in there at all- much like in my Healthy Edible Cookie Dough. All you get is an amazing, chocolate-y flavour in a cute and fluffy mini muffin.
The other simple ingredients in this tasty snack include cocoa powder, egg, baking powder, peanut butter (yum), vanilla and banana. Everything gets tossed into the blender and combined until a smooth batter forms. I greased up my mini muffin pans with a bit of coconut oil, filled them up, and baked for about 15-20 minutes. So these muffins are not only healthy, but quick and easy to make too!
I love this recipe because it’s soooooo delicious and makes the perfect snack, quick breakfast, or healthy dessert. The chickpeas worked perfectly as a kind of flour substitute- I definitely want to play around with that some more! Don’t be scared away by them though- they give a great texture but have no effect on the taste.
2. Add all of the ingredients to a blender or food processor and combine to form a smooth batter.
3. Grease 18 mini muffin cups with a little bit of coconut oil and fill them 3/4 of the way with batter. Bake the muffins for 15-20 minutes, until a toothpick comes out clean.
4. Remove from the oven and let cool completely before you enjoy.
Hey friends! I’ve already posted a great guide on How To Meal Prep The Perfect Lunch Bowl, but today I wanted to give you a few more tips on how to make eating during the week much easier.
While making lunch bowls is a super easy way to stay ahead, having these 5 ingredients always prepped and ready to go means that you’re, like, AHEAD. It makes it so easy to just throw some stuff into a bowl and go, without cooking each separate component every time you need to make your lunch. Some of these ingredients are great for a quick breakfast too!
Trust me, when eating well is this convenient, it’s almost too easy. In about 20-30 minutes, you can have almost all of these 5 versatile and healthy foods prepped and ready to go for the week. 20-30 minutes- FOR THE WHOLE WEEK. It’s just way less of a headache then having to remake the same things every day, and will definitely help you to fuel your body for all of the amazing things that you do when you’re on the go.
I love having these foods on hand, and there’s so much you can do with each and every one of them to keep things interesting! I’ll definitely be sure to list some recipes and ideas that you can try with them. here they are!
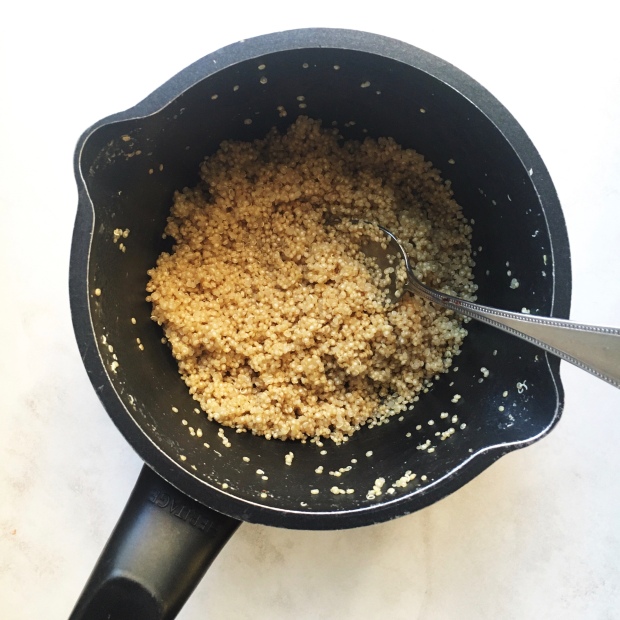
Quinoa
Making a big batch of quinoa at the beginning of the week allows you to make a variety of different bowls, salads, and stir-frys with ease! Quinoa takes 15 minutes to cook and contains all 9 essential amino acids, amazing it a complete source of protein, as well as a complex carb. It’s the perfect base for a lunch bowl, and is great for breakfast, lunch or dinner. That’s right- I said breakfast! Mix some quinoa with fruit, almond milk or yogurt for a quick breakfast, like in these Cherry, Peach and Quinoa Breakfast Bowls. Hands down, quinoa is the most versatile ingredient on this list. Check out these great recipes you can make with pre-cooked quinoa!
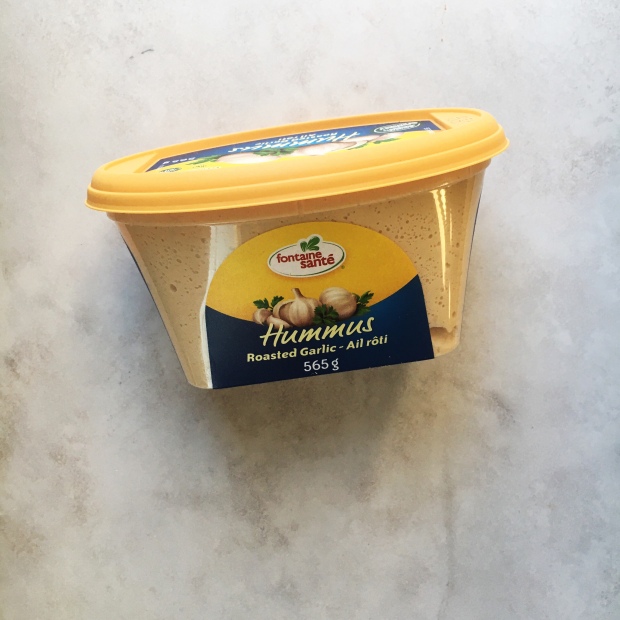
Whether you make your own hummus or buy it at the store (no judgement here- there’s a great hummus that I love from Costco), having some in your fridge at all times is a great idea. It makes a delicious snack paired with crackers or veggies, or spread on toast. Plus, dolloped onto bowls and salads it’s SO GOOD- not to mention the amazing flavour it gives to sandwiches and wraps. Hummus brings any of your meals to life, especially your lunch bowls, and so it’s great to have some always ready to go! Here are some delicious hummus recipes- and some recipes that use hummus in delicious ways!
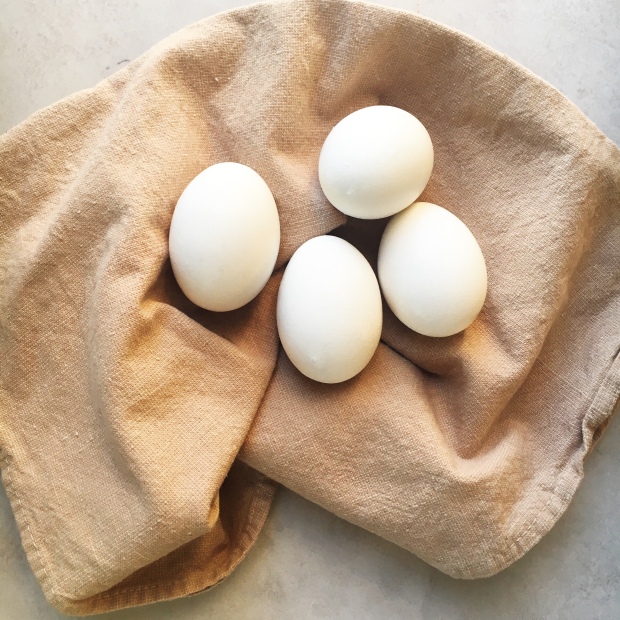
Gotta get that protein baby! Protein is super important for building muscle and filling you up, but it can be hard to fit into your diet. Having some boiled eggs prepped in the fridge means you can just grab some and go. Need breakfast? Good, grab a couple eggs. Making a lunch bowl? Add a couple eggs. Quick snack? Eggs! I know some of you might get tired of eggs quickly, so even prepping them just once every couple of weeks can keep them from becoming boring. I have one salad recipe where I use a nice soft boiled egg- but feel free to add an egg to any salad or bowl!
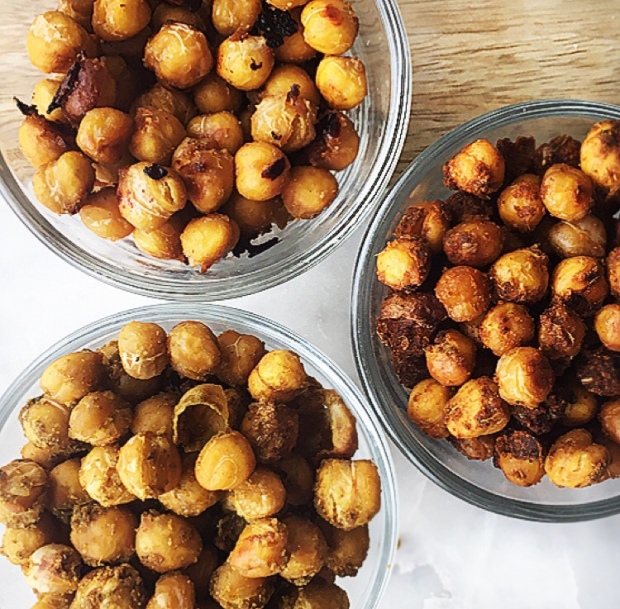
Roasted chickpeas are so crunchy and delicious, and are packed with protein and fibre! This makes them an amazing snack, and a super tasty addition to sandwiches, salads, bowls, and wraps. It only takes about 20 minutes to roast up some chickpeas, and there are a TON of delicious flavours out there! Here are some great roasted chickpea recipes- and a couple of recipes that highlight these crispy little legumes.
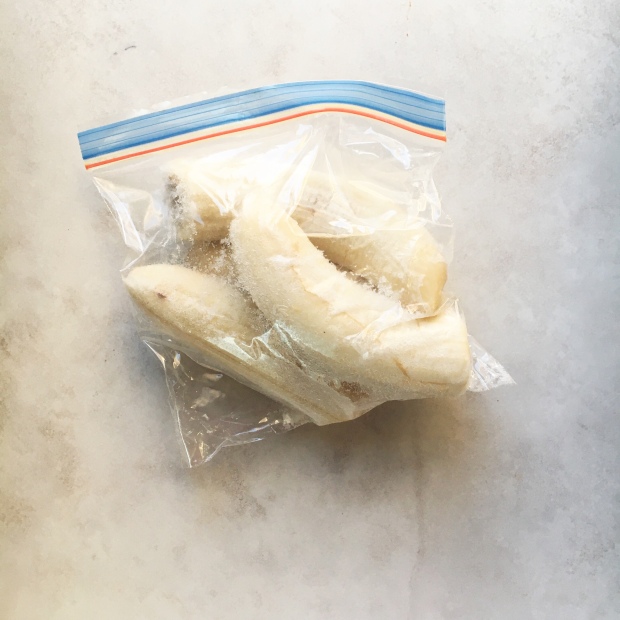
Fresh bananas are definitely a necessity for me, and I eat one almost every day at breakfast. But having a couple of frozen bananas in the fridge is a lifesaver- mainly for making smoothie bowls! Frozen banana gives your smoothies and smoothie bowls an amazing creamy texture and a perfect touch of sweetness. Even if you’re not a big fan of smoothies, you can still easily defrost a frozen banana and add it to oats, pancakes, or make some delicious banana bread. You can freeze your bananas peeled and halved like this, but I like to chop them up first, so that I can skip the hassle of trying to cut up a frozen banana! Here are my favourite frozen banana recipes.
I hope this list helps you out when planning ahead for your busy week! Making sure that you’re getting the kind of fuel your body needs is super important, and having these ingredients on hand will definitely make it a lot easier. As always, if you have any questions don’t hesitate to reach out!
I’m SO excited for this post because sushi is my absolute favourite food. I would consider going vegan but I don’t think I could give up sushi! That sashimi- or raw fish- is just too good. Going out to sushi restaurants is always so fun, but right now depending on where you live you might not be able to go to a restaurant. So in this post I’m going to detail how to make your very own sushi at home!
Making sushi can seem complicated, but it doesn’t have to be. All you need is a few simple ingredients that you can find in the International or Asian aisles!
Sushi Rice – this is usually a Californian or Japanese short or medium grain rice, but will be labelled as sushi rice. It’s important that you use sushi rice because it’s more starchy and sticky than regular rice, which is important when spreading it onto your nori.
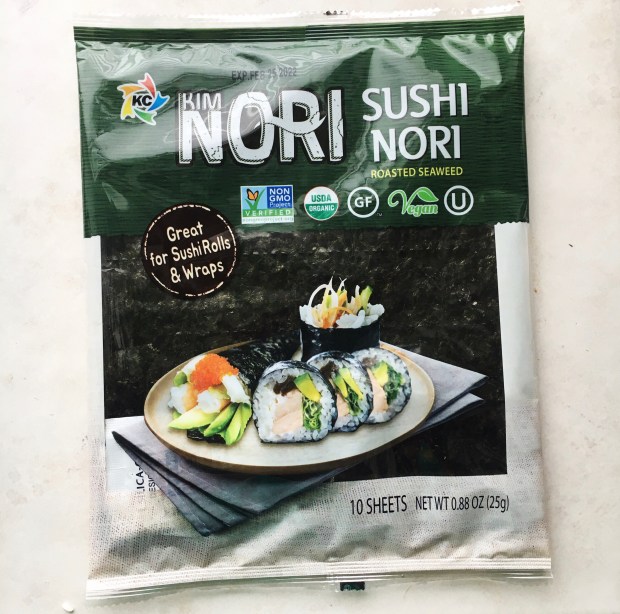
Sushi Nori (roasted seaweed) – these are rectangles of roasted seaweed that the rice gets spread onto, and everything gets rolled inside.
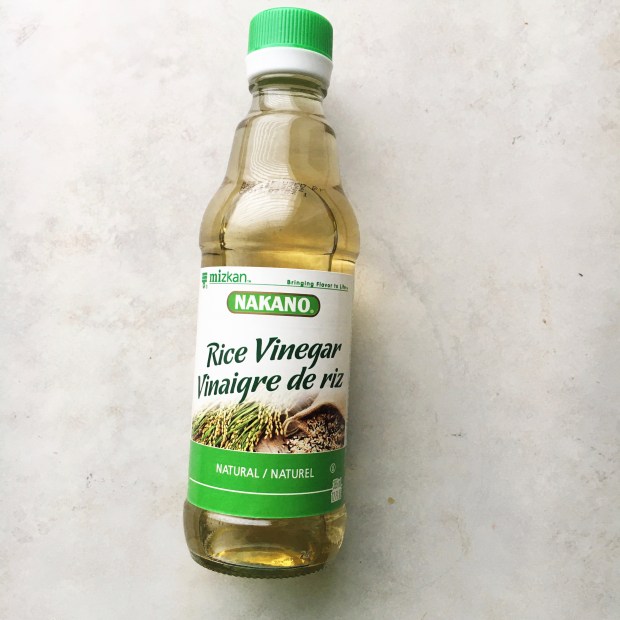
Rice Vinegar – rice vinegar is used to season up your sushi rice! If you’re making your sushi gluten free, make sure you purchase a gluten free rice vinegar.
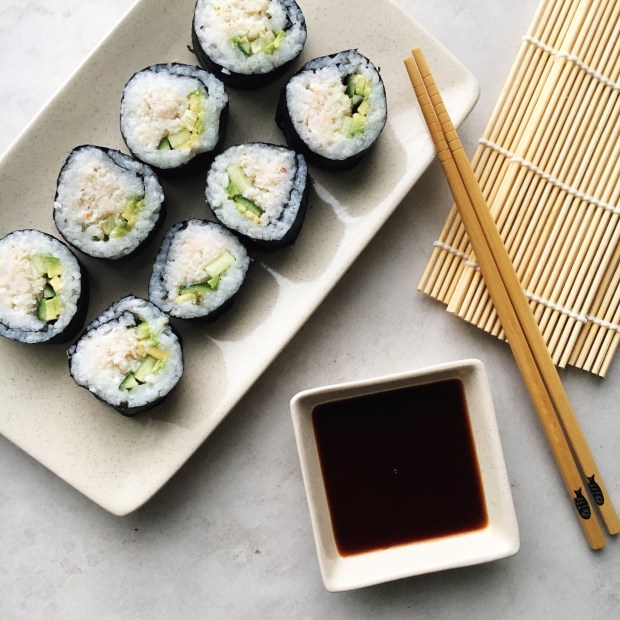
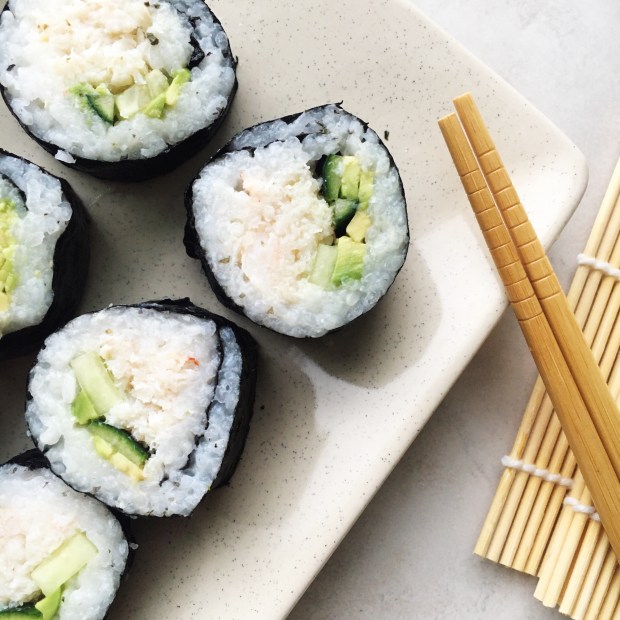
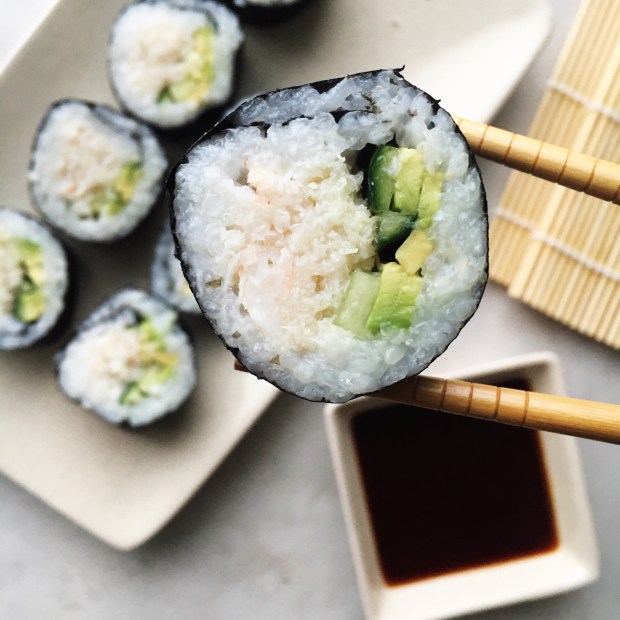
With those ingredients as your base, you can proceed to choose any fillings you’d like. I went with some avocado, cucumber, and canned (not imitation) crab to make some great California rolls. There are so many delicious combinations you can try though- and I hope to get my hands on some sushi grade fish soon!
Some more roll ideas include:
Vegetarian- fill your rolls with mushrooms cooked in soy sauce, just avocado, carrot, or cucumber, or some combination of the four.
Sushi Grade Fish- slice up some sushi grade salmon or tuna and pair it with some creamy avocado.
Cooked Shrimp, Crab or Tuna- fill your rolls with cooked shrimp, canned crab, or canned tuna mixed with soy and avocado (see my Tuna and Avocado Poke Bowls)
Ok, so now we’ve got all of our ingredients rounded up- now it’s time to make some rolls! The first and most important step is cooking your rice.
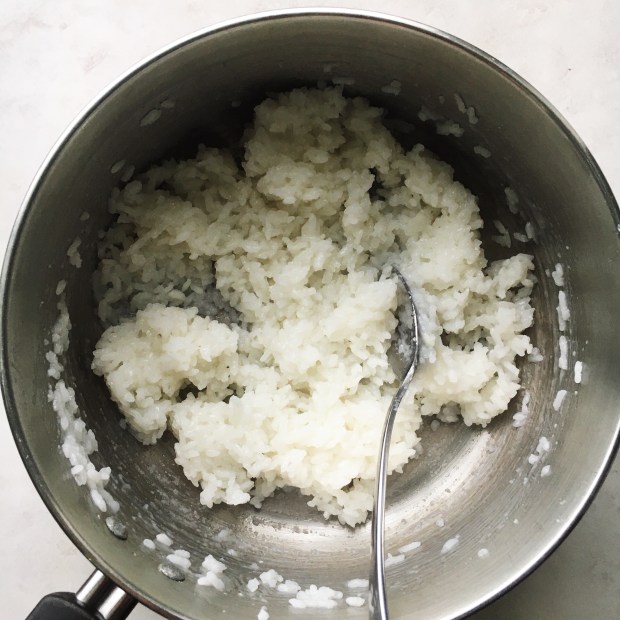
It’s very important to rinse your rice first, to get rid of some of that starchiness. Otherwise, your rice with be too mushy. I placed mine and a bowl and rinsed and drained it about 4-5 times, swirling it around with my fingers, under the water is clear when I mixed it. I then filled the bowl with more water and let the rice soak for about 10 minutes.
Once the rice is good to go, it goes into a pot with some more water and simmers for about 10-15 minutes, until it’s cooked all the way through. I then let it cool for a bit before mixing in some rice vinegar for flavour.
Get ready to get rolling! To roll your sushi rolls, you’ll need a bamboo sushi mat- these are easily found on Amazon for around ten dollars or so. I got out my mat, covered it with a piece of plastic wrap, and placed one sheet of nori down.
I then scooped out some sushi rice onto the nori, and spread it around with my fingers to cover the whole sheet in a nice, even layer. You don’t want to see too much of the nori underneath, but you also don’t want the rice layer to be to thick, so find a good middle ground. Leave about a centimetre strip at the top empty, however, so that it can seamlessly seal the end of the roll. This picture does not illustrate this very well- do better than me!
For the rolls, you can choose if you want to have the rice on the inside, or the outside. In this demonstration I flipped my nori over so that the rice would be on the outside, but in the photos I took of my final product were of my second batch of rolls, where the rice was on the inside. I found that these were easier to roll and held together more nicely, but you can choose whichever you like best! Here I proceeded to add in my filling right on top of the rice in a straight line, leaving some space at the bottom.
To roll up the sushi, you’re going to fold over the bamboo mat from the bottom, until that overhang you left at the bottom covers the filling ingredients to form a roll. Press firmly so that everything gets held together, and keep rolling until the full sheet of sushi covered nori is rolled into a nice cylinder. You may need to pause a few times to adjust the plastic and the mat during this process. Once everything is rolled up, you can use a bit of water on your finger to seal the nori on the outside of the roll.
All that’s left is to cut the sushi into nice even pieces, dip em into some soy sauce, and enjoy! It can take a little while to get a hang of the rolling, so don’t be discouraged if your first few rolls aren’t turning out so nice- my first rolls were a bit rough. Making sushi is an art that takes years to perfect, but these homemade rolls are great for a little something different at home, and they’re super fun to make as well!
Definitely play around with filling combinations, dipping sauces, and toppings too, to make these rolls your own. If you have any questions feel free to leave a comment! Enjoy:)
1. Add the rice to a small bowl, fill it with water, and swirl it around with your fingers. You should see the water turn white and cloudy as the starch from the rice is released. Drain the rice and repeat this process 4-5 times, until the water remains clear.
2. Fill the bowl with water once more and let the rice soak for 10 minutes to remove additional starch. Drain and add the rice to a pot.
3. Add the 1 cup of water to the pot and bring to a boil, then turn the heat to low, cover, and let the rice simmer for 10-15 minutes, until cooked through. Set aside and let cool before mixing in the rice vinegar.
4. Lay your bamboo sushi mat flat on your counter and cover it with a piece of plastic wrap. Place a sheet of nori down, and proceed to spread out about half of the rice on it in an even layer, leaving an empty space of about one centimetre at the top for sealing.
5. Either flip the nori over so that the rice will be on the outside of your sushi, or leave it so that the rice will be on the inside. In a straight line about an inch away from the bottom of the nori, lay down half of the crab, cucumber, and avocado.
6. Begin rolling the sushi by folding over your mat from the bottom, an pressing firmly to make a tight roll once the empty space at the bottom of the nori has completely encircled the filling. Continue to roll your sushi by rolling the mat, pausing to adjust the plastic or the mat when needed.
7. Seal the roll by brushing a little bit of water onto the nori with your finger. Slice into 8 even rolls.
8. Repeat steps 4-7 with your remaining ingredients.