Nutty Granola

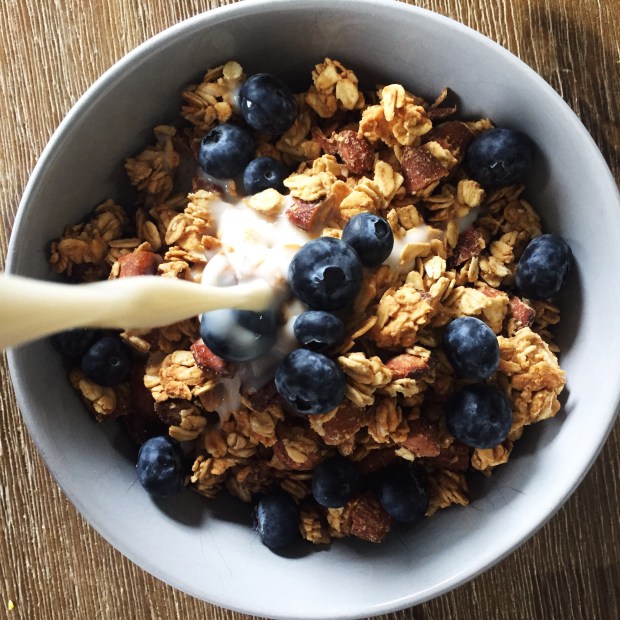
Hey guys! I have another granola recipe for you today because as you know, granola is one of my true loves. This one is actually really simple, it only uses one…two…three…four ingredients! Just had to count em up in my head there. Plus you don’t need any oil, unless you count peanut butter as an oil. I count it as spreadable gold.

There are also loooots of nuts in this granola, because who doesn’t love a nutty granola? I used almonds and pecans from a jar of mixed nuts. Why not use all of the mixed nuts, you ask? BECAUSE I”M ALLERGIC TO CASHEWS AND PISTACHIOS AND I’M REALLY MAD ABOUT IT! They make my mouth all itchy which is really inconvenient, because like every vegan cheesecake or creamy pasta sauce recipe ever has cashews in it. (Except for my Creamy Mushroom and Hummus Pasta which is an awesome alternative for my fellow cashew allergen people). But anyways, I love me some almonds and pecans so it’s all good. I know you might be running short on supplies right now, so if you absolutely positively cannot get your hands on almonds and pecans, you can use other nuts or even some seeds if you’re super desperate. I’m sorry, but nuts are just superior to seeds. Like would you rather have some peanut butter or like, pumpkin seed butter? I’ve never actually had pumpkin seed butter but based on my experience with peanut butter I’m going to say that it’s better.

Back to the granola. It’s sweet and nutty and crunchy, and you’ve also got some nice big clusters in there. If you’re not using salted nut butter, you could top it off with a little sea salt at the end for an extra hit of perfection. I will definitely be making this recipe again!

Nutty Granola

Serves: 3-4

Total Time: 25 minutes

Ingredients:

  • 2 1/2 cups rolled oats
  • 3/4 cup roughly chopped almonds and pecans (you still want some nice chunks in there)
  • 1/4 cup smooth natural peanut butter
  • 1/4 cup pure maple syrup

Directions:

  1. Preheat your oven to 375 degrees Fahrenheit.
  2. Mix together the nuts and oats in a large bowl. Set aside.
  3. In a small bowl, add in the peanut butter and maple syrup and microwave for about 30-45 seconds, until the peanut butter is nice and melty. Mix together until smooth.
  4. Add the maple syrup and peanut butter mixture into the oats and nuts and stir until everything is evenly coated. Spread the granola out onto a parchment lined baking sheet and bake for about 10 minutes.
  5. Remove the granola from the oven and give it a little stir, trying not to break up any clusters that are forming (because lets be honest, those are the best part). Return the pan to the oven and bake for another 5-8 minutes, until the granola is golden brown.
  6. Take out the granola, let cool and enjoy!

Hope you enjoy this nutty granola! See you soon;))

Yours Truly,

MyDayIsBooked;))

The ULTIMATE Guide To Roasting Veggies

Hey guys! Roasted veggies are one of my favourite things to eat, and my go to side dish. They get so caramelized and delicious in the oven and just taste AMAZING! I’ve posted a lot of recipes that feature roasted veggies as well, and I thought that it was high time to post an ULTIMATE guide to making these babies. They’re very simple and straight forward, but this post will help you get the perfect roasting time and know exactly what to look for when your veg comes out of the oven.

I’d have to say that my favourite veggie to roast is sweet potato, but I also love a good roasted cauliflower, onion, beet, carrot, or chickpea. The possibilities are endless! I’ll categorize the veggies that I’m writing about into groups like root vegetables and cruciferous vegetables (your vocab word of the day- veggies like broccoli and cauliflower), so that if there is a veggie I’ve missed you can roast it the same way as the other veggies in its family. Let’s get started!

First of all, I almost always roast my veggies at 400 degrees Fahrenheit. It’s high enough to cook the veggies quickly and get some nice caremelization going, but not so high that you’ll burn them to a crisp. Some kind of oil is also good for roasting, so I usually toss my veg in about a tablespoon or two of olive oil, enough to lightly coat them, and some salt and pepper before throwing them on a parchment lined baking sheet in the oven. You can also get creative with other spice combos! Okay, now that you know the roasting basics, you can scroll on down and I’ll let you know how to prepare each vegetable and how long to roast it for. When reading this next part, keep in mid that soft means easily pierce-able with a fork, but not mushy. No one likes mushy vegetables.

Root Vegetables

Sweet Potatoes (had to start with my fave): Wash your potato well, or peel it. Dice into cubes about an couple centimetres wide. Roast for about 30-35 minutes, until the sweet potatoes are soft and going slightly dark around the edges. (ps I don’t do a lot of normal potato roasting, but I can assume it would be the same procedure).

Carrots: Peel the carrots. Cut into sticks about five centimetres long and a centimetre wide. Roast for about 25-30 minutes, until soft and slightly caremelized.

Beets: Peel the beets. Dice into cubes that are two centimetres wide and roast for 30-35 minutes, until soft.

Onion: Peel the onion. Cut the onion in half, then into think slices, without separating the layers. Roast for about 20 minutes, until they’re soft and slightly brown.

Garlic (great for soups and dips!): Wrap a whole garlic clove in some tinfoil (I don’t use oil for this one) and roast for 15-20 minutes. Let the tinfoil cool slightly, then unwrap the little packet and remove the garlic cloves from their skins.

Cruciferous Vegetables:

Cauliflower: Wash the cauliflower well and cut it into florets a few centimetres high and a couple wide. Roast them for 20-25 minutes, until they’re tender and going brown.

Broccoli: Can be roasted the same way as cauliflower.

Brussels Sprouts: Remove some of the outer leaves and cut the brussels sprouts in half. Roast for 25-30 minutes, until soft and going brown.

Red Cabbage: Wash the cabbage and cut into lengthwise into cross sections about a centimetre thick. Roast for 25-30 minutes, until soft.

Kale: Chop width-wise into two centimetre long pieces and roast for 15-20 minutes, until crisp.

Squashes:

Zucchini: Wash and slice into circles about a centimetre think. Roast for 20 minutes, until soft and browning.

Butternut: Peel and cut into two centimetre wide cubes. Roast for 30-30 minutes, until soft and going golden.

Eggplant: Wash and cut into one centimetre thick cross sections. Roast for 20-25 minutes, until soft and going golden brown.

Other (aka I don’t know where these go)

Cherry Tomatoes: Wash and roast for 10-15 minutes, until very soft and getting slightly charred.

Tomatoes: Wash and cut into quarters. Roast for 15-20 minutes, until slightly charred.

Peppers: Wash, remove the stems and cut into chunks a few centimetres wide. Roast for 20 minutes, until soft.

Asparagus: Wash and cut off the very bottoms of the stems and any mushy parts. Roast for about 20-25 minutes, until fork tender but still a bit firm. The one vegetable that I would most hate to have mushy is asparagus!

Snap Peas: Wash and roast for 15-20 minutes, until soft.

Mushrooms: Apparently washing mushrooms make them absorb water that will come out when cooking them, so wiping your mushrooms with a paper towel might be a better cleaning method. You can slice the mushrooms and roast them for 15-20 minutes, or leave them whole and roast for 20-25 minutes. Either way, the mushrooms should be soft when done.

Chickpeas (from the can): Drain and rinse the chickpeas, then roast for 20 minutes, until crispy.

And there you have it! Talking about these veggies makes me want some:) If you like roasting any other kinds of veggies, let me know so I can try them out!

Yours Truly,

Olivia;)

My Top 10 Favourite Recipes

Hi people! You showed up at a great time. To celebrate my 200th post, I decided to compile a list of my top ten favourite recipes. This is the stuff you really need to pay attention to right here! These are my best offerings, the cream of the crop, the A-list of blog recipes. Going through all of these recipes made me want to make so many of them:) I’m usually trying to come up with new stuff all of the time, but I’m definitely going to remake some of this food because it’s so good. The recipes I that I post have definitely changed over the course of my blogging career, and they’re getting more tasty and creative;) There are definitely some OGs that made this top ten list though! I’m proud of myself for numbering them all off, because it was super hard to rank them. I want to hear from you guys though; what’s your favourite recipe at mydayisbooked.com? Here’s my list!

10. Coconut and Lentil Curry

I love curry so much because it’s warm and comforting, and the coconut milk in this one gives it so much flavour and richness. It’s super easy, is made in one pot, and packs in a ton of protein with all those lentils! You can check out the recipe for this Coconut and Lentil Curry here.

9. Mango Salsa

This mango salsa recipe was given to me by my aunt and is SO fresh and delicious! I could literally eat it on or with anything, or just by the spoonful. Click here for the recipe!

8. Hearty Vegetable Chilli

I think that this is the one blog post that I don’t have a picture for! I’ll definitely have to make this recipe and post one. I think that chilli is super underrated, but it’s do tasty and is a great staple recipe that you can make in a pinch. I love all of the veggies in this version! Take a look at the recipe here🙂

7. Scrumptious Sugar Free Muffins

Here’s an OG recipe that I clearly made before I was good at naming things! Seriously, who says “scrumptious”? Anyway, these muffins are awesome, and I haven’t really tried another muffin recipe since. (Except for my carrot and apple muffins but those aren’t as good). You FOR SURE need to try these! Click here to have your mind blown:)

6. Rainbow Bowls

When I look at this bowl I just think that it embodies what this site is about, which is making healthy food exciting. Also, it’s all of my favourite things in a bowl. Sweet Potato? Yep. Avocado? Yessir. And a delicious peanut dressing to tie it all together? YOU’D BETTER BELIEVE IT! Check it out right here.

5. PB Banana Creamsicles

These are one of the first dessert recipes that I posted, and I absolutely love them! They’re the perfect refreshing summer treat because they’re creamy and peanut-buttery and just YUM! I need to make these in the near future. The link to the recipe is right here.

4. Walnut Brownies

Coming in at number 4 we have my Walnut Brownies. These are super addictive, chocolatey and rich, and still healthy(ish). I keep repeating this, but it’s very important that they actually tricked my brother into thinking that they were the regular kind of brownies. He promptly spit them out after he figured out that they were my recipe because he’s supportive like that, but it’s fine I already had validation that these brownies are FREAKING awesome. I’m using capital letters a lot in this post;)) The recipe link is here.

3. Veggie Sandwich

I think this recipe legit changed my life. Anytime you put stuff between two pieces of bread it’s awesome, but throw some hummus, avocado, balsamic red onions, chickpeas and carrot in there and it’s next level people. I mean, just look at that. That is a bad ass sandwich right there. Click here RIGHT NOW because you’re making this for lunch.

2. Chocolate Saskatoon Berry Pie

Now it’s getting really serious. Are you ready? You sure? I’m going to take a deep breath because THIS PIE IS ON ANOTHER LEVEL THAT WILL BLOW YOUR MIND AND YOU NEED TO MAKE IT ASAP BECAUSE IT IS HEAVEN ON YOUR TASTE BUDS. Whew. That was quite the run on sentence! I just had to get that out there. In all seriousness, this pie is pure awesomeness. A chocolate crust? Get out of here! Click here to make your mouth happy;)

1. Peanut Butter Chocolate Fudge Bars

While it was really hard to choose, the number one spot goes to my Peanut Butter Chocolate Fudge Bars. They’re just so easy to make and so darn good. I don’t have many words to describe them other then delicious, chocolatey, and I want them. That didn’t really make sense but I can’t talk coherently while I’m thinking about these bars, ok? Their lengendary-ness can’t be conveyed by using all caps, but just trust me, click here and you won’t regret it.

That is one EPIC list right there! Let me know what your favourite recipes are, and I’ll see you guys soon!

Yours Truly,

Olivia

Beet and Parsley Salad

Hi there! I wanted to start by letting you know that this is my 200th post!! Crazy how time flies! I’ve loved every minute of working on this site, and I want to thank you guys for all of your support. Your likes and comments mean so much! To celebrate, I’ll be posting my top ten favourite recipes sometime this weekend, so be sure to check that out;)

Today I have a very colourful and fresh recipe to share- Beet and Parsley Salad! Other than roasting the beets, this recipes calls for very little prep and is a perfect lunch or side dish. I even used pre -roasted beets to cut down on prep time. Fresh herbs are great to work with and bring so much flavour. Paired with the earthy beets they really get a chance to sing! This salad is even better when it sits overnight in the fridge because it allows it to marinate in the dressing (which is a delicious combo of fresh lemon juice, red wine vinegar, and olive oil), but feel free to enjoy it right after you whip it up. Honestly, I wouldn’t blame you.

Beet and Parsley Salad

Serves: 4

Total Time: 10 minutes (using pre-roasted beets), 30 minutes (roasting the beets included)

Ingredients:

  • 1 beet
  • 1 tomato, diced
  • 1/4 of a red onion, diced
  • 1/2 a red bell pepper, diced
  • 3/4 cup packed parsley leaves (I used the flat-leafed Italian variety, but the curly leafed kind would work too)
  • 1 tbsp olive oil
  • 1 tbsp lemon juice
  • 1 tbsp red wine vinegar
  • salt and pepper to taste

Directions:

  1. If roasting the beet, peel it and dice it into small cubes. Preheat your oven to 400 degrees Fahrenheit, toss the beets in some olive oil on a parchment lined baking sheet, and roast for about 25 minutes. Remove from the oven and let cool completely before tossing with the salad.
  2. If you’re using a pre-roasted beet, make sure that it’s diced into small cubes. Toss the beet chunks in a bowl with the tomato, parsley, onion, bell pepper, lemon juice, olive oil and red wine vinegar.
  3. Season to taste with salt and pepper and enjoy!

**optional: let the salad sit in the fridge overnight in the fridge to marinate in the dressing**

Thank you so much for reading! Stay safe and I’ll see you again this weekend with my top ten favourite recipes;))

Yours Truly,

Olivia;))

Chocolate Shake

Hello! The last couple of weeks I’ve been kind of disorganised, which is why my posting schedule has been off. But I’m taking this weekend to plan things out a bit better, so I can post better content more consistently! Anyways, I’m really excited about this Chocolate Shake because it’s simple, healthy, delicious, and EVERYTHING YOU NEED RIGHT NOW! It’s also very thick and creamy. With just three ingredients (one being water), you can make yourself a delicious treat that’s kind of like a frosty;))) Because of its healthy simplicity, it can be enjoyed any time of day. It would be great in the morning with some granola! Here’s the recipe;))

Chocolate Shake

Serves: 1

Total Time: 5 minutes

Ingredients:

  • 1 ripe banana, frozen in slices
  • 1 tbsp cocoa powder
  • 1/4 cup + 3 tbsp water (or more if you’re a crazy person who likes a thin milkshake)

Directions:

  1. Blend all of the ingredients together in a blender.
  2. Enjoy!

Hope this Chocolate Shake brightens up your day a bit! Stay tuned for awesome posts coming your way this week;))

Yours Truly,

MyDayIsBooked;))